Back to: Trading with Smart Money
Supply and Demand Trading (Part – 2)
This is Part 2 of Supply and Demand Trading. Please read Supply and Demand Trading Part 1 before proceeding to this article. In this article, we will discuss the following pointers in detail.
- Which supply or demand zone rejects the price
- Good zone vs bad zone
- Price action at the supply and demand zone for confirmation
- How to find supply and demand zone
- How to draw supply and demand zone
- How to trade with supply and demand zone
Supply and Demand Zone types
There are different supply and demand zone patterns. shown below:
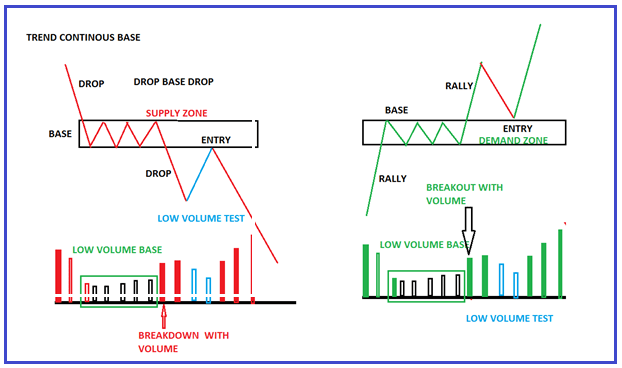
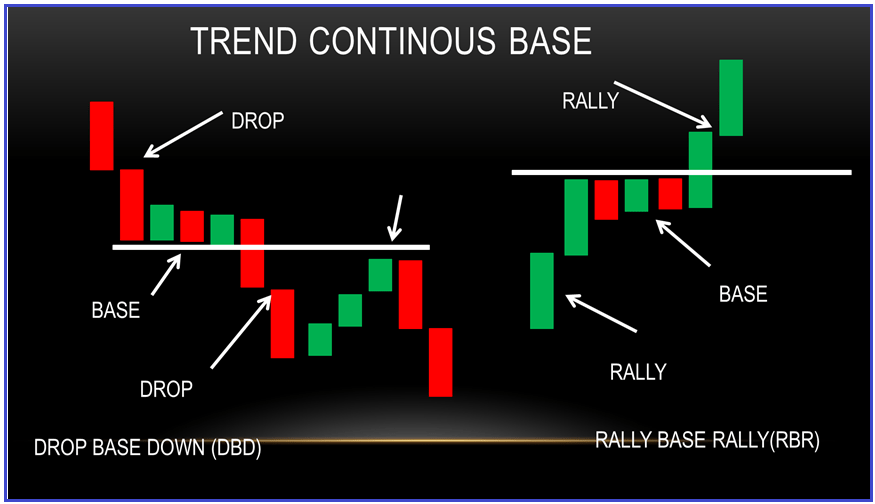
TREND CONTINUOUS BASE
- RALLY BASE RALLY(RBR)
- DOWN BASE DOWN (DBD)
TREND REVERSAL BASE
- RALLY BASE DROP (RBD)
- DOWN BASE RALLY (DBR)
TREND CONTINUOUS BASE
- Rally Base Rally (RBR)
- Down Base Down (DBD)


TREND REVERSAL BASE
- Rally Base Drop (RBD)
- Down Base Rally (DBR)


How to Find Supply and Demand Zones or institutional activity?
- Start at the current price
- Look left and find smart money activity
- Mark the base from which smart money activity initiates the trade
Smart money activity
There are three main signs of smart money activity we can spot with volume Price Action:
- Strong, aggressive move with clear volume expansion
- Strong rejection or trapping
- Gap (check which gap)
Aggressive initiation activity
- If you are aggressive in buying or selling, you want to buy or sell now. It means you place a MARKET ORDER to sell or buy immediately at the available current price.
- Because your position is big, it won’t be filled all at once. It will get filled fast, and you will be able to enter the full position, but the position will get split (due to the big position) as the price moves upward quickly. It is the aggressive market participants who move the price aggressively up or down with their market orders.
- So, the supply and demand zone can only be seen once the price speeds away from the zone. It indicates that there was smart money buying or selling interest at the origin of that move.
Aggressive volume price action activity
- STRONG AGGRESSIVE CANDLE
- CLEAN CLOSE
- INCREASING VOLUME

The strong rejection or V TURN
- Strong rejection of price levels is a sudden price reversal. This zone is made when the price goes one way aggressively and then turns quickly and with the same aggression and speed goes the other way.
- What happens here is that one side of the market is aggressive and moves the price in one way. Then it clashes with the other side, which suddenly becomes even stronger and more aggressive. So, the price turns back quickly, and the stronger side takes over. Like V reversal
- The zone where the other side took over is significant because it marks a place where strong market participants rejected aggressively and started a strong countermove. This zone is significant for us because it will most likely be defended again if the price gets near again. It becomes a new demand or supply zone.
- Pin bar or any reversal candlestick pattern formed at this zone

GAPS ARE THE STRONGEST FORM OF IMBALANCE
- Mark the gap from where it occurs
- Draw the zone(demand/supply) that is right below/above the gap, not the zone right before it.


Please watch the following video to better understand the Supply-and-Demand Trading concept.
In this article, I try to explain supply and demand trading. I hope you enjoy this Supply and Demand Trading article. Please join my Telegram Channel and YouTube Channel as well as my Facebook Group to learn more and clear your doubts.
In the next article, we will discuss the following pointers in detail.
- How to mark supply and demand zones using a candlestick
- How to define strong and weak zone
- How to trade supply and demand zone

I am interested to know the demand & Supply zone in depth.