Back to: ASP.NET Core Tutorials For Beginners and Professionals
ViewModel in ASP.NET Core MVC Application
In this article, I will discuss ViewModel in ASP.NET Core MVC Application with Examples. Please read our previous article discussing Strongly Typed View in ASP.NET Core MVC Application. When building web applications with ASP.NET Core MVC, you will often encounter situations where you need to pass data to a view that doesn’t perfectly match a single model from your database or business layer. In these cases, ViewModels provide a flexible, clean, and maintainable way to present exactly the data your view requires.
What is a ViewModel in ASP.NET Core MVC?
A ViewModel is a special class explicitly created to hold the data and UI state required by a particular View. It differs from the Entity or Domain Model (which represents your business logic or database structure) because:
- A ViewModel is designed exclusively for the presentation layer, i.e., View.
- It can combine properties from multiple domain models.
- It can include calculated fields, UI state flags, and any additional information the View needs.
- It acts as a Data Transfer Object (DTO) between the Controller and View, containing exactly the data needed, no more, no less.
- ViewModels do not represent database tables but are designed to suit the View’s requirements.
Example: Imagine you want to display a student’s details, including their basic information, address, and dynamic page elements such as the header and title. None of the individual domain models alone covers all these requirements. That’s where a ViewModel shines.
How Do We Implement the View Model in an ASP.NET Core Application?
To implement a view model in ASP.NET Core MVC, we need to follow the steps below:
- Define the View Model: Create a class that includes properties relevant to the view’s needs.
- Populate the View Model in the Controller: In your controller, populate the view model from the domain model or other data sources.
- Pass the View Model to the View: Pass the populated view model to the view from the controller using the View overloaded method, which takes the model object as a parameter.
- Use the View Model in the View: Access the view model’s properties in the view using Razor syntax.
Example to Understand View Model in ASP.NET Core MVC:
Let’s say you want to build a page to display Student Details, including:
- The student’s basic info (name, branch, section, gender, etc.).
- The student’s address (city, state, country, pin code).
- Some static or dynamic page information, like a header and page title.
If you use just your domain models, you might have:
- A Student model for the basic info.
- An Address model for the address.
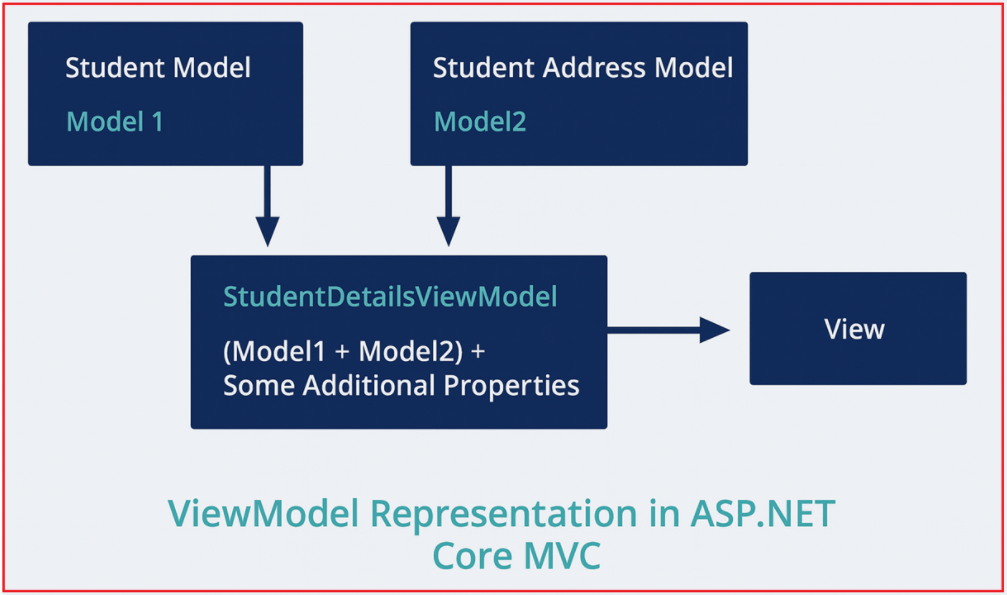
But neither model alone contains all the data your view needs. This is where a ViewModel makes things simple and powerful. For a better understanding, please have a look at the following diagram:

Let us proceed and implement the above example step by step in our ASP.NET Core MVC Application using a View Model.
Step 1: Define the Domain Models
We start by defining the underlying domain models. These models map to your real-world data and may reflect your database structure.
Student Model (basic info):
First, create or modify the Student.cs class file, which is present within the Models folder as follows. This model will represent a student’s basic information, including their name, Branch, Section, and Gender.
namespace FirstCoreMVCWebApplication.Models
{
    public class Student
    {
        public int StudentId { get; set; }
        public string? Name { get; set; }
        public string? Branch { get; set; }
        public string? Section { get; set; }
        public string? Gender { get; set; }
    }
}
Address Model (student’s address):
Next, we need to create the Address model, which will represent the Student’s Address, including city, State, Country, and other relevant details. So, create a class file named Address.cs within the Models folder and then copy and paste the following code.
namespace FirstCoreMVCWebApplication.Models
{
    public class Address
    {
        public int StudentId { get; set; }
        public string? City { get; set; }
        public string? State { get; set; }
        public string? Country { get; set; }
        public string? Pin { get; set; }
    }
}
Step 2: Create the ViewModel
The ViewModel aggregates the above models, as well as any additional view-specific properties. In our case, it’s the student Details view. This View Model will represent the Student Model, the Student Address Model, and some additional data for the view, such as the page title and Header.
You can create the View Models anywhere in your application, but it is recommended to create all the View Models within a folder called ViewModels to keep things organized. First, create a folder at the root directory of your application named ViewModels. Then, create a class file named StudentDetailsViewModel.cs within the ViewModels folder and copy and paste the following code.
using FirstCoreMVCWebApplication.Models;
namespace FirstCoreMVCWebApplication.ViewModels
{
    public class StudentDetailsViewModel
    {
        public Student? Student { get; set; }
        public Address? Address { get; set; }
        public string? Title { get; set; }
        public string? Header { get; set; }
    }
}
Naming Convention: We named the ViewModel class StudentDetailsViewModel. Here, Student represents the Controller name, and Details represents the action method name. As it is a view model, we prefix the word ViewModel. Although it is not mandatory to follow this naming convention, I personally prefer to follow it to organize view models.
Step 3: Populate and Pass ViewModel from Controller:
Please modify the Home Controller as follows. As you can see in the Details action method, we populate the StudentDetailsViewModel with the required data and then pass it to the corresponding view. Now, all required data, including student information, address, and UI metadata, is passed to the view using a single, clean ViewModel. There’s no need for ViewBag or ViewData.
using FirstCoreMVCWebApplication.Models;
using FirstCoreMVCWebApplication.ViewModels;
using Microsoft.AspNetCore.Mvc;

namespace FirstCoreMVCWebApplication.Controllers
{
    public class HomeController : Controller
    {
        public ViewResult Details()
        {
            //Student Basic Details
            Student student = new Student()
            {
                StudentId = 101,
                Name = "Dillip",
                Branch = "CSE",
                Section = "A",
                Gender = "Male"
            };

            //Student Address
            Address address = new Address()
            {
                StudentId = 101,
                City = "Mumbai",
                State = "Maharashtra",
                Country = "India",
                Pin = "400097"
            };

            //Creating the View model
            StudentDetailsViewModel studentDetailsViewModel = new StudentDetailsViewModel()
            {
                Student = student,
                Address = address,
                Title = "Student Details Page",
                Header = "Student Details",
            };

            //Pass the studentDetailsViewModel to the view
            return View(studentDetailsViewModel);
        }
    }
}
Step 4: Create a Strongly Typed View for ViewModel:
In the view, declare the ViewModel at the top with the @model directive, then access all properties with strong typing and IntelliSense. Please modify the Details.cshtml within the Views/Home folder as follows.
@model FirstCoreMVCWebApplication.ViewModels.StudentDetailsViewModel
@{
    Layout = null;
}
<html xmlns="http://www.w3.org/1999/xhtml">
<head>
    <title>@Model?.Title</title>
</head>
<body>
    <h1>@Model?.Header</h1>
    <div>
        StudentId : @Model?.Student?.StudentId
    </div>
    <div>
        Name : @Model?.Student?.Name
    </div>
    <div>
        Branch : @Model?.Student?.Branch
    </div>
    <div>
        Section : @Model?.Student?.Section
    </div>
    <div>
        Gender : @Model?.Student?.Gender
    </div>

    <h1>Student Address</h1>
    <div>
        City : @Model?.Address?.City
    </div>
    <div>
        State : @Model?.Address?.State
    </div>
    <div>
        Country : @Model?.Address?.Country
    </div>
    <div>
        Pin : @Model?.Address?.Pin
    </div>
</body>
</html>
The view accesses everything it needs through a single, strongly-typed @Model object. You get full compile-time checking, IntelliSense, and clarity, no messy dynamic code, no type casting.
Step 5: Running the Application:
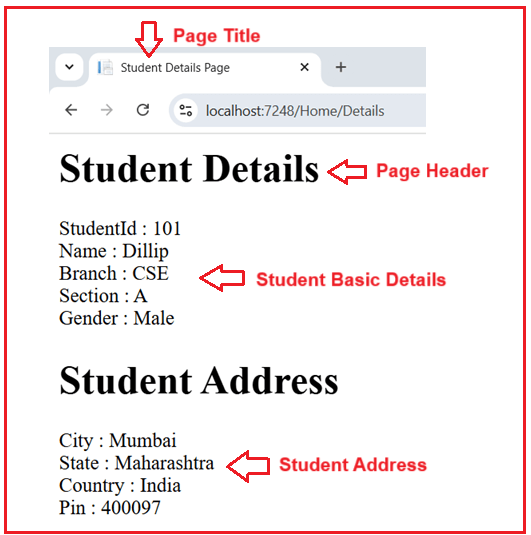
Now run the application and navigate to the /Home/Details URL. As shown in the image below, you will see the expected output on the webpage.

Why Do We Need a ViewModel in ASP.NET Core MVC?
There are several reasons why ViewModels are essential:
- Combining Multiple Models: Views often require data from several sources. Since strongly typed views accept only one model, ViewModels consolidate multiple models into a single object.
- Customizing Data for the View: ViewModels can reshape, format, or aggregate data specifically for the UI. For example, you could add a property to the ViewModel that formats the student’s full address as a single string.
- Separation of Concerns: By keeping your UI models (ViewModels) separate from your business/domain models, you make your code cleaner and easier to maintain. The ViewModel reflects only the presentation needs, not your entire business logic.
- Adding UI State: ViewModels can include UI-related information, such as dropdown lists, checkbox states, or validation messages, that are not present in the domain model.
- Simplifies Validation: You can apply validation attributes (such as [Required] and [EmailAddress]) to ViewModel properties for user input scenarios, without adding those UI concerns to your domain models.
In summary, ViewModels in ASP.NET Core MVC help organize and structure the data needed by Views by combining multiple models and adding UI-specific information. They improve code clarity, maintainability, and make it easier to manage complex data on the presentation layer. Using ViewModels ensures a clean separation between the business logic and the user interface, making your application more robust and easier to maintain.
In the next article, I will discuss ASP.NET Core MVC TempData with Examples. In this article, I explain View Model in an ASP.NET Core MVC Application with an example. I hope you understand the need for and use of the ASP.NET Core MVC ViewModel, along with Examples.
Registration Open – Microservices with ASP.NET Core Web API
Session Time: 6:30 AM – 8:00 AM IST
Advance your career with our expert-led, hands-on live training program. Get complete course details, the syllabus, registration, and Zoom credentials for demo sessions via the links below.


No need for these two lines in the StudentController code:
ViewBag.Title = “Student Details Page”;
ViewBag.Header = “Student Details”;
As Ahmed has already pointed above, setting the values for ViewBag.Title and ViewBag.Header is not required as we are using strongly typed model. They are not being used anyway.
Further, can you please write a guide on using a ViewModel for a form and submitting it back to the controller?
Thanks.
Yes. There is no need. Thanks for identifying the issue. We have corrected this.
Between this lesson and the last, the StudentId changed from a string to an int.
Because of this, the HomeController.cs generates a compile time error.
We have corrected the example. Please check now.