Back to: ASP.NET Core Tutorials For Beginners and Professionals
How to Download and Install .NET Core SDK
In this article, I will discuss how to Download and Install the .NET Core SDK on the Windows Operating System. Please read our previous article, discussing how to Download and Install Visual Studio 2022 on the Windows Operating system. The .NET Core SDK is required to develop and run .NET Core Applications.
How to Download and Install .NET Core SDK
Follow the below steps to download and install the .NET Core SDK. These steps apply to various operating systems, including Windows, macOS, and Linux.
- Visit the Official .NET Website: Go to the .NET download page to find the latest version of the .NET SDK.
- Choose Your Version: Select the .NET SDK version you wish to download. If you are not sure which version to install, it is usually best to choose the most current stable release.
- Download the Installer: Click the Windows installer link to download the .NET SDK installer. This will be a .exe file.
- Run the Installer: Once the download is complete, run the downloaded file and follow the instructions on the installer to complete the installation.
- Verify the Installation: Open a Command Prompt or terminal and run the following command to verify that .NET has been installed correctly. The dotnet –version command will display the latest installed .NET version.
Download .NET Core SDK:
To download .NET 8 SDK, go to the following website, and you will find the link to download .NET 8 SDK for different OS.
https://dotnet.microsoft.com/en-us/download/dotnet/8.0
Once you visit the above URL, it will open the below page. Select the appropriate link to download the .NET 8 SDK for the respective OS. After downloading the installer, click on it to start the installation.

If you are using the Windows Operating System, please visit the website below.
https://dotnet.microsoft.com/download
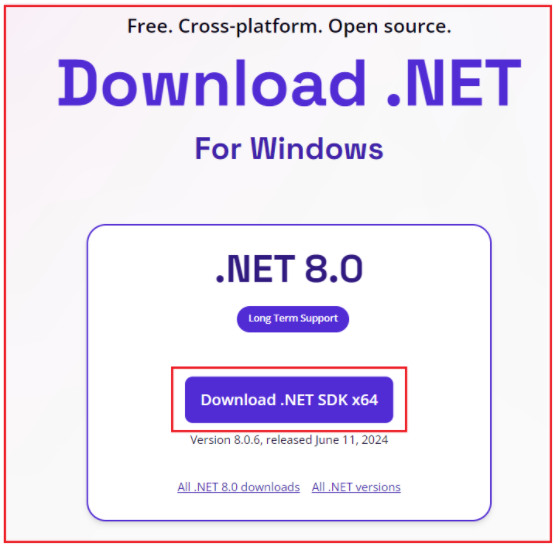
You will find the following webpage once you go to the above website. The latest version at this point is .NET 8, which provides Long-Term Support, as shown in the image below. In this course, we are going to use .NET 8.

As we are here to develop, build, run, and deploy .NET Core Applications, we need to click the Download .NET SDK x64 link. Once you click on the Download .NET SDK x64 button, it will download the .NET SDK and navigate to the page below, which shows how to Run the Installer, Verify the Installation, and get started, as shown in the below page.

Installing .NET Core SDK:
Once you download the .NET SDK, install it by double-clicking the downloaded exe file. Once you click on the EXE, it will open the following window. In this window, click on the Install button, as shown in the image below.

If everything is fine, once the installation is completed, you will get the following message saying the installation was successful: Click on the Close button, as shown in the image below.

Note: If you installed .NET SDK on your machine, you do not need to install .NET Runtime separately, as .NET SDK automatically installs the .NET Runtime. Another point you need to remember is that once you install .NET SDK, ASP.NET Core is automatically installed.
Verify the Installation of .NET SDK:
Once you installed .NET SDK, open the command prompt type dotnet, and press the enter key as shown in the below image. If the installation succeeds, you should get the following output:

Now, to verify what versions are installed on your machine, type the dotnet –info command in the command prompt and press the enter button, as shown in the image below.

As you can see in the above image, my machine has 6 .NET SDK versions installed. It displays the OS name, version, platform, etc. Further, it also installed .NET Runtimes. Please make sure .NET 8 is installed on your machine, as we are going to develop the applications using .NET 8.
If you want to see what is the latest version installed on your machine, please use the dotnet –version command as shown in the image below:

Note: The .NET SDK provides a complete environment for developing, building, testing, and deploying ASP.NET Core Web API Applications.
In the next article, I will discuss How to Download and Install Visual Studio Code on Windows Operating System. Here, in this article, I try to explain How to Download and Install .NET Core SDK on Windows Operating System. I hope you enjoy this Download and Install .NET Core SDK article.
