Back to: ASP.NET Core Web API Tutorials
Download and Install Visual Studio Code
Visual Studio Code (VS Code) is one of the most popular lightweight yet powerful code editors in the world. It is free, open-source, and cross-platform, created by Microsoft. Unlike Visual Studio (a full IDE), VS Code is more modular and relies on extensions to provide functionality for various languages, frameworks, and tools.
We will use VS Code for developing the front-end applications using Angular because it is fast, customizable, and offers excellent support for JavaScript and TypeScript projects.
Why Use Visual Studio Code?
Visual Studio Code is designed as a modern, extensible source-code editor. Developers highly favour it because of its simplicity combined with powerful features:
- Lightweight yet robust: It starts quickly and runs smoothly, even on low-resource machines.
- Cross-platform: Works on Windows, macOS, and Linux, allowing the same project to be worked on across different environments.
- Rich language support: Supports a wide range of programming languages, including JavaScript, TypeScript, Python, C#, Java, PHP, and more.
- Extensibility: Thousands of extensions are available through the Visual Studio Code Marketplace to support frameworks (Angular, React, Vue), tools (Docker, Kubernetes), and additional features (themes, debuggers).
- Git and GitHub integration: Built-in version control tools for easy code management and collaboration.
- IntelliSense Code Editing: Features like IntelliSense support provide intelligent code completions based on variable types, function definitions, and imported modules. Syntax highlighting and error detection help in writing cleaner code.
- Debugging Capabilities: Provides a powerful debugging experience with breakpoints, call stacks, and an interactive console. Supports debugging for a wide range of languages and platforms.
- Integrated Terminal: Built-in terminal to run command-line operations without leaving the editor.
- Code Navigation and Refactoring: Features like Go to Definition, Find All References, and rename symbol make navigating and refactoring code easier.
Steps to Download and Install Visual Studio Code
Downloading and installing Visual Studio Code (VS Code) is a straightforward process. To download and install Visual Studio Code, we need to follow the steps below:
- Visit the Official Website: Go to the official Microsoft Visual Studio Code page: https://code.visualstudio.com. Always download from the official site to avoid unsafe versions.
- Select Your Operating System: Choose the installer depending on your OS:
-
- Windows: .exe installer for quick setup.
- macOS: .dmg installer.
- Linux: .deb (Debian/Ubuntu) or .rpm (RedHat/Fedora) packages.
-
- Download the Installer: Click the Download button. The installer will be saved in your Downloads folder by default.
- Run the Installer: Double-click the downloaded installer file to begin the installation process. Windows will ask for permission to allow the setup to proceed. Click Yes.
- Follow the Installation Wizard: Follow the on-screen instructions in the installation wizard.
- Accept the license agreement.
- Select the installation location (the default is recommended).
- Select additional options such as:
- Add to PATH (necessary for running VS Code from the terminal).
- Create a Desktop Icon (quick access).
Complete Installation: Click Install. Wait for the setup to finish and then click Finish. At this point, VS Code is installed on your system.
Download Visual Studio Code
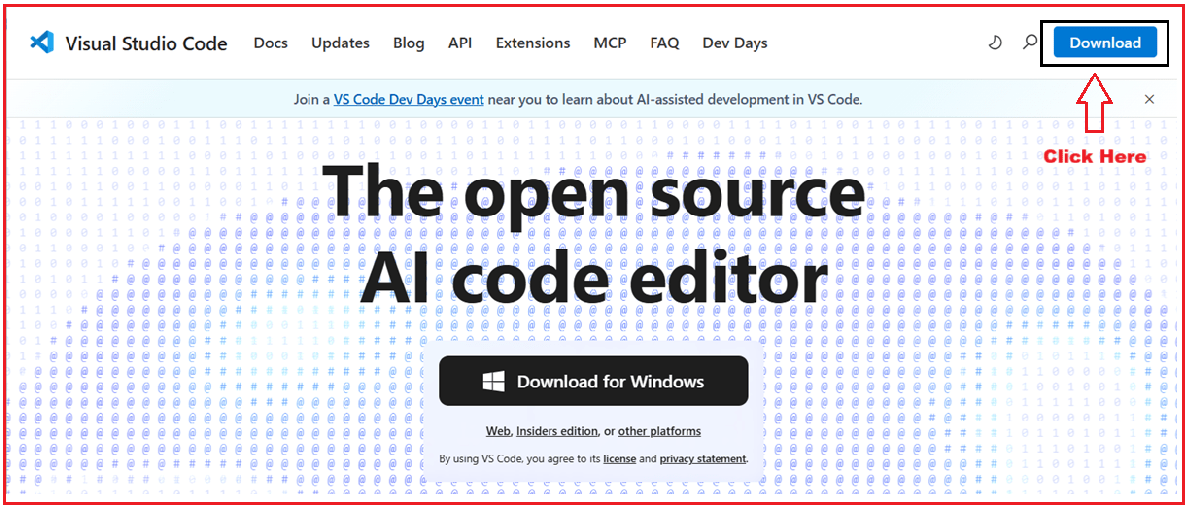
To download Visual Studio Code, please click on the following link: https://code.visualstudio.com/
Once you click on the above link, it will open the page below. From this webpage, click the Download button, located at the top of the website, as shown below.

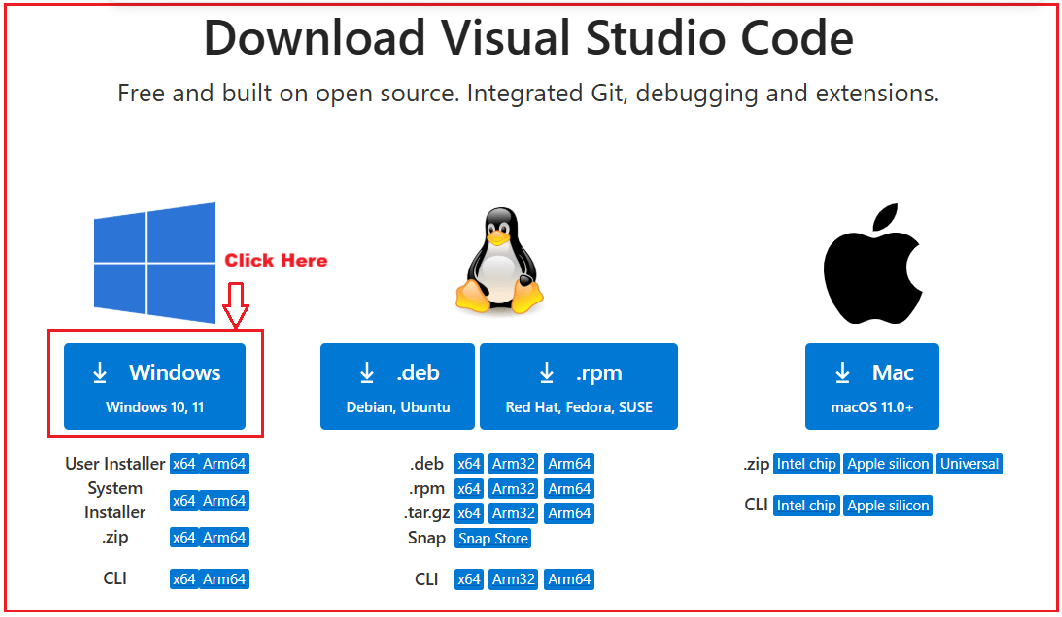
Once you click on the Download button, it will open the following page. Based on your operating system, choose the appropriate Visual Studio. I have Windows 11 installed on my machine, so I installed the Windows option as shown in the image below.

How to Install Visual Studio Code on Windows Operating System?
Let’s go into more detail for Windows installation since it is the most commonly used:
Start Setup
After downloading, double-click the installer file to begin the installation process. A window will open asking you to accept the license terms. Select ‘I accept the agreement’ and click the Next button, as shown in the image below.

Choose Install Location
Once you click the Next button, it will prompt you to select the location where you want the Visual Studio Code editor to be installed.
- By default, VS Code installs under: C:\Users\<YourUser>\AppData\Local\Programs\Microsoft VS Code
- You can change this, but the default is recommended.
Here, I am using the default location and then click the Next button, as shown in the image below.

Select Start Menu Folder
Once we click the Next button, the Select Start Menu Folder window will open.
- By default, a Start Menu shortcut will be created for Visual Studio Code.
- You can rename it or skip it, but leaving it as the default is best.
Here, I am using the default name, i.e., Visual Studio Code, for the program’s shortcut name, and then I click on the Next button, as shown in the image below.

Select Additional Tasks
Once you click the Next button, the Select Additional Tasks window will open. We have the following options:
- Create a desktop icon: If you select this option, the installer will place a shortcut icon for VS Code on your desktop. This makes it quick and easy to open VS Code without needing to go through the Start Menu or search for it. It’s optional, but recommended if you like convenient desktop access.
- Add “Open with Coe” action to Windows Explorer file context menu: When this option is checked, you can right-click on any file in Windows Explorer and directly see an option called “Open with Code”. This allows you to quickly open individual files in VS Code without first opening the editor and then browsing to the file.
- Add the “Open with Code” action to the Windows Explorer directory context menu: This option allows you to right-click on any folder in Windows Explorer and open the entire folder in VS Code as a project. It is very useful for developers because most projects consist of multiple files inside a folder, and this provides a quick way to start working on them.
- Register Code as an editor for supported file types: Selecting this option will register VS Code as the default editor for file types it supports, such as .js, .ts, .html, .css, .json, and many others. That means when you double-click these files, they will automatically open in VS Code instead of another program, such as Notepad.
- Add to PATH (requires shell restart): This is one of the most essential options. It allows you to open VS Code directly from the command line using the code command. For example, if you are inside an Angular project folder in the Command Prompt or PowerShell, you can type’ code’. To instantly open the project in VS Code. This makes switching between the terminal and the editor much faster and smoother.
From this window, review all the options and then click the Next button, as shown in the image below.

Install Visual Studio Code
Once you click the Next button, the Ready to Install window will open. From this window, click the Install button, as shown in the image below, to install Visual Studio Code Editor on your machine. Installation may take a few minutes, depending on your machine and internet speed.

Finish Installation
Once the installation is completed successfully, you will be presented with the following window. Click on the Finish button, and you are ready to use Visual Studio Code Editor.

This is how you need to install Visual Studio Code on the Windows Operating System.
Download and Install for Other Operating Systems
Although we have demonstrated how to install Visual Studio Code on the Windows Operating System, the process is similar for other operating systems:
- macOS: Download the .dmg file, drag VS Code into the Applications folder.
- Linux: Download the .deb (Debian/Ubuntu) or .rpm (Fedora/Red Hat) package and install via package manager.
This flexibility makes VS Code an excellent choice for developers working across different environments.
First Launch of VS Code
When you open VS Code for the first time, you will see a Welcome screen with options to create a new file, open a folder, or clone a repository.

You can choose a theme (e.g., Dark+, Light).

Why We Use VS Code for Angular Development
For front-end development, especially when working with Angular, VS Code is the ideal choice:
- Lightweight and Fast: Angular projects involve frequent builds and testing, and VS Code’s speed makes this efficient.
- Extension Support: Angular-specific extensions (like Angular Essentials, Angular Language Service) improve productivity.
- Integrated Terminal: Run Angular CLI commands (ng serve, ng generate, etc.) directly inside VS Code.
- Easy Debugging: Debug Angular apps with Chrome Debugger or Edge Tools extensions.
- Cross-Platform: Front-end developers can work on different operating systems without issues.
Therefore, throughout our course/project, we will use VS Code for developing Angular-based front-end applications.
Visual Studio Code is a lightweight yet powerful editor, suitable for almost all types of development. With its cross-platform support, extensions, and customization options, it has become the default choice for front-end developers worldwide.
By installing the recommended extensions and configuring it properly, VS Code becomes a complete development environment for Angular projects, offering productivity without unnecessary complexity.
