Back to: ASP.NET Core Web API Tutorials
Creating an ASP.NET Core Web API Project in Visual Studio
In this article, I will discuss how to create, build, run, and test the ASP.NET Core Web API Project in Visual Studio. Please read our previous article discussing How to Create, Build, Run, and Test the ASP.NET Core Web API project using .NET Core CLI and Visual Studio Code.
ASP.NET Core Web API enables developers to create lightweight, fast, and cross-platform services that various clients, including browsers, mobile apps, and IoT devices, can consume. Using Visual Studio 2022, we can easily create and configure a new Web API project with built-in options like HTTPS, Swagger for API testing, and controllers for handling requests.
Opening Visual Studio and Creating a New Project
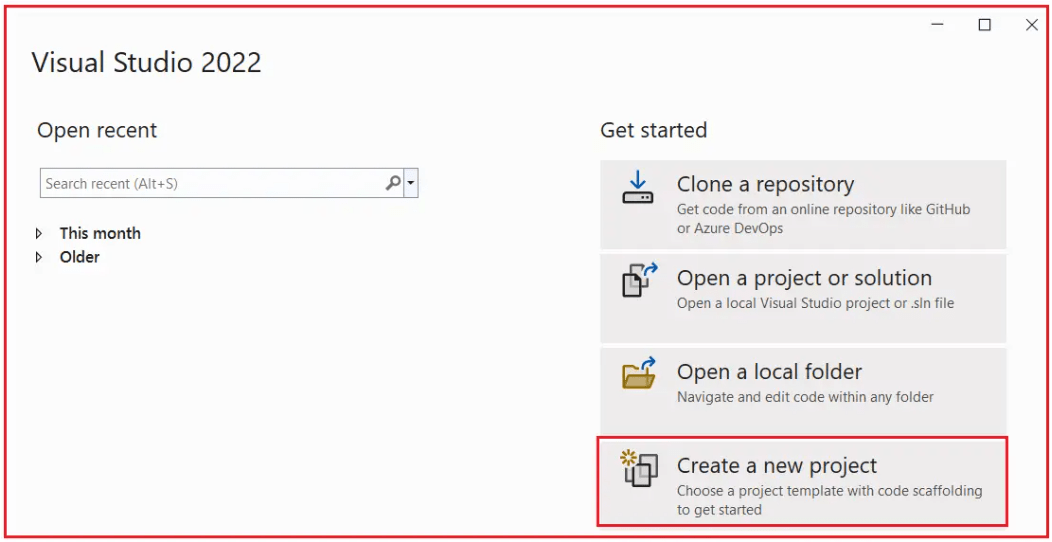
When you open Visual Studio 2022, the first screen provides an option to “Create a new project”. This is the starting point for creating any kind of .NET project. To begin building a new Web API, click on the “Create a new project” option as shown in the image below.

Key Points:
- This is the entry point for starting any new solution in Visual Studio.
- Clicking this option tells Visual Studio that you want to set up a fresh project workspace.
- It allows you to select from a wide range of project templates depending on whether you’re building a console app, desktop app, web service, or library.
- Behind the scenes, Visual Studio prepares to generate the required folder structure, project files, and configuration settings.
Choosing the ASP.NET Core Web API Template
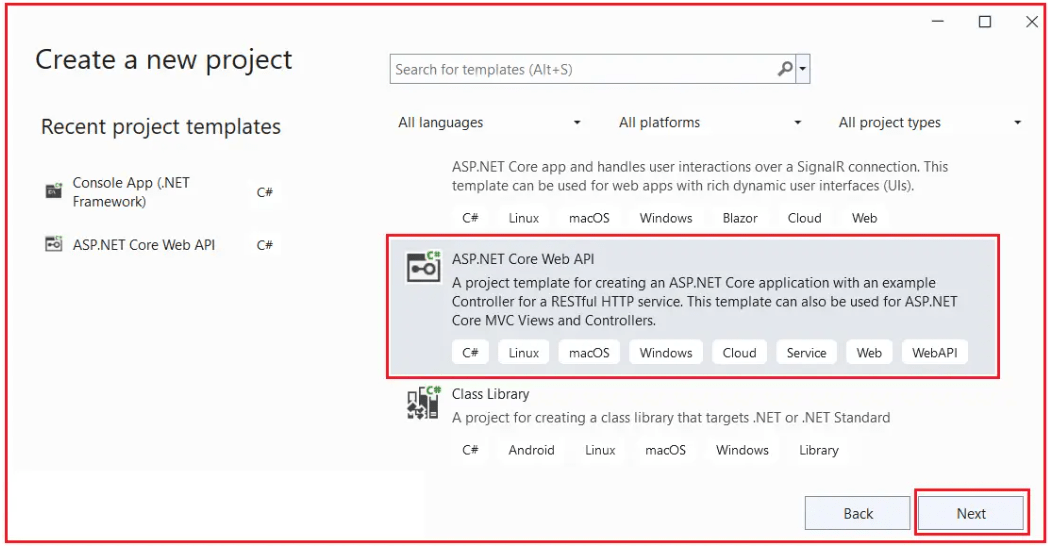
After selecting “Create a new project,” the Create a New Project window appears, as shown in the image below, listing multiple templates for different project types, such as Console Apps, Web Apps, Class Libraries, and more. From here, choose the “ASP.NET Core Web API” template with C# as the language, as shown in the image below. You can use the search box to type “Web API” to filter the right template quickly.

Key Points:
- This template sets up all the necessary dependencies for building RESTful APIs.
- It saves you time by automatically including startup code, program configuration, and controller examples.
Configuring Your New Project
Once you’ve selected the template, Visual Studio prompts you to configure your new project. In the Configure your new project window, please provide:
- Project Name: Provide a name like MyFirstWebAPIProject.
- Location: Choose a folder where you want the project to be saved on your system.
- Solution Name: You can keep the same as the project or use a broader solution name if you plan to add multiple projects.
Naming your project properly helps in code organization and clarity, especially in enterprise applications. Once filled, click the Next button, as shown in the image below.

Additional Information Window
Once you click the Next button, the Additional Information window will open. Here you configure:
- Target Framework: Select .NET 8 (LTS), as it ensures long-term support and stability. .NET 8 (LTS) means Long-Term Support, offering stability and updates for 3 years — ideal for production applications.
- Authentication Type: For now, select None, as we are not implementing login or user management. If you choose ‘None’, no authentication is added. For secure APIs, you can later integrate JWT Bearer authentication or Microsoft Identity.
- Other Options: These checkboxes define project scaffolding and whether you want Swagger docs, HTTPS setup, and structured controllers.
- ✔ Configure for HTTPS
- ✘ Enable Docker (leave unchecked for now unless containerization is required)
- ✔ Use Controllers
- ✔ Enable OpenAPI Support
- ✔ Do Not Use Top-Level Statements
Then, click on the Create button as shown in the image below.

Understanding the Options
- Configure for HTTPS: This option configures your ASP.NET Core application to use HTTPS (Hypertext Transfer Protocol Secure) by default. Visual Studio sets up the necessary SSL (Secure Sockets Layer) certificates and configures the application to listen on an HTTPS endpoint.
- Enable Container Support: Adds containerization support, helpful for DevOps.
- Use Controllers: This option structures your Web API project to use MVC (Model-View-Controller) controllers. If you don’t select this, it will create a Minimal API.
- Enable OpenAPI Support: Adds Swagger UI for easy API testing and documentation. Swagger automatically generates an interactive UI for testing API endpoints, which is helpful for developers and clients.
- Do Not Use Top-Level Statements: It uses the traditional Program.cs entry point for clarity in larger projects.
- Enlist in .NET Aspire Orchestration: Enlist in .NET Aspire Orchestration, which integrates your Web API into Microsoft’s Aspire framework for building and managing distributed, cloud-ready applications. It’s helpful in microservices scenarios, but unnecessary for simple single-API projects.
Project File & Folder Structure
Once you click on the Create button, Visual Studio will create the ASP.NET Core Web API project with the following file and folder structure. In our next session, we will discuss all these files and folders in detail.

That’s it! We have created an ASP.NET Core API project using Visual Studio 2022 with ASP.NET Core 8.0. You can continue building your API by adding more controllers, models, and services as required, which we will discuss as we progress in this course.
How to Build the ASP.NET Core Web API Project?
You can build the ASP.NET Core Web API Project in many ways.
Option 1: Using Visual Studio Menu
From the Visual Studio top menus, click Build → Build Solution as shown in the image below.

This will compile all projects in the solution and show the build status in the Output window.

Option 2: Right-click and Build
You can also:
- Right-click on your project → Select Build
- Or right-click the solution to build all projects
This method is useful when you want to build a specific project within a solution containing multiple projects. If you right-click the solution and select ‘Build Solution’, all projects within it will be compiled.
Option 3: Use Keyboard Shortcut
- Press Ctrl + Shift + B
This is the fastest way to trigger a build of the entire solution.
Note: The Build Solution command compiles everything; however, if you only want to build a single project, use the right-click → Build option.
How do you run the ASP.NET Core Web API Application in Visual Studio?
Step 1: Select Launch Profile
Visual Studio provides multiple ways to run your API:
- IIS Express
- https (recommended)
- http
- WSL (Windows Subsystem for Linux)
Select https and click the green run button, as shown in the image below.

Note: IIS Express is used for local development, while Kestrel is the built-in, cross-platform server used in production.
Step 2: Running the Application – Swagger UI
When the project runs, the browser opens Swagger UI.
- The app runs on a port, such as https://localhost:7237/ (your port may vary).
- Swagger displays all available endpoints, such as/WeatherForecast.
- You can test endpoints directly in the Swagger interface.

Step 3: Testing Endpoints in Browser
You can test your API by:
- Using Swagger UI
- Using tools like Postman or Fiddler
- Or simply hitting the endpoint in a browser: https://localhost:7237/WeatherForecast
This will return a JSON response with weather forecast data. This proves the API is running successfully.

By following these steps, you:
- Created an ASP.NET Core Web API project in Visual Studio 2022.
- Learned how to configure HTTPS, Swagger, and Controllers.
- Built and ran the project successfully using multiple methods.
- Verified API endpoints through Swagger UI and the browser.
By using Visual Studio, creating an ASP.NET Core Web API project becomes straightforward and efficient. You can set up, build, and run your API quickly, then test it through Swagger or a browser. This process provides the foundation to add more controllers, models, and services, making it easier to grow your application into a complete solution.
In the next article, I will discuss the Default Files and Folders of the ASP.NET Core Web API Project. In this article, I explain how to create, build, run, and test an ASP.NET Core Web API Application in Visual Studio. I hope you enjoy this article on developing, building, running, and testing ASP.NET Core Web APIs in Visual Studio.
