Back to: ASP.NET Core Web API Tutorials
Download and Install Visual Studio 2022
Currently, .NET 8 has Long Term Support (LTS), and Visual Studio 2022 is the primary Microsoft IDE that fully supports it. While you can technically use other editors such as Visual Studio Code, Rider, or even Sublime Text, Visual Studio 2022 provides the richest development experience with integrated tools for coding, debugging, testing, and deployment.
Since I have a Windows operating system on my machine, we’ll focus on Visual Studio 2022 for Windows, step by step, starting from download to installation and verification. But this is not mandatory. You can use any editor of your choice.
What is Visual Studio?
Visual Studio is Microsoft’s Integrated Development Environment (IDE) designed for building applications across multiple platforms, including desktop, web, cloud, and mobile. It is often referred to as a “One-Stop Shop” because it consolidates everything you need for development into a single tool.
- Code Editor with intelligent suggestions, refactoring tools, and code navigation.
- A debugger that works at the source code level, and even supports live debugging.
- Integrated Testing Support, including unit tests and live testing in advanced editions.
- Project templates for almost every type of .NET application.
- Version control integration (Git, GitHub, Azure DevOps).
- Extensibility via extensions and plugins from the Visual Studio Marketplace.
In short, Visual Studio is not just an editor; it’s a complete development platform.
How to Download and Install Visual Studio for Windows
To download and install Visual Studio 2022 on a Windows Operating System, we need to follow the steps below:
- Visit the Official Website: Go to https://visualstudio.microsoft.com/downloads/. This is the only official source to download Visual Studio safely.
- Choose an Edition: Visual Studio comes in Community (free), Professional, and Enterprise editions (both require a subscription). The choice depends on your needs.
- Download the Installer: After selecting an edition, click the Download button. This downloads the Visual Studio Installer executable (a small setup file).
- Run the Installer: Double-click the downloaded .exe file. Windows will prompt for confirmation. Click Yes to allow the installer to run.
- Select Workloads (Features): Visual Studio uses a workload-based installation model. Workloads are collections of tools for different development areas (e.g., web, desktop, mobile). Select the workloads relevant to your project.
- Complete Installation: Click Install and wait for the installer to download and configure the selected components. This may take time depending on your internet speed and system performance.
Download Visual Studio
In order to download Visual Studio’s Latest Version, please visit the following Visual Studio download link:
https://visualstudio.microsoft.com/downloads/
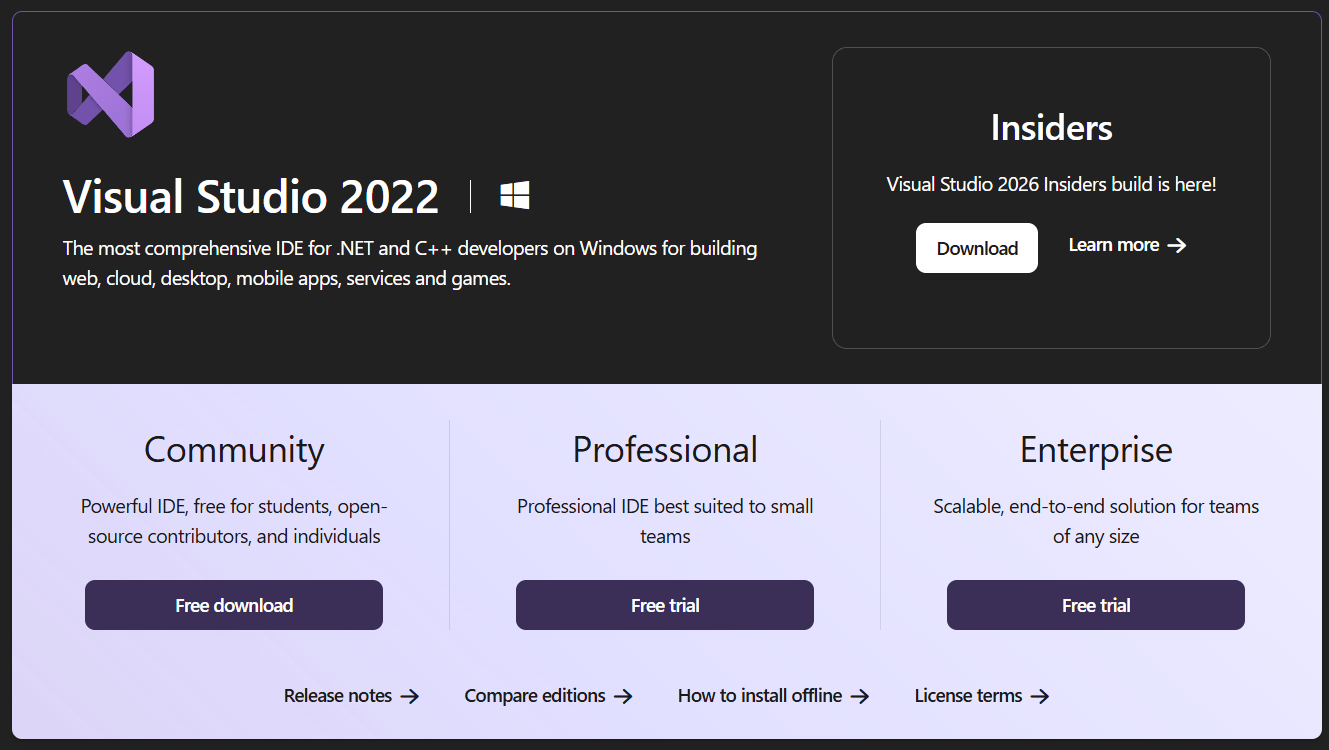
Once you visit the link above, you will be directed to the following page.

Visual Studio Editions
Visual Studio 2022 is available in three editions: Community, Professional, and Enterprise. Each edition is designed for different user needs. The following are the key differences between these three editions:
Community Edition
- Target Audience: Individual developers, students, open-source contributors, and small teams.
- Price: Free.
- Features:
- Multi-language support (C#, C++, Python, JavaScript, etc.).
- Integrated debugging and testing.
- Git and Azure DevOps integration.
- Code refactoring and navigation tools.
- Limitations: Cannot be used for commercial purposes in larger organizations (more than 5 users or $1M annual revenue).
- Perfect for learning, training, and small non-enterprise projects.
Professional Edition
- Target Audience: Professional Developers, Freelancers, and small to medium teams.
- Price: A paid subscription is required.
- Features (in addition to Community):
- Includes all Community Edition features.
- Advanced debugging and testing tools.
- CodeLens for tracking references and changes.
- Access to Microsoft support.
- Usage: No restrictions on company size.
- Recommended for freelancers and small businesses who need extra productivity tools.
Enterprise Edition
- Target Audience: Large development teams and organizations needing advanced and scalable development tools.
- Price: Requires a more expensive subscription compared to the Professional edition.
- Features (all of Professional plus advanced tools):
- IntelliTrace: Allows you to step back in your debugging session to understand past states.
- Live Unit Testing: Automatically runs impacted unit tests in the background, providing immediate feedback.
- Test Impact Analysis: Helps identify which tests are impacted by recent code changes.
- Performance Profiling Tools: Helps identify performance bottlenecks in your code.
- DevOps and Lifecycle Management: Enhanced integration with Azure DevOps, advanced build and release management, and extensive lifecycle management features.
- Best for large teams that manage and organize.
Choosing the Community Edition:
If you are a student or want to learn .NET, you can select the Community Edition, which is absolutely free. I am selecting the Community Edition and clicking the free download button. Once you click the free download button, the Visual Studio 2022 Community Edition EXE file will be downloaded.
Open the .exe file
Double-click on the EXE file, which is downloaded on your machine. Once you double click, it will open one popup asking do you want to allow this app to make changes to your device, simply click on the Yes button to continue.
Start Visual Studio Installation
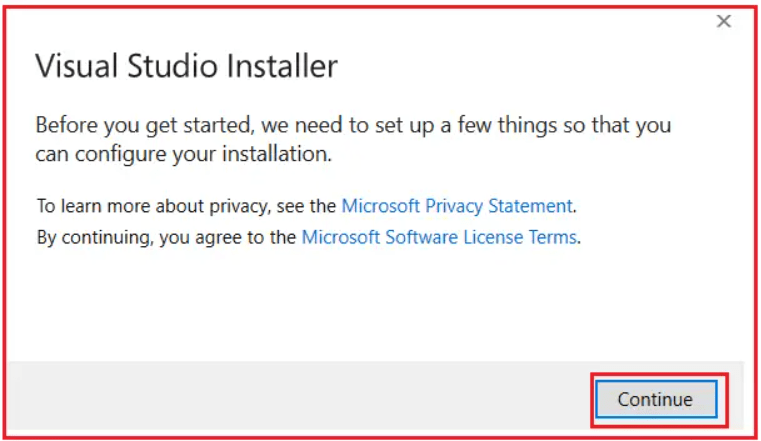
Once you click the Yes button in the previous step, the following window will open. From this screen, click on the continue button to start Visual Studio installation, as shown in the image below.

Once you click on the Continue button, Visual Studio will start downloading the initial files. Download speed will vary as per your internet connection. Let the installation complete as shown in the image below.

Select Visual Studio Features:
Once the initial files are downloaded, you will get the following Visual Studio installer screen. Here’s where you decide what kind of development you want to enable. Please select at least the following two checkboxes.
- ASP.NET and Web Development: For developing web-based applications using ASP.NET Core, such as ASP.NET Core Web Apps, REST APIs, Blazor apps, etc.
- .NET Desktop Development: For building Console apps, Windows Forms, and WPF applications.
- You can install more workloads later (e.g., Mobile development, Game development with Unity).
Once you select the two checkboxes above from the Workload section, click the Install button, as shown in the image below.

Wait for the Files to be Downloaded
After selecting workloads, click Install. Visual Studio downloads and configures the required packages. This can take 15–45 minutes, depending on features and speed. You can monitor the same as shown in the image below.

Sign in to Visual Studio
Once installed, Visual Studio will prompt you to sign in with a Microsoft Account. Benefits of signing in:
- Sync settings across devices.
- Access Azure DevOps and GitHub.
- Manage licenses (Professional/Enterprise).
You can skip and sign in later if you prefer.
First Launch
Open the Visual Studio IDE. If you are opening Visual Studio for the first time, it will prompt you to select a theme of your choice. Then, click the Start Visual Studio Button, as shown in the image below.

That’s it. Now you are ready to develop .NET Applications using Visual Studio. In Visual Studio IDE, you can create new applications by clicking on the ” Create a new project option, as shown in the image below.

Ensure .NET 8.0 Runtime and .NET SDK
If you already have Visual Studio 2022 installed, ensure that ASP.NET and Web Development are installed. If not installed, you can install them using Visual Studio Installer. Ensure that .NET 8.0 Runtime and .NET SDK are selected under the Individual Components section, as shown below.

Once you have installed it, you can also verify its installation using the Command Prompt (Windows OS) and Terminal (Linux OS). On my Machine, I have installed the Windows Operating System. So, I can verify it using the “dotnet –list-sdks” command, as shown in the image below. This command will give you a list of all SDKs installed on your machine.

Visual Studio Key Features
The Visual Studio offers many powerful features:
- Multi-Language Support: The Visual Studio IDE enables the development of .NET applications using a wide range of programming languages, including C#, VB.NET, F#, C++, Python, JavaScript, and more.
- Creation of any application type: The Visual Studio IDE can be used to develop various types of .NET applications, including web-based or Windows Forms-based applications, Console Applications, Web APIs, mobile apps, cloud apps, and games.
- Integrated Development Server (IIS Express): Includes IIS Express ,which helps in quick testing of web applications without external setup.
- Rich Code Editor: It provides the code editor with IntelliSense, auto-completion, syntax highlighting, navigation, and refactoring features.
- Live Debugging: Set breakpoints and step through code while the program runs.
- Version Control Integration: Integrates with Git and other version control systems, such as TFS, directly within the IDE.
- Database Tools: Includes SQL Server Object Explorer for managing and querying databases.
Visual Studio 2022 is the most comprehensive IDE for .NET and related technologies. Whether you are a student just starting out with the Community Edition or a professional in need of Enterprise features, the setup process is straightforward once you understand workloads and SDK requirements. With the installation complete, you are now ready to start building real-world applications in .NET 8 using Visual Studio.
