Back to: ASP.NET Core Web API Tutorials
Environment Setup for ASP.NET Core Web API Development
In this article, I will discuss the Environment Setup required for developing ASP.NET Core Web API Applications. Please read our previous article discussing HTTP (Hyper Text Transport Protocol), i.e., HTTP Verbs or Methods, HTTP Status Codes, HTTP Requests, and Responses. Tools and Software Requires for the Development of ASP.NET Core Web API Applications.
- Operating System: (Windows, Mac, Linux)
- Editor: Visual Studio 2022 (latest version), Visual Studio Code.
- .NET SDK 8 (Latest Version as of this writing): This is the software development KIT, and this KIT is helpful for the development and running of the application in the system.
- Database: SQL Server 2019
- SSMS (SQL Server Management Studio): To interact with SQL Server database
- API Client: Postman, Fiddler. These are client tools and are used to test the Web APIs
Operating System:
You can use any operating system of your choice to develop .NET Core Applications. This is because .NET Core is an Open-Source and Cross-Platform framework. So, you can use any type of Operating System, such as Windows, Mac, and Linux, for ASP.NET Core Web API Application development. I will use Windows Operating System throughout this course, but you can use any operating system.
Download and Install .NET Core SDK 8 (LTS)
Once you decide on an Operating System, you need to install .NET SDK on that machine. To download .NET Core SDK 8, please go to the below website.
https://dotnet.microsoft.com/en-us/download/dotnet/8.0
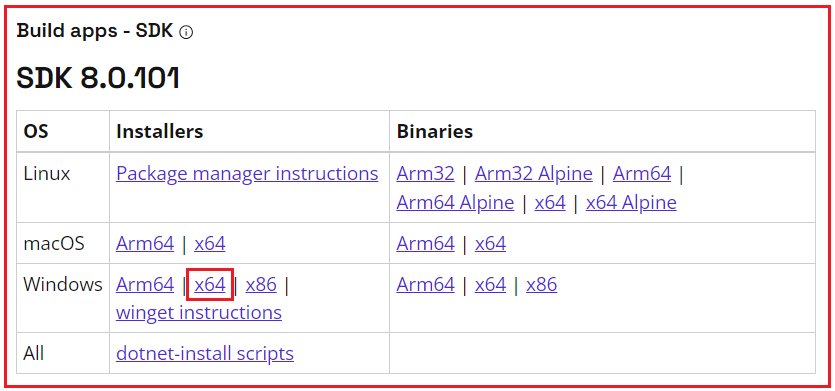
Once you go to the above website, you will find the following webpage. As per your operating system, choose the appropriate .NET SDK. The latest version as of this writing is .NET 8.0, and .NET 8 provides long-term support, which is the recommended one. In this course, we will use .NET 8, and at the end of this course, I will discuss the new features introduced with .NET 8 with Real-Time Examples.

As we are here to develop, build, run, and deploy .NET Core Applications, we need to click on the Download .NET SDK x64 link. Once you click on the Download .NET SDK x64 button, it will download the .NET SDK.
Installing .NET Core SDK:
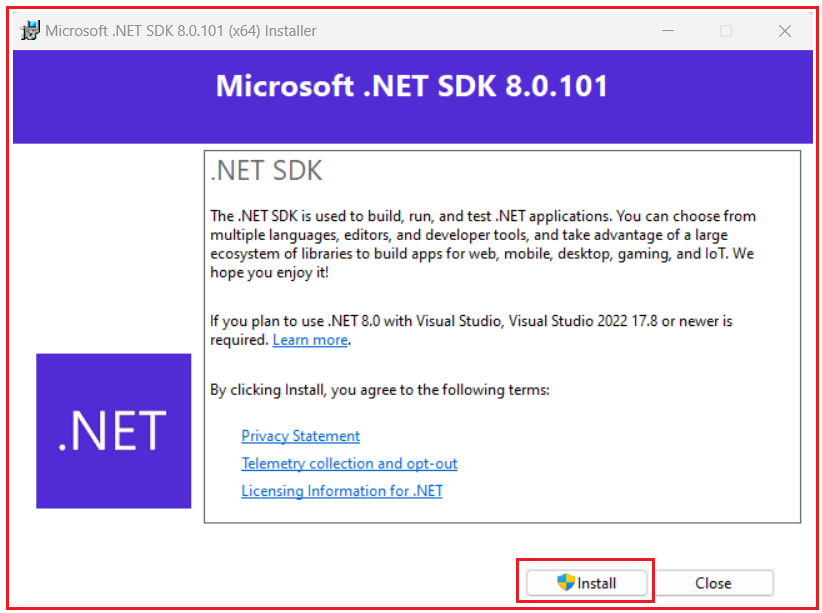
Once you download the .NET SDK 8, install it by double-clicking on the exe. Once you click on the EXE, it will open the following window, and here, click on the Install button as shown in the below image.

If everything is fine, once the installation is completed, you will get the following message saying the installation was successful. Simply click on the Close button as shown in the below image.

Note: If you installed .NET SDK on your machine, then there is no need to install .NET Runtime separately, as .NET SDK automatically installs the .NET Runtime. The .NET Runtime is a part of the .NET SDK. Another point you need to remember is that once you install .NET SDK, ASP.NET Core gets installed automatically.
Verify Installation of .NET Core SDK.
Once you installed .NET SDK 8, open the command prompt, type dotnet, and press the enter button as shown in the image below. If the installation succeeded, then you should get the following output.

To verify what versions are installed on your machine, type the dotnet –list-sdks command in the command prompt and press the enter button as shown in the image below.

As you can see in the above image, 5 .NET SDK versions are installed on my machine.
Note: The .NET SDK will give a complete environment to develop, build, test, and deploy the ASP.NET Core Web API Applications.
Integrated Development Environment (IDE) for ASP.NET Core Web API Development:
You can use any of the following IDEs to develop the ASP.NET Core Web API Applications.
- Visual Studio 2022
- Visual Studio Code
- .Net Core CLI
We will discuss using all the above options to develop the ASP.NET Core Web API Applications. However, from the beginning, we will use Visual Studio 2022 as the IDE for ASP.NET Core Web API development.
Download Visual Studio 2022:
If you have not installed Visual Studio 2022, then please download and install Visual Studio From the URL below.
https://visualstudio.microsoft.com/downloads/
Once you navigate to the above URL, and if you are a student and you want to learn ASP.NET Core Web API, then I recommend you choose the Community Edition of Visual Studio 2022, which is free, as shown in the below image and the community version has all the features of the enterprise edition has. Based on your operating system, choose the right visual studio. As I have Windows OS, so I am selecting Visual Studio Community Edition for Windows, as shown in the image below.

Please check the article below, which shows the step-by-step process to download and install Visual Studio 2022 Community Edition on the Windows operating system.
https://dotnettutorials.net/lesson/how-to-download-and-install-visual-studio-in-windows/
While installing Visual Studio 2022, please ensure ASP.NET and Web Development Workload are Installed. To verify whether you have installed this workload, Open Visual Studio Installer and click the Modify Button of Visual Studio Community 2022, as shown in the image below.

Once you click on the Modify button, the following window will open. Select the Workloads option from the menus and then ensure the ASP.NET and Web Development checkboxes are checked, as shown in the image below.

Note: If the above ASP.NET and Web Development are not checked, please check the check box and click on the Modify button to install the same to develop ASP.NET Core Web Applications.
Install SQL Server 2022:
Next, we are going to install SQL Server 2019. Remember, we will develop Web APIs and work with Web APIs; we need some data. You can hard code the data in memory. But in real-time, we need to work with databases. As a database, in this course, we are going to use SQL Server. If you have not installed SQL Server 2019 on your machine, please download and install it from the URL below.
https://www.microsoft.com/en-ie/sql-server/sql-server-downloads
Once you click the above link, it will open the page below. Here, we have many options for using the SQL Server database. Click on the Download Now button below the Developer tab, as shown in the image below.

SQL Server 2019 Developer is a Full-Featured Free Edition, licensed for use as a development and test database in a non-production environment. Once you download it, then install it by following the on-screen steps. Please check the below article for the step-by-step process of downloading and installing SQL Server.
https://dotnettutorials.net/lesson/how-to-download-and-install-sql-server/
SQL Server is a DBMS that provides the complete environment to save and work with an application’s data. SQL Server stores the data in the form of Tables. We can create relationships between the tables. You can use SQL Server from any other server from your local machine.
Download and Install SQL Server Management Studio:
Once you have installed the SQL Server database, you will need an interface to interact with it. For that, we will use SQL Server Management Studio (SSMS) to interact with the SQL Server database. If you have not installed SSMS on your machine, please download and install the SQL Server Management Studio from the link below.
https://docs.microsoft.com/en-us/sql/ssms/download-sql-server-management-studio-ssms
Once you go to the above link, it will open the webpage below, and click on the Download SQL Server Management Studio (SSMS) link, as shown in the image below.

Once you download SSMS, then install it. SQL Server Management Studio (SSMS) is an integrated environment for managing any SQL infrastructure, from SQL Server to Azure SQL Database. SSMS provides tools to configure, monitor, and administer instances of SQL Server and databases. Use SSMS to deploy, monitor, and upgrade the data-tier components used by your applications and build queries and scripts. Please check the article below for the step-by-step process to download and install SSMS.
https://dotnettutorials.net/lesson/how-to-download-and-install-ssms/
Use SSMS to query, design, and manage your databases and data warehouses, wherever they are – on your local computer or in the cloud.
Install Postman:
As we will work with the Web API, we also need one Web API client tool. And for the client tool, we are going to use Postman. To install Postman, click on the below link.
https://www.postman.com/downloads/
Once you click the above link, it will open the webpage below. From the below page, click on the Download the App link to download Postman on your machine. Depending upon your operating system, you can choose either 32-bit or 64-bit. I have installed a 64-bit operating system, so I chose Windows 64-bit, as shown in the image below.

Once you download it, then install it. A postman is an API tool. Postman provides a complete and nice interface to work with APIs. That’s it. We are ready with our environment to develop ASP.NET Core Web API Applications.
In the next article, I will discuss Creating an ASP.NET Core Web API Project using .NET Core CLI. In this article, I explain the Environment Setup for ASP.NET Core Web API Application Development, and I hope you enjoy this ASP.NET Core Web API Environment setup for Development article.

Please add a tutorial for React