Back to: ASP.NET Core Web API Tutorials
SSO Authentication in ASP.NET Core Web API
In this article, I will discuss SSO Authentication in ASP.NET Core Web API step by step. Single Sign-On (SSO) is an authentication approach that allows users to access multiple applications or services using a single set of credentials. By centralizing identity management, organizations can simplify the login experience, enhance security, and reduce administrative overhead. In modern software architectures, especially those involving microservices and API-driven backends, implementing SSO in an ASP.NET Core Web API environment can streamline the user experience and ensure consistency across platforms. I have divided the SSO Authentication Implementation into five parts. They are as follows:
- Part 1: Basic Concepts of SSO Authentication will be discussed in this article.
- Part 2: Implementing the Authentication Server using ASP.NET Core Web API.
- Part 3: Implementing Resource Server using ASP.NET Core Web API.
- Part 4: Implementing Client Application One using ASP.NET Core MVC.
- Part 5: Implementing Client Application Two using ASP.NET Core MVC.
What is SSO Authentication?
Single Sign-On (SSO) Authentication is a centralized user authentication process that enables a user to log in once with a single set of credentials, such as a username and password, and gain access to multiple applications or systems without needing to authenticate separately for each one. By centralizing authentication on a dedicated, trusted server, SSO enhances both the user experience and organizational security.
Key Points about SSO Authentication:
The following are Key Points Single Sign-On (SSO) Authentication:
- Centralized Authentication: The user authenticates once through a dedicated Authentication Server or Identity Provider (IdP), which manages the user’s credentials and authentication state.
- Token-Based Access: After successful authentication, the system issues a secure token, often a JSON Web Token (JWT). This token carries user claims (like user ID, roles, and email) and is used to access various services without re-authentication.
- Enhanced Security and Management: Centralizing authentication enables stronger security practices such as multi-factor authentication (MFA), standardized password policies, and centralized account management (like immediate revocation upon termination).
SSO Authentication Real-time Applications:
SSO is now a standard feature across a wide range of industries and environments. The following are some of the common real-world scenarios:
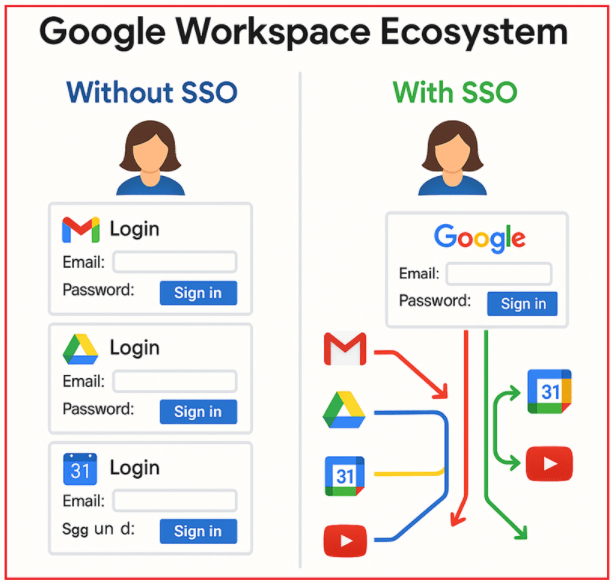
Example 1: Google Workspace Ecosystem
A user needs to access multiple Google services such as Gmail, Google Drive, Google Calendar, YouTube, and various third-party apps connected to their Google account for both personal and professional tasks. To understand how it works with and without SSO, please have a look at the following diagram:

Here:
- Without SSO: The user would have to log in separately to each Google service or third-party app using different usernames and passwords, resulting in inconvenience, increased login time, and a higher risk of password fatigue or reuse.
- With SSO: The user logs in once to their Google account, and this authentication seamlessly grants access to all Google services and authorized third-party applications without needing to re-enter credentials. Google acts as the centralized identity provider, simplifying access while maintaining security across the entire ecosystem.
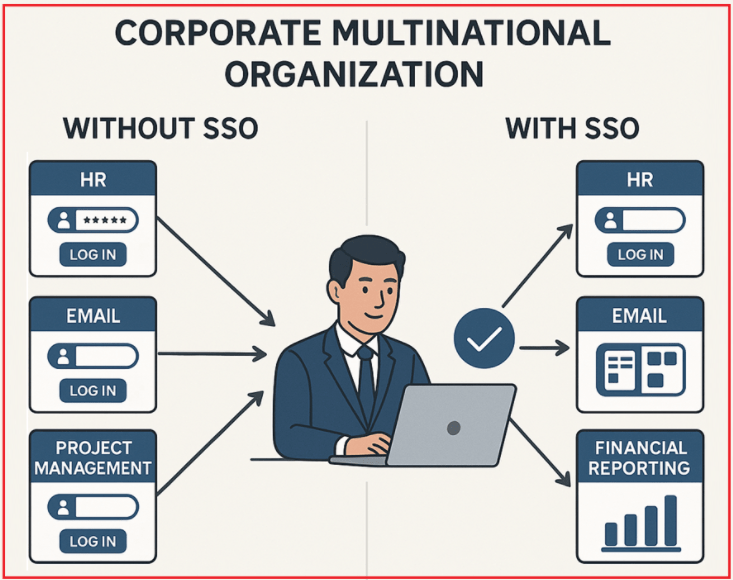
Example 2: Corporate Multinational Organization
An employee at a multinational corporation needs to access various internal systems, including HR, Email, Project Management, and Financial Reporting, throughout the day. To understand how it works with and without SSO, please have a look at the following diagram:

Here:
- Without SSO, users must repeatedly enter credentials, increasing frustration and security risks from password fatigue or weak passwords.
- With SSO: Employees authenticate once and seamlessly access all authorized systems, improving productivity and reducing IT support demands.
How Does SSO Authentication Work?
Let’s break down a typical SSO flow in an ASP.NET Core Web API environment, where JSON Web Tokens (JWTs) are used for secure, stateless authentication. The process involves several components working together as follows:
- Authentication Server (Identity Provider): Responsible for verifying user credentials, issuing JWT tokens, and managing SSO tokens.
- Resource Server: Hosts protected resources (APIs, data, services) that require user authentication. Client applications will consume these services.
- Client Applications: Multiple related applications that the user wishes to access using SSO.
Let us understand the Step-by-Step Process of how SSO Authentication Works. For a better understanding, please refer to the following diagram.

Step 1: Initial Login at Client Application One
The primary goal of this step is to authenticate the user’s identity for the very first time in the system by verifying their credentials. This establishes a trusted session and generates an access token that confirms the user’s authentication status.
Actions:
- User Action: The user navigates to the first client application (Application One) and submits their login credentials, such as username and password, via a secure login form.
- Server Communication: Application One sends these credentials securely to the Authentication Server for token generation.
- Token Generation: The Authentication Server verifies the credentials. Upon successful validation, it generates a JWT token that contains essential user claims (such as User ID, Roles, and Email).
Step 2: Token Delivery and Secure Storage
This step aims to securely deliver the authentication token to the client application and store it safely on the client side to maintain the authenticated session for future requests.
Actions:
- Token Delivery: The Authentication Server returns the JWT token to Application One after successful authentication.
- Secure Storage: Application One securely stores this token in the user’s browser, commonly using HTTP-only cookies or session storage. This practice helps prevent client-side scripts from accessing the token and minimizes the risk of XSS attacks.
The JWT token is now used to verify the user’s identity for all subsequent resource requests within Application One.
Step 3: Initiating SSO for Another Application
This step enables the user to access a second client application without having to re-enter credentials. This is accomplished by requesting a special SSO token from the Authentication Server that works across multiple applications.
Actions:
- User Navigation: When the user wants to access Client Application Two, Application One provides an SSO link or button.
- Token Forwarding: Clicking this SSO link triggers Application One to forward the stored JWT token to the Authentication Server. This request instructs the server to generate a new SSO token, designed explicitly for cross-application authentication.
Step 4: Generating, Storing, and Returning the SSO Token
This step focuses on validating the existing JWT token and generating a secure, temporary SSO token that can be used to authenticate the user on other client applications.
Actions:
- Validation and Token Generation: The Authentication Server checks the validity of the incoming JWT token. If it’s valid, the server generates a unique, short-lived SSO token (such as a GUID or a cryptographically secure string).
- Persistence: The SSO token, along with its associated user information and expiration time, is stored securely in a database or in-memory cache for tracking and validation purposes.
- Response: The freshly created SSO token is returned to Application One.
Step 5: Redirecting the User to Application Two
This step aims to transfer the user from the first application to the second application, transferring the SSO token in a secure and verifiable manner.
Actions:
- User Redirection: Once Client Application One receives the SSO token from the Authentication server, Application One redirects the user to Client Application Two. During this process, the SSO token is attached either as a query parameter in the URL or within an HTTP header, enabling Application Two to initiate the validation process.
Step 6: Validation of SSO Token at Application Two
This step ensures that only legitimate, authenticated users can gain access to protected resources in Application Two by validating the SSO token with the Authentication Server.
Actions:
- SSO Token Validation: Application Two receives the SSO token and sends it to the Authentication Server for validation.
- If Valid: The Authentication Server verifies the SSO token’s authenticity, retrieves the corresponding user information, and issues a new JWT token specific to Application Two. Application Two stores this new JWT and grants the user access to protected resources.
- If Invalid: If the SSO token is expired, invalid, or already used, Application Two denies access, often redirecting the user to a login page or displaying an access denied message.
Important Note: The SSO token is typically designed for one-time use and is configured to expire quickly. This design protects against replay attacks and unauthorized access, ensuring the integrity of the SSO process.
Is External Authentication, like Google or Facebook, the same as SSO Authentication?
External Authentication Providers (such as Google, Facebook, Microsoft, and Twitter) enable users to log into your application using their credentials from these trusted providers. This is often referred to as “Social Login.”
These external providers utilize OAuth 2.0/OpenID Connect protocols behind the scenes to authenticate users and provide identity information.
From a broad perspective, using Google or Facebook login can be considered a form of SSO, because the user authenticates once with the external provider and can access multiple applications that trust that provider.
However, SSO in enterprise environments often refers to centralized authentication within an organization or between trusted enterprise systems, using protocols such as SAML or OAuth 2.0/OpenID Connect (JWT).
So:
- External authentication via Google or Facebook is a kind of SSO for consumers, using third-party identity providers.
- However, not all SSO implementations involve external or social login; many enterprise SSOs are internal and used for communication between trusted enterprise systems.
Benefits of SSO Authentication in ASP.NET Core Web API
Implementing SSO in an ASP.NET Core Web API (or any modern architecture) offers a wide range of benefits:

Understanding Each Benefit:
- Enhanced User Experience: SSO eliminates the need for multiple logins, reducing password fatigue and the likelihood of login errors, resulting in smoother user journeys.
- Improved Security: Centralizing authentication allows for robust security controls such as MFA and consistent password policies. It reduces the risk of password reuse and enables the rapid revocation of access when needed.
- Increased Productivity: Users quickly switch between applications without repeated logins, boosting efficiency, especially in multi-application workflows.
- Minimized Password Fatigue: Maintaining a single set of credentials encourages the use of stronger passwords and reduces the risk of weak or repeated passwords.
- Simplified Access Management: Administrators gain centralized control over user access rights, enabling instant updates or revocations across all applications.
- Scalability: SSO enables the seamless integration of new applications into your ecosystem without increasing user management complexity.
SSO Implementation with JWT Authentication in ASP.NET Core Web API:
A typical SSO implementation using JWT in an ASP.NET Core Web API environment consists of these key components:
- Authentication Server: Manages user authentication, issues JWTs and SSO tokens, and maintains token validation logic.
- Resource Server: Hosts protected services and data, accepting JWTs as proof of authentication.
- Application One (Initial Client): Where the user initially authenticates, obtains a JWT, and later requests an SSO token.
- Application Two (Secondary Client): Another client application where the user is redirected using the SSO token and obtains its own JWT for access.
This architecture ensures a secure, stateless, and scalable authentication process that improves user experience and centralized security management.
Summary:
- Single Sign-On (SSO) authentication is a robust identity management approach that simplifies the login process, improves security, and enhances user productivity across multiple applications.
- In ASP.NET Core Web API environments, implementing SSO with JWT-based tokens (using OAuth 2.0 and OpenID Connect Protocols) enables secure, centralized authentication that aligns with modern microservices and API-driven architectures.
- By reducing password fatigue and administrative overhead, SSO supports better security practices, lowers IT support costs, and provides a seamless user experience, making it an essential component of enterprise-grade authentication solutions.
In the next article, we will discuss implementing the Authentication Server using ASP.NET Core Web API. In this article, I explain the basic concepts of SSO Authentication, and I hope you find it informative.

thanks