Back to: ReactJS Tutorials
Using One State Instead Multiple States in React:
In this article, I am going to discuss Using One State Instead Multiple States in React with Examples. Please read our previous article where we discussed Working with Multiple States in React.
Using One State Instead Multiple States in React:
In the last article, we added the handler functions and multiple state slices. We can have multiple state slices, and this is totally normal. However, there is also an alternative and it depends on your personal preferences which approach you prefer.

Here, we have multiple slices, but you can think that all the 3 States are related to our form. Basically, the same concept is repeated 3 times. Therefore, you can also go for one state instead of three states. How?
One State Concept in React:
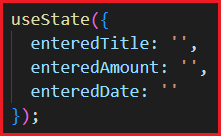
By calling useState only once and passing an object as a value, not a string or number or anything like that, but an object. And in this object, you can now group together your 3 States.

So, here, we pass an object that contains ‘enteredTitle’, ‘enteredAmount’, and ‘enteredDate’. These keys hold an empty string. The logic is kind of the same but now it’s in one state object, managed as one piece of state instead of 3 separate slices.
The difference is that whenever you update this state, you need to update all 3 properties and not just one. So, here, you can also extract this by using a variable and a set function i.e. userInput, setUserInput,

For example, if you users enter a title, you will call setUserInput and in there, you will pass a new object where you set the entered title i.e. event.target.value.

Now, here, you have to ensure that the other two pieces of data i.e. enteredAmount and enteredDate don’t get lost. If you just set your new user title to this object, you will basically dump the other keys to this object. Because when you update your state, react will not merge the new state with the old state. It will simply replace the old state with the new one. And if your new state is an object with one key-value pair, the old state will be replaced and therefore the other 2 key-value pairs that are for amount and date will be lost.
So, if you choose to use one state approach and you manage such an object, it’s all your responsibility to make sure that the other data does not get lost. And to do that, you manually need to copy the other values which you’re not updating here. For example, if you are updating the title, you have to copy the existing values for the amount and date.
Using Spread Operator in React:
To copy the existing value, one way to do this is to use the spread operator (…) which is a default JavaScript operator in modern JavaScript. So you can use it as,

If you haven’t seen this syntax before, this syntax just takes an object, pulls out all the key-value pairs, and adds them to this new object. And then we can still override key-value pairs like in the above case i.e. enteredTitle. By doing it like this, we ensured that the other values weren’t thrown away, but were also part of that new state. So, we can do this in all other places i.e. for amountChangeHandler and dateChangeHandler,

So, this is an alternative to having the 3 individual state slices. It’s up to you, what you prefer. And this code isn’t perfect yet. We’ll come back to this later but generally, you can switch between these approaches. Now, we tend to prefer individual state slices. You will see that more often in other react projects. But ultimately both approaches are fine.
One thing that is not fine though, and that is how we updated our state when we consider our oldest state for copying in values in changeHandler functions. And that’s something we’re going to take a closer look at in our next article.
Full code of ExpenseForm.js:
import React, {useState} from "react";

import "./ExpenseForm.css";

const ExpenseForm = () => {

  // const[enteredTitle, setEnteredTitle] = useState('');
  // const[enteredAmount, setEnteredAmount] = useState('');
  // const[enteredDate, setEnteredDate] = useState('');

  const[userInput, setUserInput] = useState({
    enteredTitle: '',
    enteredAmount: '',
    enteredDate: ''
  });

  const titleChangeHandler = (event) => {
    // setEnteredTitle(event.target.value);
    setUserInput({
      ...userInput,
      enteredTitle: event.target.value
    })
  };

  const amountChangeHandler = (event) => {
    // setEnteredAmount(event.target.value);
    setUserInput({
      ...userInput,
      enteredAmount: event.target.value
    })
  }

  const dateChangeHandler = (event) => {
    // setEnteredDate(event.target.value);
    setUserInput({
      ...userInput,
      enteredDate: event.target.value
    })
  }

  return (
    <from>
      <div className="new-expense__controls">
        <div className="new-expense__control">
          <label>Title</label>
          <input type="text" onChange={titleChangeHandler}/>
        </div>
        <div className="new-expense__control">
          <label>Amount</label>
          <input type="number" onChange={amountChangeHandler} min="0.01" step="0.01" />
        </div>
        <div className="new-expense__control">
          <label>Date</label>
          <input type="date" onChange={dateChangeHandler} min="2023-06-25" max="2025-12-31" />
        </div>
      </div>
      <div className="new-expense__actions">
        <button type="submit">Add Expense</button>
      </div>
    </from>
  );
};

export default ExpenseForm;
In the next article, I am going to discuss Updating the State that Depends on the Previous State in React. Here, in this article, I try to explain Using One State Instead Multiple States in React with Examples. I hope you enjoy this Using One State Instead Multiple States in React article
