Back to: ReactJS Tutorials
Adding Conditional Return Statements in React:
In this article, I will discuss Adding Conditional Return Statements in React with Examples. Please read our previous article discussing Outputting Conditional Content in React. Now, we will restructure the Expenses component. We want to extract that list logic into a new component we added in the previous article to make the expense component cleaner.
Create a Separate Component for Conditional List Logic:
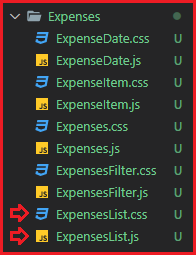
Therefore, we’ll add an ExpensesList.js file and an ExpensesList.css file,

In the ExpensesList.js file, we will add a constant expenses list which will receive props and return something. Then, we’ll export this ExpensesList,

And you can if you want to import React from React (optional). Now, in ExpensesList, we want to output my expenses list. We will not add the filter logic in the ExpensesList.js file. We will keep the filter logic in Expenses.js. But I will move the conditional list content into the ExpensesList component.

As we have used the ExpenseItem component in the logic, we need to import that in ExpensesList.js. The filteredExpenses is no longer exist in ExpensesList.js, so we will replace it with props.items,

Now, in Expenses.js, we have to output the ExpensesList component. And, of course, we have to import ExpensesList from ExpensesList.js file. You can get rid of the import statement of the ExpenseItem component. Now, the filteredExpenses should be passed to the ExpensesList component through the items prop we’re using inside ExpensesList.

Now, inside the ExpensesList.js file, we want to make a couple of changes. We need to return some JSX, but we want to return an unordered list here and give that list a class name of expenses-list. We have an expenses-list class, ExpensesList.css file. Therefore, we also have to import the ExpensesList.css file into the ExpensesList.js file.

Now, we want to output porps.items.map expression inside the unordered list. So, we’ll grab that and render this dynamically inside the unordered list. And we will handle the case a little bit differently. We will add an if check, but I’ll check if props.items.length equals zero. So, if we have no items, and if that’s the case, we will return a totally different JSX snippet because that’s another way of handling conditional content.
You can use this approach if your component’s return changes entirely based on different conditions. It would not have been appropriate in Expenses.js because only a part of the JSX snippet we returned was changed. So, in Expenses.js, the approach we showed in the last article was better. But if your entire JSX content changes when you haven’t data to show, you can always add an if-check to return a different JSX block if some condition is met.
So, in if-check, we want to return an h2 tag with a class name of expenses-list__ fallback with the text “No Expenses Found”. So that’s what this component, Expenses List, will render if we have no expenses. Hence, we can also get rid of expensesContent variable.

Now, if you run the code, you will see,

If you select a year with no expenses, you will see the text “No Expenses Found”. And if you have expenses in that year, you will see the list of all expenses,

So, with the help of this extra component (ExpensesList), which uses a different logic for rendering or returning different JSX code, we got a little bit of a leaner Expenses.js file.
Slight Change in ExpenseItem Component:
Now, one additional change we want to make here is that since we’re using an unordered list, for semantic reasons in the ExpenseItem component, we want to switch away from having a div being rendered to a list item instead. So, we will wrap the entire card in ExpenseItem.js with a list item,

Visually, this doesn’t change anything, but semantically, this is a little bit better. So that’s just another tiny change that we wanted to make here.
Below are all the files that we used in this article.
Expenses.js:
import React, { useState } from "react";

import "./Expenses.css";
import Card from "../UI/Card";
import ExpensesFilter from "./ExpensesFilter";
import ExpensesList from "./ExpensesList";

const Expenses = (props) => {
  const [filteredYear, setFilteredYear] = useState("2023");

  const filterChangeHandler = (selectedYear) => {
    setFilteredYear(selectedYear);
  };

  const filteredExpenses = props.items.filter((expense) => {
    return expense.date.getFullYear().toString() === filteredYear;
  });

  return (
    <div>
      <Card className="expenses">
        <ExpensesFilter
          selected={filteredYear}
          onChangeFilter={filterChangeHandler}
        />

        <ExpensesList items={filteredExpenses} />

      </Card>
    </div>
  );
};

export default Expenses;
ExpensesList.js:
import React from "react";

import ExpenseItem from './ExpenseItem';
import './ExpensesList.css';


const ExpensesList = props => {

    if (props.items.length === 0) {
      return <h2 className="expenses-list__fallback">No Expenses Found.</h2>
    }

    return <ul className="expenses-list">
        {props.items.map((expense) => (
        <ExpenseItem
          key={expense.id}
          title={expense.title}
          amount={expense.amount}
          date={expense.date}
        />
      ))}
    </ul>
};

export default ExpensesList;
ExpensesList.css:
.expenses-list {
    list-style: none;
    padding: 0;
  }

  .expenses-list__fallback {
    color: white;
    text-align: center;
  }
ExpenseItem.js:
import React from "react";
import ExpenseDate from "./ExpenseDate";
import Card from "../UI/Card";
import "./ExpenseItem.css";

const ExpenseItem = (props) => {
  return (
    <li>
      <Card className="expense-item">
        <ExpenseDate date={props.date} />
        <div className="expense-item__description">
          <h2>{props.title}</h2>
          <div className="expense-item__price">₹{props.amount}</div>
        </div>
      </Card>
    </li>
  );
};

export default ExpenseItem;
In the next article, I will discuss Adding Conditional Return Statements in React. In this article, I try to explain Adding Conditional Return Statements in React with Examples. I hope you enjoy this Adding Conditional Return Statements in React article.

Hello, I hope you are very well.
And Your tutorial are awesome…
Can you please complete React.Js Tutorial
yes, what you are writen in this artical i read it but this concepts are ok to build the all react applications
hello sir please add more content in to this