Back to: ReactJS Tutorials
Updating State that Depends on Previous State in React:
In this article, I am going to discuss Updating the State that Depends on the Previous State in React with Examples. Please read our previous article where we discussed Using One State Instead Multiple States in React.
Updating State that Depends on Previous State in React:
In the last article, we showed you how we can use one state instead of multiple states. In this article, we will discuss the correct way to update the state that is dependent on the previous state.
Understanding the Problem:
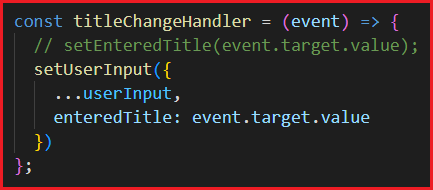
The way we were updating the state is not entirely correct. Technically, it will work, but in niche cases it could fail,

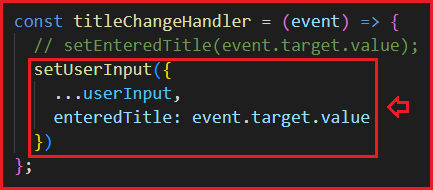
It’s not a good practice to update the state like above. So what’s the problem here? Here, we are depending on our previous state for updating the state. In this case, we depend on the previous state because we used one state concept instead of 3 states approach. So, we need to copy the old values to update the state so that we don’t lose them. Hence we depend on the previous state snapshot to copy the existing values and then just override one value with a new one.
The Solution to the Problem:
The key rule which you should memorize, whenever you update the state and you depend on the previous state, for example, as we did above, you should use an alternative form of the state updating function. Instead of calling it like this,

We should call ‘setUserInput’ function and pass a function to setUserInput function.

This is an anonymous arrow function that we pass to setUserInput here, which will automatically be re-executed by React. And it will receive the previous state snapshot for that state for which we’re calling the updating function, in this case, for the below object state,

So we’ll get the previous state snapshot,

and now here, we should return the new state snapshot. In this case, it should be our object where we copy the key-value pairs from the previous state with the spread operator, but then we also have to override, in this case, enteredTitle with event.target.value.

Now why should we do it like this? In many cases, both ways will work fine, but keep in mind that we mentioned that Reacts schedules state updates. It doesn’t perform them instantly. And therefore, theoretically, if you schedule a lot of state updates at the same time, you could be depending on an outdated or incorrect state snapshot.
If you use the new approach, react will guarantee that the state snapshot that it gives you here in the inner function of setUserInput, will always be the latest state snapshot by keeping all scheduled state updates in mind.
So this is the safer way to ensure that we always operate on the latest state snapshot. You should use this function syntax whenever your state update depends on the previous state. That is something you should memorize. If your state update depends on the previous state, use this function form.
With all of that, we wanted to show this because these are the key concepts that you’re going to see again and again in our upcoming articles and throughout a lot of React projects. But here, we comment out all of the alternatives and switch back to the multiple states approach that we initially had.

We just want to show you the alternative because it is a valid alternative, you will see it in many projects. You will have scenarios where you need it.
You will often depend on a previous state, not just if you merged state but also in other scenarios, like the counter which we mentioned. Nonetheless, let’s go back to the multi-state approach now.
Full Code of ExpenseForm.js:
import React, {useState} from "react";

import "./ExpenseForm.css";

const ExpenseForm = () => {

  const[enteredTitle, setEnteredTitle] = useState('');
  const[enteredAmount, setEnteredAmount] = useState('');
  const[enteredDate, setEnteredDate] = useState('');

  // const[userInput, setUserInput] = useState({
  //   enteredTitle: '',
  //   enteredAmount: '',
  //   enteredDate: ''
  // });

  const titleChangeHandler = (event) => {
    setEnteredTitle(event.target.value);

    // setUserInput({
    //   ...userInput,
    //   enteredTitle: event.target.value
    // })

    // setUserInput((prevState) => {
    //   return {...prevState, enteredTitle: event.target.value};
    // });
  };

  const amountChangeHandler = (event) => {
    setEnteredAmount(event.target.value);

    // setUserInput({
    //   ...userInput,
    //   enteredAmount: event.target.value
    // })

    // setUserInput((prevState) => {
    //   return {...prevState, enteredAmount: event.target.value};
    // });
  }

  const dateChangeHandler = (event) => {
    setEnteredDate(event.target.value);

    // setUserInput({
    //   ...userInput,
    //   enteredDate: event.target.value
    // })

    // setUserInput((prevState) => {
    //   return {...prevState, enteredDate: event.target.value};
    // });
  }

  return (
    <from>
      <div className="new-expense__controls">
        <div className="new-expense__control">
          <label>Title</label>
          <input type="text" onChange={titleChangeHandler}/>
        </div>
        <div className="new-expense__control">
          <label>Amount</label>
          <input type="number" onChange={amountChangeHandler} min="0.01" step="0.01" />
        </div>
        <div className="new-expense__control">
          <label>Date</label>
          <input type="date" onChange={dateChangeHandler} min="2023-06-25" max="2025-12-31" />
        </div>
      </div>
      <div className="new-expense__actions">
        <button type="submit">Add Expense</button>
      </div>
    </from>
  );
};

export default ExpenseForm;
In the next article, I am going to discuss Creating a Shared Handler Function in React. Here, in this article, I try to explain Updating State that Depends on the Previous State in React with Examples. I hope you enjoy this Updating State that Depends on Previous State in React article.
Registration Open – Microservices with ASP.NET Core Web API
Session Time: 6:30 AM – 8:00 AM IST
Advance your career with our expert-led, hands-on live training program. Get complete course details, the syllabus, registration, and Zoom credentials for demo sessions via the links below.
