Back to: ReactJS Tutorials
Adding Form Inputs in React:
In this article, I am going to discuss Adding Form Inputs in React with Examples. Please read our previous article where we discussed Working with React useState Hook with Examples.
Adding Form Inputs in React:
In our previous articles, we have now fully understood what the state is and how it works. We’ve also understood how we can listen to events. So, we can continue working on our application and turn it into an expense tracker.
Before continuing, we missed one important thing. For example, the capability to gather user input so that users can add their own expenses. This is important for an expense tracker. And up to this point, that’s not possible. So that’s what we’ll work on next. And for that, first of all, we need to add new components to our React app and add a new category of components.
Adding New Expense Component to our React App:
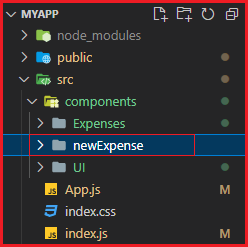
The expense components that we have are all about outputting the expenses or showing these expenses. Now, we want to gather user input and therefore we’ll add a new sub folder in the components folder, and we’ll simply name it ‘newExpense’ because ultimately that will be what the components here are about gathering the input for a new expense.

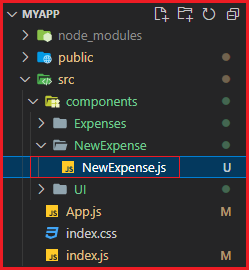
And in the NewExpense folder, we can add a NewExpense.js file which will hold the NewExpense component,

Inside the NewExpense component, we want to render a form where users can enter their expense data. So, here, we’ll add our component function and export NewExpense to make it available inside other components. Then, we will import React from ‘react’. As we mentioned, we don’t need to add it but we will still add it. Since you will see that in many react projects. JSX code uses this react library.

Now, as we mentioned, the goal of this component is to return a form. A form for our input. And we also want to provide some styling around that form. So, first of all, return a div, and then inside of that div return a form as shown below,
import React from 'react';

const NewExpense = () => {
    return <div>
        <form></form>
    </div>
};

export default NewExpense;

Now, let’s add some styling. So, we will add a NewExpense.css file.

Make sure you import NewExpense.css in the NewExpense.js file.
import “./NewExpense.css”;
The code of the NexExpense.css file is attached at the end of this article. Now, let’s add the ‘new-expense’ CSS class to the root div,
<div className=’new-expense’>
Creating a Separate Component for Expense Form:
Let’s work on the form. We will take that form and put it into a separate component so that the form logic lives in its own component. So, we will add an ExpenseForm.js file and in there we will import React from ‘react, we’ll create an ExpenseForm component function and then export that ExpenseForm function.
import React from 'react';
const ExpenseForm = () =>  {};
export default ExpenseForm;

We will also add an ExpenseForm.css file. You will find the CSS code at the end of this article.

In ExpenseForm.js, we have to import the ExpenseForm.css file,
import “./ExpenseForm.css”;
In the ExpenseForm component function, we will return the form element,
return <form></form>
Now, when it comes to structuring the form for gathering expense data, we want to let users enter a title, enter a date, or pick a date with a date picker. And users should be able to enter the amount. So, we’ll need 3 input fields and for styling reasons, we’ll put every input field in a div. So, the first div is the root div which will hold all inputs. We will give this div element ‘new-expense__controls’ class.
Root Div Element of Form:

This is a div that will hold all inputs. Then, inside this root div, we’ll create another div with a class of ‘new-expense__control’ for a single input. See, we have two different classes one is with ‘s’ and another is without ‘s’ i.e. new-expense__controls and new-expense__control. And in there, we will set up a label i.e. Title for the first input, and then add an input of type text with a self-closing tag because these input elements don’t have any content between the opening and closing tags. So, we can write it as a self-closing tag in react.
Div Element for Title:

That’s how we created the first input. These are all just default HTML elements, nothing reacts specifically here, but we’re soon going to add listeners and manage some state with that. So, this is some crucial groundwork that we have to do first.
Now, we have to make another same div for the input of the amount. So, we can copy the above div with the label and title and duplicate it. We will change the label to ‘Amount’, change the type to ‘number’, and add the min & step attribute to ‘0.01’. So, min and step are just default HTML attributes for input elements that control how the element can be used.
Div Element for Amount:

We will duplicate the div element one more time to provide the title and input for the date. In the 3rd div, we set the label as ‘Date’ and type to ‘date’ so that it will automatically give us a date picker. And we will also set up a min date and set this to ‘2023-06-25’ and add a max date which we’ll set to ‘2025-12-31’.
Div Element for Date:

We’re picking the min and max date because later we also want to add a filter where we only provide the years from 2023 to 2025 for filtering. So, we want to make sure that these are also the year expenses that can be set to. You can play around with these values. These are just some example values we’re working on here.
So, we got all these inputs. Now, we need a button to submit the form, and therefore right before the form closes, we’ll add a new div next to the other div which holds the controls. In there, we’ll add a ‘new-expense__actions’ class. And inside div, we’ll add a button where we say ‘Add Expense’ and we’ll set the type of this button to ‘submit’ so that when this button is pressed since it’s inside of this form, this form will be submitted.
Form Submit Button:

There was a lot of work in ExpenseForm.js. Now we can use the ExpenseForm in the NewExpense component. So we will import our ExpenseForm functional component in NewExpense.
import ExpenseForm from ‘./ExpenseForm’;
And then here, we can render ExpenseForm and add it as an HTML element in our NewExpense function.
Render ExpenseForm Component in NewExpense Function:

So, the NewExpense component will render the ExpenseForm component. Now, we want to render the entire NewExpense component in the App.js file, because in there, in the end, we’re combining all these components. In App.js, we will import NewExpense as,
import NewExpense from “./components/newExpense/newExpense”;
That’s the path to this NewExpense JavaScript file. And then inside the return statement, inside the div element, we’ll render NewExpense.
Render NewExpense component in App.js File:

So, if we now save everything, we’ll see the following.

Summary:
Now, we have the form here at the top, which is looking great. Here, the ‘Add Expense’ button is not doing anything. Our next goal is to make sure that we gather the inputs whenever the value in one of these inputs changes. when the form is submitted, we step in, in our code and we take those gathered input values and combine them into a new expense object.
Below is the code of all the files that we have used in this article.
ExpenseForm.css:
.new-expense__controls {
    display: flex;
    flex-wrap: wrap;
    gap: 1rem;
    margin-bottom: 1rem;
    text-align: left;
  }

  .new-expense__control label {
    font-weight: bold;
    margin-bottom: 0.5rem;
    display: block;
  }

  .new-expense__control input {
    font: inherit;
    padding: 0.5rem;
    border-radius: 6px;
    border: 1px solid #ccc;
    width: 20rem;
    max-width: 100%;
  }

  .new-expense__actions {
    text-align: right;
  }
ExpenseForm.js:
import React from "react";
import "./ExpenseForm.css";

const ExpenseForm = () => {
  return (
    <from>
      <div className="new-expense__controls">
        <div className="new-expense__control">
          <label>Title</label>
          <input type="text" />
        </div>
        <div className="new-expense__control">
          <label>Amount</label>
          <input type="number" min="0.01" step="0.01" />
        </div>
        <div className="new-expense__control">
          <label>Date</label>
          <input type="date" min="2023-06-25" max="2025-12-31" />
        </div>
      </div>
      <div className="new-expense__actions">
        <button type="submit">Add Expense</button>
      </div>
    </from>
  );
};

export default ExpenseForm;
NewExpense.css:
.new-expense {
    background-color: #ddaaa3;
    padding: 1rem;
    margin: 2rem auto;
    width: 50rem;
    max-width: 95%;
    border-radius: 12px;
    text-align: center;
    box-shadow: 0 1px 8px rgba(0, 0, 0, 0.25);
  }

  .new-expense button {
    font: inherit;
    cursor: pointer;
    padding: 1rem 2rem;
    border: 1px solid #dd4a36;
    background-color: #dd4a36;
    color: white;
    border-radius: 12px;
    margin-right: 1rem;
  }

  .new-expense button:hover,
  .new-expense button:active {
    background-color: #ff705d;
    border-color: #ff705d;
  }

  .new-expense button.alternative {
    color: #dd3822;
    border-color: transparent;
    background-color: transparent;
  }

  .new-expense button.alternative:hover,
  .new-expense button.alternative:active {
    background-color: #ff8575;
  }
NewExpense.js:
import React from 'react';
import ExpenseForm from './ExpenseForm';
import "./NewExpense.css";

const NewExpense = () => {
    return <div className='new-expense'>
        <ExpenseForm />
    </div>
};

export default NewExpense;
App.js:
import React from "react";
import Expenses from "./components/Expenses/Expenses";
import NewExpense from "./components/NewExpense/NewExpense";

const App = () => {
  const expenses = [
    {
      id: "e1",
      title: "Household Expense",
      amount: 25000,
      date: new Date(2023, 4, 27),
    },
    {
      id: "e2",
      title: "Travel Expense",
      amount: 1300,
      date: new Date(2023, 5, 28),
    },
    {
      id: "e3",
      title: "Education fees",
      amount: 5000,
      date: new Date(2023, 6, 29),
    },
  ];

  return (
    <div>
      <NewExpense />
      <Expenses items={expenses}/>
    </div>
  )
};

// return React.createElement(
//   "div",
//   {},
//   React.createElement("h2", {}, "Hello Coders!"),
//   React.createElement(Expenses, { items: expenses })
// );

export default App;
In the next article, I am going to discuss Listening to User Input in React with Examples. Here, in this article, I try to explain Adding Form Inputs in React with Examples. I hope you enjoy this Adding Form Inputs in React article.

Hi Team,
Can you please share further articles of this react tutorial.
Thanks in advance
Ashutosh
We are working on it. Very soon we will complete this course.
Thanks!