Back to: MySQL Tutorials for Beginners and Professionals
Create a new user using MySQL Workbench
In this article, I am going to discuss how to create a new user in the MySQL database server using MySQL Workbench. Please read our previous article where we discussed how to connect to the MySQL Database Server using Workbench.
Create a new user using MySQL Workbench
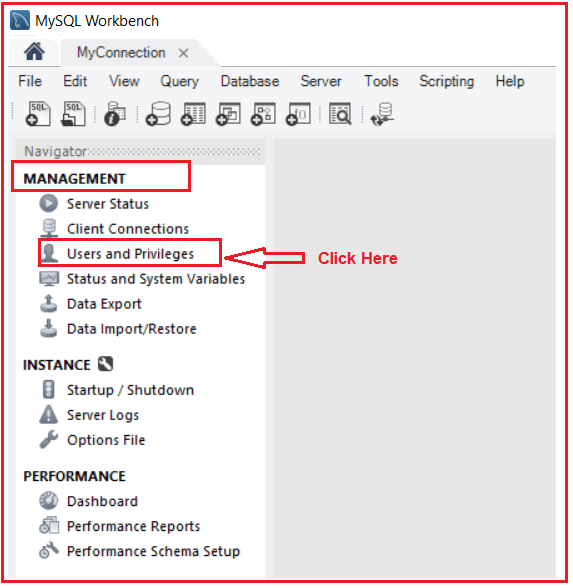
First, log in to the MySQL Server using root user. Once you are logged in to the MySQL Database Server, in the left-hand window, under the ‘MANAGEMENT’ menu, there is a link for ‘Users and Privileges’. Open the ‘Users and Privileges’ window by clicking the link as shown in the below image.

Once you click on the ‘Users and Privileges’ link it will open the below window. On this window, in the center screen, you can see the current users for your MySQL database server. In order to add a new user, click on the ‘Add Account’ button as shown in the below image.

Once you click on the ‘Add Account’ button to add a new user, it will open the below window to enter the new user details. Here, we need to provide the Login Name i.e. the user name as well as we need to provide the password and confirm the password for the new user. Here, I am providing the Login Name as testuser and password as test2123 as shown in the below image.

Then select the Account Limits tab and using this tab we can limit the users to maximum queries, Maximum updates, Maximum connections, and Concurrent Connections.

Then select the Administrative Roles tab and in this tab, we can allow or disallow certain privileges to the new user as shown in the below image. ‘Database Administrative’ (DBA) has all the permission.

Then select the Schema Privileges tab and using this tab, you can also restrict or allow the new users to access certain databases or schemas. Finally, click on the Apply button to save the new user as shown in the below image.

Now close MySQL workbench and try to login again using the new user i.e. testuser credentials. In order to create a new connection in MySQL, click on the + symbol which appeared next to the MySQL Connections as shown in the below image.

Once you click on the + symbol, it will open the below Setup new Connection window. Here, you need to give a name to your connection in the Connection Name text box. I provided the Connection Name as TestConnection. In the parameters tab, enter hostname. The hostname value can be localhost or the local IP address that is 127.0.0.1 and I am provided the port number as 3306. In the username text box, type the username i.e. testuser. testuser is the username that we have just created. Then click on the Store in Vault to set the password as shown in the below image.

Once you click on the Store in Vault to set the password, it will open the below Enter Password window. Here, enters the password which you have set for the testuser and click on the OK button as shown in the below image.

Once you click on the OK button, it will take you back to the previous window. You can also check the test connection by clicking on the Test Connection button. If the connection is successful, then you will get the following message.

Simply click on the OK button from the above popup. Then finally click on the OK button as shown in the below window which will be successfully created a new connection for the new user.

Now, click on the Database -> Connect to Database option as shown in the below image.

It will open the below window. And this time we need to select TestConnection from the Stored Connection window and click on the OK button as shown in the below image. This time it will not ask you to enter the password for testuser as we have saved the password in the vault.

Now depending upon the role assigned to the new user, the user can manage the database from the new account.
In the next article, I am going to discuss how to Create, Alter, and Drop MySQL Database using MySQL Workbench. Here, in this article, I try to explain how to create a new user in MySQL Database Server using MySQL Workbench and I hope you enjoy this how to create a new user in MySQL Database Server using MySQL Workbench article.
