Back to: JavaScript Tutorial For Beginners and Professionals
JavaScript Hoisting with Examples
In this article, I am going to discuss JavaScript Hoisting with Examples. Please read our previous article where we discussed JavaScript Variables with Examples. At the end of this article, you will understand what is JavaScript Hoisting and how to implement this with examples.
What is JavaScript Hoisting?
Hoisting is a JavaScript default behavior that moves the declaration of variables and functions at the top of the current scope. We can use variables and functions before declaring them. Hoisting is applied only for declaration, not initialization. It is required to initialize the variables and functions before using their values.
JavaScript Variable Hoisting:
Let us understand the JavaScript Hoisting concept with an example. Please have a look at the below code. As you can see in the below code, within the if condition, we have declared the variable x and as you might be thinking the following code will give you an error as you are trying to access the variable x outside the if block. This happens in programming languages like C, C++, Java, C#, etc. But in the case of JavaScript, it is not. In JavaScript, there are only two scopes i.e. inside the function (Local Scope) and on the body (Global Scope). So, within the for loop, within the if block, these kinds of scopes do not exist in JavaScript.
<html>
<head>
    <title>JavaScript Hoisting Example</title>
</head>
<body>
    <script>
       "use strict"
       function Fun1()
       {
           if(1 == 1)
           {
               var x = 10;
           }
           console.log("X="+ x);
       }
       Fun1();
    </script>
</body>
Output: Once you run the above code, you will see the x value in the browser console window as expected as shown below.
X=10
So, the point that you need to remember is, if you declare some variable in some kind of scopes like within the if block, within a for loop. Then you can access that variable within the function. So, in JavaScript, there is nothing called if the scope, for scope, or while scope.
Example: Accessing the variable before the if block
In the below example, we are defining the variable x within the if block and accessing the variable before the if block. In that case what will happen? I think you might be thinking the following example will give you an error. No. the following code will not give you any error. Let us first run the code and see the output.
<html>
<head>
    <title>JavaScript Hoisting Example</title>
</head>
<body>
    <script>
       "use strict"
       function Fun1()
       {
           console.log("X="+ x);
           if(1 == 1)
    {
               var x = 10;
    }
       }
       Fun1();
    </script>
</body>
Output: X=undefined
When we execute the above code, we get the x value is undefined.
Why we get undefined? Or why we didn’t get any error?
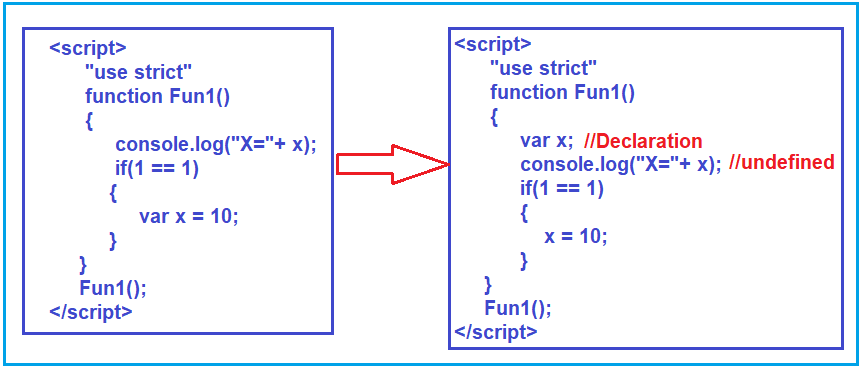
Let us understand why. Even though you have declared the variable inside the if block, what it internally does is, it will move the declaration to the top of the JavaScript code. For a better understanding please have a look at the below image. It automatically moves the declaration to the top. It will not move the initialization part. On the left-hand side, you can see the code which is written by us, and on the right-hand side, the code is generated by JavaScript.

This is the reason why you get undefined as the value of x when you run the application. This is called JavaScript Hoisting. JavaScript Hoisting is a process where if you declare a variable inside a scope, then it will move those declarations at the top.
JavaScript function Hoisting
In the below example, first, the function call statement is there and then the function definition statement is there. When you execute the below code, you will get the output as expected.
<html>
<head>
    <title>JavaScript function Hoisting</title>
</head>
<body>
    <script>
        document.write(addition(10, 20));
        function addition(a, b) {
            return a + b;
        }
    </script>
</body>
</html>
Output: 30
JavaScript Strict Mode
Use strict as the name implies which makes the JavaScript code be executed in strict mode. As we know JavaScript is a scripting language, sometimes the JavaScript code displays the correct result even it has some errors. To overcome this issue, we can use the JavaScript strict mode. Strict mode is declared by using “use strict”; at the start of a script or a function.
Note – The “use strict“; expression can only be placed as the first statement in a script or in a function.
Example without strict mode
In the below example we create the variable x with value 10 but we are not using the keyword var while creating the variable. Here as you can see in the below code, we are not using the strict mode. So, when you will execute the below code you will get the output without any error.
<html>
<head>
    <title>example with strict mode</title>
</head>
<body>
    <script>
        x = 10;
        document.write(x);
        console.log(x);
    </script>
</body>
</html>
Output: 10
Example with strict mode:
The following is the same example as the previous example except here we are using the JavaScript strict mode. When we use strict mode, if we are not using the var keyword to declare the variable, then It will throw an error. In the below code, we are trying to create the variable x without using the var keyword.
<html>
<head>
    <title>Example with strict mode</title>
</head>
<body>
    <script>
        "use strict";
        x = 10;
        document.write(x);
        console.log(x);
    </script>
</body>
</html>
Output: When you execute the above code, you should get the following error in the browser console window.

Example:
Adding numbers using strict mode and throws an error for using duplicate elements.
<head>
    <title>addition example with strict mode</title>
</head>
<body>
    <script>
        console.log(addition(10, 20));
        function addtion(x, x) {
            "use strict";
            return x + x;
        }
    </script>
</body>
</html>
Output:

In the next article, I am going to discuss JavaScript Operators with examples. Here, in this article, I try to explain JavaScript Hoisting with Examples. I hope you enjoy this JavaScript Hoisting with Examples article.
