Back to: ASP.NET Core Identity Tutorials
Customizing AspNetUsers Table in ASP.NET Core Identity
In this article, I will discuss Customizing the AspNetUsers Table in ASP.NET Core Identity. Please read our previous article discussing ASP.NET Core Remote and Client-Side Validation.
Customizing AspNetUsers Table in ASP.NET Core Identity
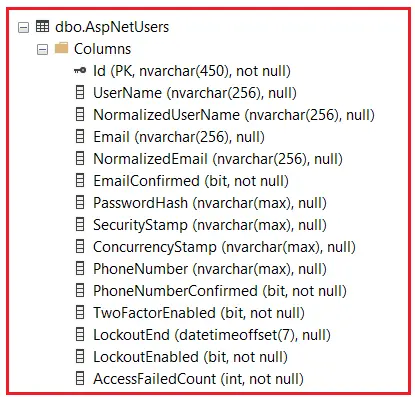
Customizing the AspNetUsers table in ASP.NET Core Identity involves extending the default identity model to include additional properties that match your application’s specific requirements. If you check the ASP.NET Core Identity database, by default, the AspNetUsers table is created with the following columns:

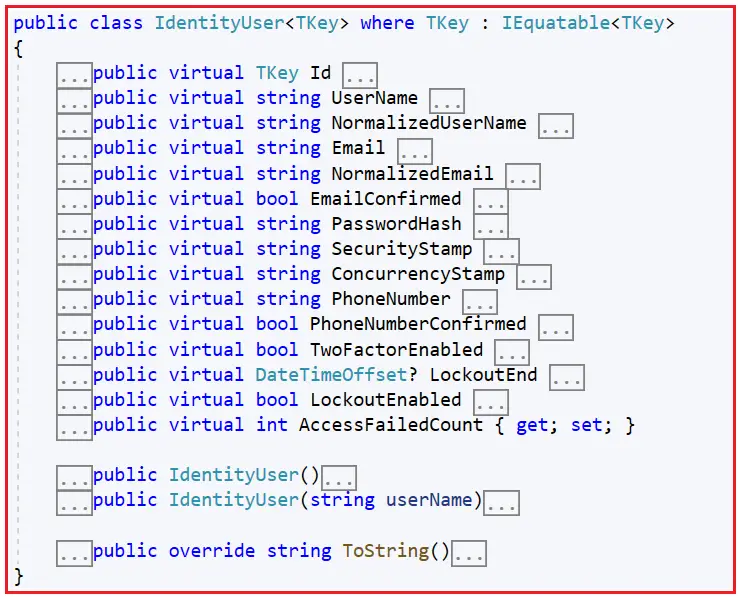
The AspNetUsers Table is created from the following IdentityUser model of ASP.NET Core Identity Framework.

What if I want to store additional data about the user, like First Name, Last Name, Date of Birth, etc? The built-in IdentityUser class does not have these properties. To store custom user data like First Name, Last Name, Date of Birth, etc, we need to extend the IdentityUser class.
Extend IdentityUser Class
So, we need to create a custom class inheriting from the IdentityUser. You can name the class that extends the IdentityUser class anything, but it is recommended that you name it ApplicationUser.
So, create a class file named ApplicationUser.cs within the Models folder and copy and paste the following code. As you can see, the ApplicationUser class extends the IdentityUser class, and we have included two properties in this class. But you can add any number of properties as per your requirements.
using Microsoft.AspNetCore.Identity;
using System.ComponentModel.DataAnnotations;

namespace ASPNETCoreIdentityDemo.Models
{
    public class ApplicationUser : IdentityUser
    {
        public string? FirstName { get; set; }
        public string? LastName { get; set; }
    }
}
Note: If you’re modifying an existing system, consider how these changes will affect existing users.
Replacing IdentityUser with ApplicationUser:
Next, anywhere in your code that you were using the IdentityUser class, please replace it with the ApplicationUser class.
Update DbContext
We need to tell the IdentityDbContext to use our ApplicationUser class instead of the IdentityUser class. To do so, we need to use the generic IdentityDbContext class and we need to specify the ApplicationUser class. This is how the IdentityDbContext class knows it has to work with our custom user class (in this case, ApplicationUser class) instead of the default built-in IdentityUser class.
So, open the ApplicationDbContext.cs class file and copy and paste the following code. As you can see, we are specifying the custom ApplicationUser class to the IdentityDbContext generic class.
namespace ASPNETCoreIdentityDemo.Models
{
    public class ApplicationDbContext : IdentityDbContext<ApplicationUser>
    {
        public ApplicationDbContext(DbContextOptions<ApplicationDbContext> options)
            : base(options)
        {
        }
    }
}
Update Identity Services Configuration
In your Program.cs class file, update the Identity services to use ApplicationUser. So, modify the Program class as follows:
using ASPNETCoreIdentityDemo.Models;
using Microsoft.AspNetCore.Identity;
using Microsoft.EntityFrameworkCore;
using System;

namespace ASPNETCoreIdentityDemo
{
    public class Program
    {
        public static void Main(string[] args)
        {
            var builder = WebApplication.CreateBuilder(args);

            // Add services to the container.
            builder.Services.AddControllersWithViews();

            //Configure Entity Framework Core
            var connectionString = builder.Configuration.GetConnectionString("SQLServerIdentityConnection") ?? throw new InvalidOperationException("Connection string 'SQLServerIdentityConnection' not found.");
            builder.Services.AddDbContext<ApplicationDbContext>(options =>
                options.UseSqlServer(connectionString));

            //Configuration Identity Services
            builder.Services.AddIdentity<ApplicationUser, IdentityRole>(
                options =>
                {
                    // Password settings
                    options.Password.RequireDigit = true;
                    options.Password.RequiredLength = 8;
                    options.Password.RequireNonAlphanumeric = true;
                    options.Password.RequireUppercase = true;
                    options.Password.RequireLowercase = true;
                    options.Password.RequiredUniqueChars = 4;

                    // Other settings can be configured here
                })
                .AddEntityFrameworkStores<ApplicationDbContext>();

            // Configure the Application Cookie settings
            builder.Services.ConfigureApplicationCookie(options =>
            {
                // If the LoginPath isn't set, ASP.NET Core defaults the path to /Account/Login.
                options.LoginPath = "/Account/Login"; // Set your login path here
            });

            var app = builder.Build();

            // Configure the HTTP request pipeline.
            if (!app.Environment.IsDevelopment())
            {
                app.UseExceptionHandler("/Home/Error");
                // The default HSTS value is 30 days. You may want to change this for production scenarios, see https://aka.ms/aspnetcore-hsts.
                app.UseHsts();
            }

            app.UseHttpsRedirection();
            app.UseStaticFiles();

            app.UseRouting();

            //Configuring Authentication Middleware to the Request Pipeline
            app.UseAuthentication();
            app.UseAuthorization();
            app.MapControllerRoute(
                name: "default",
                pattern: "{controller=Home}/{action=Index}/{id?}");

            app.Run();
        }
    }
}
Update Identity-Related Views and Controllers
If you have any views or controllers that refer to the IdentityUser, update them to use ApplicationUser. So, modify the Account Controller as follows:
using ASPNETCoreIdentityDemo.Controllers;
using ASPNETCoreIdentityDemo.Models;
using Microsoft.AspNetCore.Authorization;
using Microsoft.AspNetCore.Identity;
using Microsoft.AspNetCore.Mvc;
using System.Security.Policy;

namespace ASPNETCoreIdentityDemo.Controllers
{
    public class AccountController : Controller
    {
        //userManager will hold the UserManager instance
        private readonly UserManager<ApplicationUser> userManager;

        //signInManager will hold the SignInManager instance
        private readonly SignInManager<ApplicationUser> signInManager;

        //Both UserManager and SignInManager services are injected into the AccountController
        //using constructor injection
        public AccountController(UserManager<ApplicationUser> userManager,
            SignInManager<ApplicationUser> signInManager)
        {
            this.userManager = userManager;
            this.signInManager = signInManager;
        }

        [HttpGet]
        public IActionResult Register()
        {
            return View();
        }

        [HttpPost]
        public async Task<IActionResult> Register(RegisterViewModel model)
        {
            if (ModelState.IsValid)
            {
                // Copy data from RegisterViewModel to ApplicationUser
                var user = new ApplicationUser
                {
                    UserName = model.Email,
                    Email = model.Email
                };

                // Store user data in AspNetUsers database table
                var result = await userManager.CreateAsync(user, model.Password);

                // If user is successfully created, sign-in the user using
                // SignInManager and redirect to index action of HomeController
                if (result.Succeeded)
                {
                    await signInManager.SignInAsync(user, isPersistent: false);
                    return RedirectToAction("index", "home");
                }

                // If there are any errors, add them to the ModelState object
                // which will be displayed by the validation summary tag helper
                foreach (var error in result.Errors)
                {
                    ModelState.AddModelError(string.Empty, error.Description);
                }
            }

            return View(model);
        }

        [HttpGet]
        public IActionResult Login(string? ReturnUrl = null)
        {
            ViewData["ReturnUrl"] = ReturnUrl;
            return View();
        }

        [HttpPost]
        [AllowAnonymous]
        public async Task<IActionResult> Login(LoginViewModel model, string ReturnUrl)
        {
            if (ModelState.IsValid)
            {
                var result = await signInManager.PasswordSignInAsync(model.Email, model.Password, model.RememberMe, lockoutOnFailure: false);

                if (result.Succeeded)
                {
                    // Handle successful login

                    // Check if the ReturnUrl is not null and is a local URL
                    if (!string.IsNullOrEmpty(ReturnUrl) && Url.IsLocalUrl(ReturnUrl))
                    {
                        return Redirect(ReturnUrl);
                    }
                    else
                    {
                        // Redirect to default page
                        return RedirectToAction("Index", "Home");
                    }
                }
                if (result.RequiresTwoFactor)
                {
                    // Handle two-factor authentication case
                }
                if (result.IsLockedOut)
                {
                    // Handle lockout scenario
                }
                else
                {
                    // Handle failure
                    ModelState.AddModelError(string.Empty, "Invalid login attempt.");
                    return View(model);
                }
            }

            // If we got this far, something failed, redisplay form
            return View(model);
        }

        [HttpPost]
        public async Task<IActionResult> Logout()
        {
            await signInManager.SignOutAsync();
            return RedirectToAction("index", "home");
        }

        [AllowAnonymous]
        [HttpPost]
        [HttpGet]
        public async Task<IActionResult> IsEmailAvailable(string Email)
        {
            //Check If the Email Id is Already in the Database
            var user = await userManager.FindByEmailAsync(Email);

            if (user == null)
            {
                return Json(true);
            }
            else
            {
                return Json($"Email {Email} is already in use.");
            }
        }
    }
}
Next, modify the _Layout.cshtml view:
@using Microsoft.AspNetCore.Identity
@inject SignInManager<ApplicationUser> SignInManager
<!DOCTYPE html>
<html lang="en">
<head>
<meta charset="utf-8" />
<meta name="viewport" content="width=device-width, initial-scale=1.0" />
<title>@ViewData["Title"] - ASPNETCoreIdentityDemo</title>
<link rel="stylesheet" href="~/lib/bootstrap/dist/css/bootstrap.min.css" />
<link rel="stylesheet" href="~/css/site.css" asp-append-version="true" />
<link rel="stylesheet" href="~/ASPNETCoreIdentityDemo.styles.css" asp-append-version="true" />
</head>
<body>
<header>
<nav class="navbar navbar-expand-sm navbar-toggleable-sm navbar-light bg-white border-bottom box-shadow mb-3">
<div class="container-fluid">
<a class="navbar-brand" asp-area="" asp-controller="Home" asp-action="Index">Home</a>
<button class="navbar-toggler" type="button" data-bs-toggle="collapse" data-bs-target=".navbar-collapse" aria-controls="navbarSupportedContent"
aria-expanded="false" aria-label="Toggle navigation">
<span class="navbar-toggler-icon"></span>
</button>
<div class="navbar-collapse collapse d-sm-inline-flex justify-content-between">
<ul class="navbar-nav flex-grow-1">
<li class="nav-item">
<a class="nav-link text-dark" asp-area="" asp-controller="Home" asp-action="Privacy">Privacy</a>
</li>
<li class="nav-item">
<a class="nav-link text-dark" asp-area="" asp-controller="Home" asp-action="SecureMethod">Secure</a>
</li>
<li class="nav-item">
<a class="nav-link text-dark" asp-area="" asp-controller="Home" asp-action="NonSecureMethod">Non Secure</a>
</li>
</ul>
<ul class="navbar-nav ml-auto">
@*If the user is signed-in display Logout link*@
@if (SignInManager.IsSignedIn(User))
{
<li class="nav-item">
<form method="post" asp-controller="account" asp-action="logout">
<button type="submit" style="width:auto"
class="nav-link btn btn-link py-0">
Logout @User?.Identity?.Name
</button>
</form>
</li>
}
else
{
<li class="nav-item">
<a class="nav-link" asp-controller="account" asp-action="register">
Register
</a>
</li>
<li class="nav-item">
<a class="nav-link" asp-controller="account" asp-action="login">
Login
</a>
</li>
}
</ul>
</div>
</div>
</nav>
</header>
<div class="container">
<main role="main" class="pb-3">
@RenderBody()
</main>
</div>
<footer class="border-top footer text-muted">
<div class="container">
© 2023 - ASPNETCoreIdentityDemo - <a asp-area="" asp-controller="Home" asp-action="Privacy">Privacy</a>
</div>
</footer>
<script src="~/lib/jquery/dist/jquery.min.js"></script>
<script src="~/lib/jquery-validation/dist/jquery.validate.min.js"></script>
<script src="~/lib/jquery-validation-unobtrusive/jquery.validate.unobtrusive.min.js"></script>
<script src="~/lib/bootstrap/dist/js/bootstrap.bundle.min.js"></script>
<script src="~/js/site.js" asp-append-version="true"></script>
@await RenderSectionAsync("Scripts", required: false)
</body>
</html>
Generate the Migration and Update the Database
After making changes to the Identity Model, we need to create a new Entity Framework migration and update your database schema to reflect these changes. Open the Package Manager Console and Execute the following add-migration and update-database commands. You can give your migration any name. Here, I am giving it IdentityMigration2. The name that you are giving it should not be given earlier.

Now, if you verify the database and check the AspNetUsers table, then you should see the newly added FirstName and LastName columns as shown in the image below:

Customize User Registration Views and Actions:
Now, let us see how to add First Name and Last Name to the AspNetUsers table. So, modify the RegisterViewModel as follows to add the FirstName and LastName properties:
using Microsoft.AspNetCore.Mvc;
using System.ComponentModel.DataAnnotations;
namespace ASPNETCoreIdentityDemo.Models
{
    public class RegisterViewModel
    {
        [Required(ErrorMessage ="First Name is Required")]
        [Display(Name = "First Name")]
        public string FirstName { get; set; }

        [Display(Name = "Last Name")]
        public string? LastName { get; set; }

        [Required]
        [EmailAddress]
        [Remote(action:"IsEmailAvailable", controller: "Account")]
        public string Email { get; set; }

        [Required]
        [DataType(DataType.Password)]
        public string Password { get; set; }

        [DataType(DataType.Password)]
        [Display(Name = "Confirm password")]
        [Compare("Password", ErrorMessage = "Password and confirmation password do not match.")]
        public string ConfirmPassword { get; set; }
    }
}
Modifying the Register View:
Open Register.cshtml view and then copy and paste the following code. Here, we are including the First and Last Name fields.
@model RegisterViewModel

@{
    ViewBag.Title = "User Registration";
}

<h1>User Registration</h1>

<div class="row">
    <div class="col-md-12">
        <form method="post">
            <div asp-validation-summary="All" class="text-danger"></div>
            <div class="form-group">
                <label asp-for="FirstName"></label>
                <input asp-for="FirstName" class="form-control" />
                <span asp-validation-for="FirstName" class="text-danger"></span>
            </div>
            <div class="form-group">
                <label asp-for="LastName"></label>
                <input asp-for="LastName" class="form-control" />
            </div>

            <div class="form-group">
                <label asp-for="Email"></label>
                <input asp-for="Email" class="form-control" />
                <span asp-validation-for="Email" class="text-danger"></span>
            </div>
            <div class="form-group">
                <label asp-for="Password"></label>
                <input asp-for="Password" class="form-control" />
                <span asp-validation-for="Password" class="text-danger"></span>
            </div>
            <div class="form-group">
                <label asp-for="ConfirmPassword"></label>
                <input asp-for="ConfirmPassword" class="form-control" />
                <span asp-validation-for="ConfirmPassword" class="text-danger"></span>
            </div>
            <button type="submit" class="btn btn-primary">Register</button>
        </form>
    </div>
</div>
Modifying the Register Post Action Method:
Next, modify the Register Post Action Method of Account Controller as follows:
[HttpPost]
public async Task<IActionResult> Register(RegisterViewModel model)
{
    if (ModelState.IsValid)
    {
        // Copy data from RegisterViewModel to ApplicationUser
        var user = new ApplicationUser
        {
            UserName = model.Email,
            Email = model.Email,
            FirstName = model.FirstName,
            LastName = model.LastName
        };

        // Store user data in AspNetUsers database table
        var result = await userManager.CreateAsync(user, model.Password);

        // If user is successfully created, sign-in the user using
        // SignInManager and redirect to index action of HomeController
        if (result.Succeeded)
        {
            await signInManager.SignInAsync(user, isPersistent: false);
            return RedirectToAction("index", "home");
        }

        // If there are any errors, add them to the ModelState object
        // which will be displayed by the validation summary tag helper
        foreach (var error in result.Errors)
        {
            ModelState.AddModelError(string.Empty, error.Description);
        }
    }

    return View(model);
}
Testing the Registration Functionality with First and Last Name:
With the above changes in place, run the application and click on the Register link, and it should display the following Register page. So, provide valid details and click on the Register button as shown in the below image:

Now, once you click the Register button, check the database. You should see the newly created user with FirstName and LastName column values, as shown in the below image.

When to Extend IdentityUser Class?
Extending the IdentityUser class in ASP.NET Core Identity is a common approach when you need to include additional information about users that isn’t covered by the default properties. For example, if your application requires storing additional information about the user that is unavailable in the default IdentityUser class, such as a user’s Birth Date, First Name, Last Name, and Address, extending the class allows you to add these properties.
When extending IdentityUser, it’s important to consider the following:
- Database Schema Changes: Adding properties to the IdentityUser class will result in changes to the database schema. Ensure that migrations are properly managed.
- Performance Considerations: More properties on the IdentityUser class can mean more data loaded with each user query, which might impact performance. Optimize as necessary.
- Maintenance and Complexity: Customizations can increase the complexity of your authentication system and might require additional maintenance and testing efforts.
In the next article, I will discuss the Roles Management in ASP.NET Core Identity. In this article, I try to explain how to customize the AspNetUsers Table in ASP.NET Core Identity. I hope you enjoy this Customizing AspNetUsers Table in the ASP.NET Core Identity article.

Thanks