Back to: ASP.NET Core Identity Tutorials
ASP.NET Core Identity Setup
In this article, I will discuss the ASP.NET Core Identity Setup in your ASP.NET Core MVC or ASP.NET Core Web API Applications. I will use SQL Server as the database, Entity Framework Core Code First Approach, ASP.NET Core MVC Application, and ASP.NET Core Identity here.
What is ASP.NET Core Identity
ASP.NET Core Identity is a membership management system that provides login functionality to ASP.NET Core applications. It allows us to create, read, update, and delete user accounts. It supports account confirmation, role-based and claim-based authorization, email confirmation, password recovery, account lockout, and two-factor authentication with SMS and Email. It also supports external authentication like Microsoft, Facebook, Google, etc. We will discuss implementing these features in our upcoming articles.
ASP.NET Core Identity Setup Step-by-Step
Let us proceed and see the step-by-step process of setting up ASP.NET Core Identity in an ASP.NET Core MVC Application.
Step 1: Create a New ASP.NET Core Project
First, create a new ASP.NET Core Project in Visual Studio. Then, select a Web Application or API template, depending on your project requirements. I will show you both the backend and frontend parts. So, I will use the ASP.NET Core Web Application with the Model-View-Controller Project template.
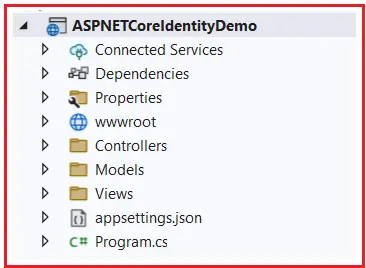
So, create a new ASP.NET Core Application using the ASP.NET Core Web App (Model-View-Project) template and provide the project name ASPNETCoreIdentityDemo. As we discuss everything from scratch, select the Authentication type as None. With this, the project should be created with the following structure.

Step 2: Install Required NuGet Packages for ASP.NET Core Identity
ASP.NET Core Identity needs four packages to be installed in your application. These packages are as follows:
- Microsoft.AspNetCore.Identity.EntityFrameworkCore: This package integrates ASP.NET Core Identity with Entity Framework Core. It provides the necessary implementation to store your user, role, and other identity-related data in a database using EF Core.
- Microsoft.AspNetCore.Identity.UI: This package contains the default UI for ASP.NET Core Identity. It provides pre-built views and controllers for functionalities such as login, registration, password reset, email confirmation, and more. By including this package, developers can quickly scaffold a working user authentication system without writing much code. It allows for customization and extension but gives a solid starting point for handling common authentication tasks.
- Microsoft.EntityFrameworkCore.SqlServer: This package is the Entity Framework Core database provider for Microsoft SQL Server. It allows your application to use Entity Framework Core to interact with SQL Server as its data storage provider. This includes functionality for connecting to a SQL Server, building queries with LINQ, tracking changes, and updating the database. It’s essential for any ASP.NET Core application that uses SQL Server as its database backend.
- Microsoft.EntityFrameworkCore.Tools: This package provides additional tools to help with development tasks related to Entity Framework Core. It includes commands for tasks like migrating databases, scaffolding a database context based on an existing database (database-first approach), and generating code for Entity Framework models based on an existing database.
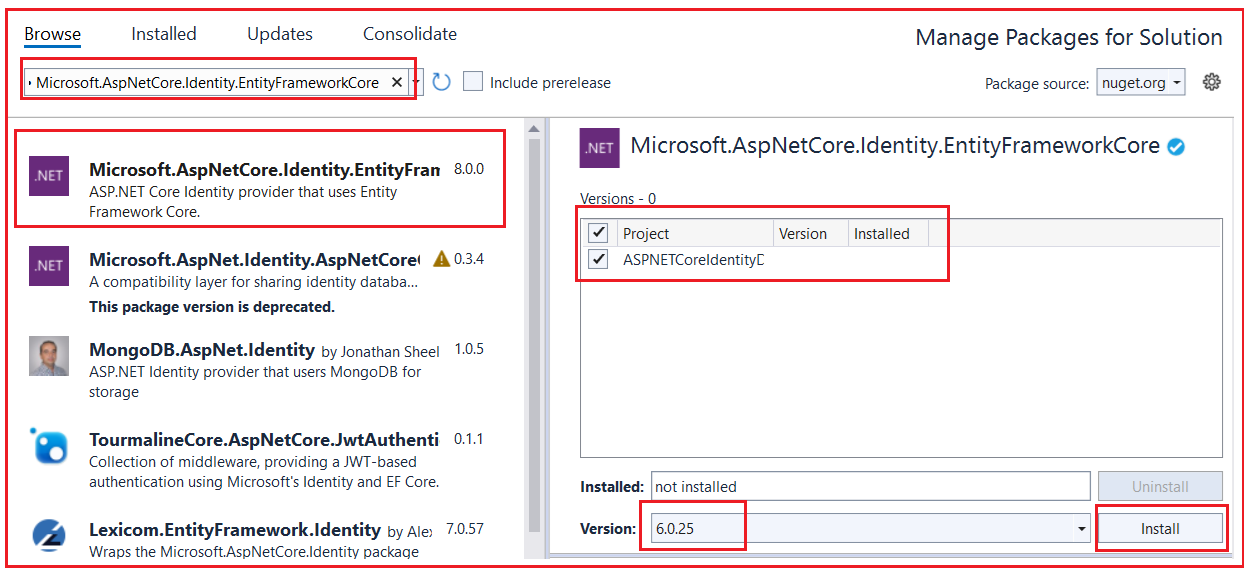
So, open NuGet Package Manager for the solution and search for Microsoft.AspNetCore.Identity.EntityFrameworkCore, and then install the package as shown in the image below.

You need to install the following packages in the same way. While installing the packages, please review the changes and accept the license.
- Microsoft.AspNetCore.Identity.UI
- Microsoft.EntityFrameworkCore.SqlServer (if using SQL Server)
- Microsoft.EntityFrameworkCore.Tools (for migrations)
Once all the packages are installed, your package folder should look as shown below. Here, you can observe all the package versions are 6.0.25.

Step 3: Define the Database Context Class
The IdentityDbContext class in ASP.NET Core Identity plays an important role in integrating the Identity system with Entity Framework Core in ASP.NET Core applications. This class inherits from DbContext in Entity Framework Core and is designed to manage the database context for the identity data. That means the IdentityDbContext provides the necessary setup to manage user authentication and authorization data in a database.
So, our application Context class needs to be inherited from the IdentityDbContext class instead of the DbContext class. This is because IdentityDbContext provides all the DbSet properties needed to manage the Identity Tables in SQL Server. We will see all the tables the ASP.NET Core identity framework generates in just a bit.
So, create a class file named ApplicationDbContext.cs within the Models folder and then copy and paste the following code. Our ApplicationDbContext class is inherited from the IdentityDbContext, and if you go to the definition of IdentityDbContext, you will see it is inherited from the DbContext class.
using Microsoft.AspNetCore.Identity.EntityFrameworkCore;
using Microsoft.EntityFrameworkCore;

namespace ASPNETCoreIdentityDemo.Models
{
    public class ApplicationDbContext : IdentityDbContext
    {
        public ApplicationDbContext(DbContextOptions<ApplicationDbContext> options)
            : base(options)
        {
        }
    }
}
Step 4: Configure ASP.NET Core Identity Services
The next step is to configure the ASP.NET Core Identity services to the built-in dependency injection container. The AddIdentity method configures the Identity system in the ASP.NET Core application. It registers the necessary services for the Identity system to work with user authentication and authorization in the ASP.NET Core application.
AddIdentity Method in ASP.NET Core Identity:
The AddIdentity Method registers the required ASP.NET Core Identity services into the dependency injection (DI) container. The AddIdentity method requires two type parameters – one for the user and one for the role. You can directly specify IdentityUser and IdentityRole classes or any types derived from IdentityUser and IdentityRole, respectively.
The AddIdentity Method also allows us to specify various configuration options for the identity system, such as password strength requirements, lockout settings, user validation rules, etc. As we progress in this course, we will see all these options. So, please add the following code within the Program class.
builder.Services.AddIdentity<IdentityUser, IdentityRole>()
                    .AddEntityFrameworkStores<ApplicationDbContext>();
ASP.NET Core Identity provides the IdentityUser class, which contains properties to store user information such as UserName, PasswordHash, Email, etc. By default, the ASP.NET Core Identity framework uses this class to manage registered users of your application.
If you want to store additional information about the registered users, like their Gender, City, First Name, Last Name, etc., we need to create a custom class that derives from the IdentityUser class. Add the additional properties you need within the custom class and then use that custom class instead of the built-in IdentityUser class while registering the Identity service. We will discuss how to do this in our upcoming articles.
Similarly, IdentityRole is a built-in class provided by ASP.NET Core Identity that contains Role information. Like the IdentityUser class, we can also customize the IdentityRole class.
We want to store and retrieve the User and Role information of the registered users using EntityFrameWork Core from the underlying SQL Server database. We specify this using AddEntityFrameworkStores<ApplicationDbContext>(), passing our application DbContext class as the generic argument.
Alternatives: In addition to AddIdentity, we can also use AddIdentityCore, which adds only the core parts of the Identity system. This provides a lighter option if you don’t need the full services like user interface (UI) login functionality, which is used in the ASP.NET Core Web API Application.
Step 5: Configure Entity Framework Core
In your Program.cs file, configure Entity Framework Core. To register the Entity Framework Core, add the following code to the Program class.
var connectionString = builder.Configuration.GetConnectionString("SQLServerIdentityConnection ") ?? throw new InvalidOperationException("Connection string 'SQLServerIdentityConnection' not found.");
builder.Services.AddDbContext<ApplicationDbContext>(options =>
    options.UseSqlServer(connectionString));
In this code, AddDbContext<ApplicationDbContext> registers your DbContext with the DI container. options.UseSqlServer(…) configures EF Core to use SQL Server with the connection string defined in your appsettings.json file.
Step 6: Configuring Connection String in AppSettings.json file:
Next, open the appsettings.json file and copy and paste the following code. Here, we are providing the connection string name SQLServerIdentityConnection, which we used in our Program class.
{
  "ConnectionStrings": {
    "SQLServerIdentityConnection": "Server=LAPTOP-6P5NK25R\\SQLSERVER2022DEV;Database=IdentityCoreDB;Trusted_Connection=True;TrustServerCertificate=True;"
  },
  "Logging": {
    "LogLevel": {
      "Default": "Information",
      "Microsoft.AspNetCore": "Warning"
    }
  },
  "AllowedHosts": "*"
}
Step 7. Add Authentication Middleware to the Request Pipeline
In the Program.cs class file, add app.UseAuthentication() and app.UseAuthorization() middleware components to the Request Processing Pipeline to enable identity. We want to authenticate users before the request reaches the MVC middleware. So, it is important to add authentication middleware before the MVC middleware in the request processing pipeline. So, the complete code of our Program class should look like below:
using ASPNETCoreIdentityDemo.Models;
using Microsoft.AspNetCore.Identity;
using Microsoft.EntityFrameworkCore;
using System;

namespace ASPNETCoreIdentityDemo
{
    public class Program
    {
        public static void Main(string[] args)
        {
            var builder = WebApplication.CreateBuilder(args);

            // Add services to the container.
            builder.Services.AddControllersWithViews();

            //Configure Entity Framework Core
            var connectionString = builder.Configuration.GetConnectionString("SQLServerIdentityConnection") ?? throw new InvalidOperationException("Connection string 'SQLServerIdentityConnection' not found.");
            builder.Services.AddDbContext<ApplicationDbContext>(options =>
                options.UseSqlServer(connectionString));

            //Configuration Identity Services
            builder.Services.AddIdentity<IdentityUser, IdentityRole>()
                    .AddEntityFrameworkStores<ApplicationDbContext>();

            var app = builder.Build();

            // Configure the HTTP request pipeline.
            if (!app.Environment.IsDevelopment())
            {
                app.UseExceptionHandler("/Home/Error");
                // The default HSTS value is 30 days. You may want to change this for production scenarios, see https://aka.ms/aspnetcore-hsts.
                app.UseHsts();
            }

            app.UseHttpsRedirection();
            app.UseStaticFiles();

            app.UseRouting();

            //Configuring Authentication Middleware to the Request Pipeline
            app.UseAuthentication();
            app.UseAuthorization();

            //MVC Middleware
            app.MapControllerRoute(
                name: "default",
                pattern: "{controller=Home}/{action=Index}/{id?}");

            app.Run();
        }
    }
}
Step 8. Create ASP.NET Core Identity Database Schema
Next, we need to generate the Migration file and Update the database. Open the Package Manager Console and Execute the following add-migration and update-database commands. You can give your migration any name. Here, I am giving it IdentityMigration1. The name that you are giving it should not be given earlier.

Now, if you verify the database, you should see the following tables in the IdentityCoreDB database. In our next article, we will discuss all these database tables in detail.

Differences Between AddIdentity and AddIdentityCore in ASP.NET Core Identity
In ASP.NET Core Identity, AddIdentity and AddIdentityCore are two methods used to register the identity services into the built-in dependency injection container, but they serve different purposes and have different scopes of functionality. Let us understand the differences between them:
AddIdentity:
- AddIdentity is used to add the full identity system to the application, including user and role management and UI support.
- It registers services like UserManager, RoleManager, SignInManager, and others essential for handling user and role operations.
- It is ideal for applications where a complete identity system with user interface components for registration, login, etc., is required.
- Typically, AddIdentity is used in ASP.NET Core MVC applications where views and controllers are used.
AddIdentityCore:
- This method is useful when you need the basic identity functionality without the additional overhead of the full identity system.
- AddIdentityCore registers only the core services of ASP.NET Core Identity, such as UserManager and RoleManager.
- It does not register services related to sign-in, cookies, or any UI components.
- It’s ideal for API-based projects (like ASP.NET Core Web API) where we manage the authentication flow (like token-based authentication) and do not require the built-in UI and cookie-based authentication mechanisms.
In the next article, I will discuss ASP.NET Core Identity Tables and their usage in detail. In this article, I try to explain ASP.NET Core Identity Setup in ASP.NET Core MVC or Web Applications. I hope you enjoy this ASP.NET Core Identity Setup in ASP.NET Core MVC or Web Applications article.
Registration Open – Microservices with ASP.NET Core Web API
Session Time: 6:30 AM – 8:00 AM IST
Advance your career with our expert-led, hands-on live training program. Get complete course details, the syllabus, registration, and Zoom credentials for demo sessions via the links below.

If update-database produces an error that includes “The server was not found or was not accessible.”, try:
1. Run remove-migration
2. In the connection string from step 5, replace “LAPTOP-6P5NK25R” with “(localdb)”
3. Try Step 8 again
If add-migration produces the error “Error: Connection string ‘SQLServerIdentityConnection’ not found.”, go back to Step 5 and remove the space from the end of “SQLServerIdentityConnection “.
Thanks😍😍