Back to: ASP.NET Core Identity Tutorials
Add or Remove Role Claims in ASP.NET Core Identity
In this article, I will discuss Managing Role Claims, i.e., How to Add or Remove Role Claims in ASP.NET Core Identity. Please read our previous article discussing How to Implement Role and Claim-Based Authorization in ASP.NET Core MVC Views.
How to Add or Remove Claims for a Role Using ASP.NET Core Identity?
In our next article, we will see how to implement Role Claim-Based Authorization in ASP.NET Core Identity. In this article, we will see How to Add or Remove Claims for a Role using ASP.NET Core Identity.
Adding or removing claims for a role in ASP.NET Core Identity involves a few key steps. ASP.NET Core Identity is a membership system that adds login functionality to ASP.NET Core applications. It supports user authentication and authorization through roles and claims. Claims are used to store additional user data, such as email, name, or even custom data relevant to your application, which can be used for authorization purposes.
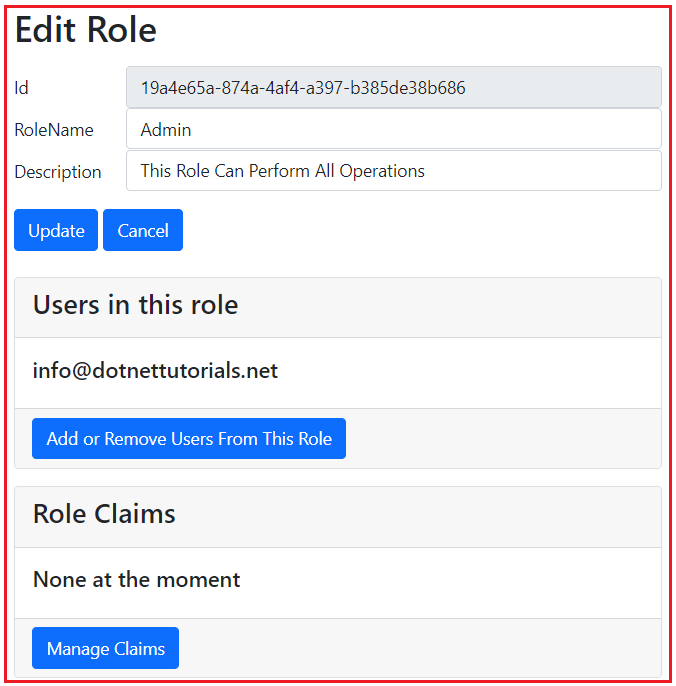
On the EditRole view, we have to add the Manage Claims button, as shown in the below image. We are not adding any Claims for any role, so it is currently showing None. Once we have added claims for this role, those claims will be shown here.

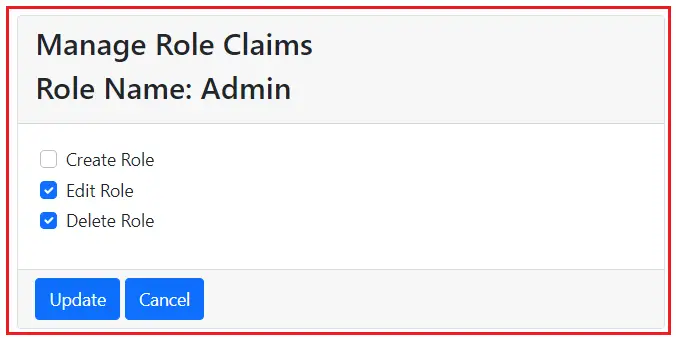
Clicking the Manage Claims button will redirect us to the ManageRoleClaims action, passing the RoleId. The ManageRoleClaims view should look as shown below. This view displays the list of all claims in our application. If you want to add a claim to the user, check the checkbox. Otherwise, leave it unchecked. Already included claims will be in the selected mode. Suppose you select the Edit and Delete Role checkboxes and click the Update button, as shown in the image below.

Once you click on the Update button, it should add the Claims to the AspNetRoleClaims database table and redirect to the Edit Role View page, and this time, it should display the assigned Claims for this Role, as shown in the image below.

Role claims are stored in the AspNetRoleClaims Identity table. So, once the Update button is clicked, the data should be updated in the underlying AspNetRoleClaims database table, as shown in the image below.

Note: When we assign claims to Role, they also apply to users. You need to remember that the users who belong to the above role also have the assigned claims.
Modify EditRoleViewModel
Please modify the EditRoleViewModel.cs class file as follows. Here, we are adding the Claims property to hold the list of assigned claims of a role.
using System.ComponentModel.DataAnnotations;

namespace ASPNETCoreIdentityDemo.Models
{
    public class EditRoleViewModel
    {
        [Required]
        public string Id { get; set; }
        [Required(ErrorMessage = "Role Name is Required")]
        public string RoleName { get; set; }

        public string? Description { get; set; }

        public List<string>? Users { get; set; }

        public List<string>? Claims { get; set; }

    }
}
Modify EditRole HttpGet Action Method
Please modify the EditRole HttpGet Action Method of the Administration Controller as follows. Here, we are fetching all the assigned claims of the role using the GetClaimsAsync method and storing the claims inside the Claims property of the EditRoleViewModel instance.
[HttpGet]
public async Task<IActionResult> EditRole(string roleId)
{
    //First Get the role information from the database
    ApplicationRole role = await _roleManager.FindByIdAsync(roleId);
    if (role == null)
    {
        // Handle the scenario when the role is not found
        return View("Error");
    }

    //Populate the EditRoleViewModel from the data retrived from the database
    var model = new EditRoleViewModel
    {
        Id = role.Id,
        RoleName = role.Name,
        Description = role.Description
        // You can add other properties here if needed
    };

    //Initialize the Users and Claims Property to avoid Null Reference Exception while Add the user name
    model.Users = new List<string>();
    model.Claims = new List<string>();

    // Gets a list of claims associated with the specified role.
    var roleClaims = await _roleManager.GetClaimsAsync(role);
    model.Claims = roleClaims.Select(c => c.Value).ToList();

    // Retrieve all the Users
    foreach (var user in _userManager.Users.ToList())
    {
        // If the user is in this role, add the username to
        // Users property of EditRoleViewModel.
        // This model object is then passed to the view for display
        if (await _userManager.IsInRoleAsync(user, role.Name))
        {
            model.Users.Add(user.UserName);
        }
    }

    return View(model);
}
Modify EditRole View
Please modify the EditRole.cshtml View as follows. Here, we add a section to display the list of assigned claims. Also, we have added a link to manage the Claims of a role. On clicking the Manage Claims button, we navigate to the ManageRoleClaims action method of the Administration controller.
@model EditRoleViewModel

@{
    ViewBag.Title = "Edit Role";
}

<h1>Edit Role</h1>

<form method="post" class="mt-3">
    <div class="form-group row">
        <input type="hidden" asp-for="Id" />
        <label asp-for="Id" class="col-sm-2 col-form-label"></label>
        <div class="col-sm-10">
            <input asp-for="Id" disabled class="form-control">
        </div>
    </div>
    <div class="form-group row">
        <label asp-for="RoleName" class="col-sm-2 col-form-label"></label>
        <div class="col-sm-10">
            <input asp-for="RoleName" class="form-control">
            <span asp-validation-for="RoleName" class="text-danger"></span>
        </div>
    </div>

    <div class="form-group row">
        <label asp-for="Description" class="col-sm-2 col-form-label"></label>
        <div class="col-sm-10">
            <input asp-for="Description" class="form-control">
        </div>
    </div>

    <div asp-validation-summary="All" class="text-danger"></div>

    <div class="form-group row">
        <div class="col-sm-10">
            <button type="submit" class="btn btn-primary">Update</button>
            <a asp-action="ListRoles" class="btn btn-primary">Cancel</a>
        </div>
    </div>
    <br/>
    <div class="card">
        <div class="card-header">
            <h3>Users in this role</h3>
        </div>
        <div class="card-body">
            @if (Model.Users != null && Model.Users.Any())
            {
                foreach (var user in Model.Users)
                {
                    <h5 class="card-title">@user</h5>
                }
            }
            else
            {
                <h5 class="card-title">None at the moment</h5>
            }
        </div>

        <div class="card-footer">
            <a asp-controller="Administration" asp-action="EditUsersInRole"
               asp-route-roleId="@Model.Id" class="btn btn-primary">
                Add or Remove Users From This Role
            </a>
        </div>
    </div>

    <div class="card mt-3">
        <div class="card-header">
            <h3>Role Claims</h3>
        </div>
        <div class="card-body">
            @if (Model.Claims.Any())
            {
                foreach (var claim in Model.Claims)
                {
                    <h5 class="card-title">@claim</h5>
                }
            }
            else
            {
                <h5 class="card-title">None at the moment</h5>
            }
        </div>
        <div class="card-footer">
            <a asp-action="ManageRoleClaims" asp-controller="Administration" asp-route-RoleId="@Model.Id"
               style="width:auto" class="btn btn-primary">
                Manage Claims
            </a>
        </div>
    </div>
</form>
RoleClaim Class
Create a class file named RoleClaim.cs and copy and paste the following code. This class contains two properties. The ClaimType is the claim, and the IsSelected property determines if the Claim is selected on the UI. This class will be used by the View Model to store the role claim information.
namespace ASPNETCoreIdentityDemo.Models
{
    public class RoleClaim
    {
        public string ClaimType { get; set; }
        public bool IsSelected { get; set; }
    }
}
RoleClaimsViewModel Class
Create a class file named RoleClaimsViewModel.cs and copy and paste the following code. This RoleClaimsViewModel class carries the data from the controller action to the view and vice versa. Regarding this view, there is a one-to-many relationship from the role to the claim. That means one role can have many claims.
namespace ASPNETCoreIdentityDemo.Models
{
    public class RoleClaimsViewModel
    {
        public RoleClaimsViewModel()
        {
            //To Avoid runtime exception, we are initializing the Cliams property
            Claims = new List<RoleClaim>();
        }
        public string RoleId { get; set; }
        public List<RoleClaim> Claims { get; set; }
    }
}
HttpGet ManageRoleClaims Action
Next, add the following HttpGet ManageRoleClaims Action method within the Administration Controller. The following code is self-explained, so please go through the comment lines.
[HttpGet]
public async Task<IActionResult> ManageRoleClaims(string RoleId)
{
    //First, fetch the Role Details Based on the RoleId
    var role = await _roleManager.FindByIdAsync(RoleId);

    if (role == null)
    {
        //handle if the role is not Exists in the database
        ViewBag.ErrorMessage = $"Role with Id = {RoleId} cannot be found";
        return View("NotFound");
    }

    //Storing the Role Name in the ViewBag for Display Purpose
    ViewBag.RoleName = role.Name;

    //Create RoleClaimsViewModel Instance
    var model = new RoleClaimsViewModel
    {
        RoleId = RoleId
    };

    // RoleManager service GetClaimsAsync method gets all the current claims of the role
    var existingRoleClaims = await _roleManager.GetClaimsAsync(role);

    // Loop through each claim we have in our application
    // Call the GetAllClaims Static Method ClaimsStore Class
    foreach (Claim claim in ClaimsStore.GetAllClaims())
    {
        //Create an Instance of RoleClaim class
        RoleClaim roleClaim = new RoleClaim
        {
            ClaimType = claim.Type
        };

        // If the Role has the claim, set IsSelected property to true, so the checkbox
        // next to the claim is checked on the UI
        if (existingRoleClaims.Any(c => c.Type == claim.Type))
        {
            roleClaim.IsSelected = true;
        }
        //By default, the IsSelected is False, no need to set as false

        //Add the roleClaim to RoleClaimsViewModel Instance
        model.Claims.Add(roleClaim);
    }

    return View(model);
}
In the above code,
- The FindByIdAsync method is used to find and retrieve a role from the identity system based on the role’s unique identifier (ID).
- The GetClaimsAsync(user) method retrieves all claims associated with the given role.
- ClaimsStore.GetAllClaims() method will return all the claims associated with the application.
- Then, we check which claims are already assigned to the role and set the IsSelected property value accordingly.
ManageRoleClaims View
Next, add a view named ManageRoleClaims.cshtml within the /Views/Administration directory, and copy and paste the following code. The model for this view is RoleClaimsViewModel.
@model RoleClaimsViewModel
<form method="post" asp-controller="Administration" asp-action="ManageRoleClaims">
    <div class="card">
        <div class="card-header">
            <h2>Manage Role Claims</h2>
            <h2>Role Name: @ViewBag.RoleName</h2>
        </div>
        <div class="card-body">
            <input type="hidden" asp-for="@Model.RoleId" />
            @for (int i = 0; i < Model.Claims.Count; i++)
            {
                <div class="form-check m-1">
                    <input type="hidden" asp-for="@Model.Claims[i].ClaimType" />
                    <input asp-for="@Model.Claims[i].IsSelected" class="form-check-input" />
                    <label class="form-check-label" asp-for="@Model.Claims[i].IsSelected">
                        @Model.Claims[i].ClaimType
                    </label>
                </div>
            }
            <div asp-validation-summary="All" class="text-danger"></div>
        </div>
        <div class="card-footer">
            <input type="submit" value="Update" class="btn btn-primary"
                   style="width:auto" />
            <a asp-action="EditRole" asp-route-UserId="@Model.RoleId"
               class="btn btn-primary" style="width:auto">Cancel</a>
        </div>
    </div>
</form>
HttpPost ManageRoleClaims Action
Next, add the following HttpPost ManageRoleClaims Action method within the Administration Controller.
[HttpPost]
public async Task<IActionResult> ManageRoleClaims(RoleClaimsViewModel model)
{
    //First fetch the Role Details
    var role = await _roleManager.FindByIdAsync(model.RoleId);

    if (role == null)
    {
        ViewBag.ErrorMessage = $"Role with Id = {model.RoleId} cannot be found";
        return View("NotFound");
    }

    // Get all the existing claims of the role
    var claims = await _roleManager.GetClaimsAsync(role);


    for (int i = 0; i < model.Claims.Count; i++)
    {
        Claim claim = new Claim(model.Claims[i].ClaimType, model.Claims[i].ClaimType);

        IdentityResult? result;

        if (model.Claims[i].IsSelected && !(claims.Any(c => c.Type == claim.Type)))
        {
            //If IsSelected is true and User is not already in this role, then add the user
            //result = await _userManager.AddToRoleAsync(user, role.Name);
            result = await _roleManager.AddClaimAsync(role, claim);
        }
        else if (!model.Claims[i].IsSelected && claims.Any(c => c.Type == claim.Type))
        {
            //If IsSelected is false and User is already in this role, then remove the user
            result = await _roleManager.RemoveClaimAsync(role, claim);
        }
        else
        {
            //Don't do anything simply continue the loop
            continue;
        }

        //If you add or remove any user, please check the Succeeded of the IdentityResult
        if (result.Succeeded)
        {
            if (i < (model.Claims.Count - 1))
                continue;
            else
                return RedirectToAction("EditRole", new { roleId = model.RoleId });
        }
        else
        {
            ModelState.AddModelError("", "Cannot add or removed selected claims to role");
            return View(model);
        }
    }
    return RedirectToAction("EditRole", new { roleId = model.RoleId });
}
In this example,
- _roleManager.FindByIdAsync(model.RoleId): This method will return the role associated with the specified roleId if any, from the AspNetRoles identity table.
- _roleManager.GetClaimsAsync(role): This method retrieves a list of claims associated with the specified role from the AspNetRoleClaims table.
- _roleManager.AddClaimAsync(role, claim): This method adds a claim to a role in the AspNetRoleClaims table.
- _roleManager.RemoveClaimAsync(role, claim): This method removes a claim from a role from the AspNetRoleClaims table.
Note: The RoleManager class in ASP.NET Core Identity doesn’t provide a direct method to remove all claims from a role. You will have to retrieve all claims for the role first and then remove them one by one.
In the next article, I will discuss Role-Based Claims Authorization in ASP.NET Core Identity. In this article, I explain How to Add or Remove Role Claims in ASP.NET Core Identity. I hope you enjoy this article, Manage Role Claims in ASP.NET Core Identity.
