Back to: ASP.NET Core Identity Tutorials
ASP.NET Core Secret Manager, i.e., secrets.json file
In this article, I will discuss ASP.NET Core Secret Manager, i.e., secrets.json file. Please read our previous article discussing How to Integrate Facebook External Authentication in ASP.NET Core MVC.
What is ASP.NET Core Secret Manager?
The ASP.NET Core Secret Manager is a tool provided by ASP.NET Core that helps us to securely store and retrieve sensitive configuration data, such as Connection Strings, API keys, Encryption Keys, External Provider’s API ID, and Secrets, or any sensitive information, during the development phase of an application. Instead of hardcoding these values in your application or configuration files, the Secret Manager allows you to store them securely in a local user-secrets store.
When to Use Secret Manager?
- It allows us to store these secrets outside of our source code, enhancing security and preventing accidental exposure of sensitive data in source control repositories.
- It’s designed for local development and should not be used for storage of production secrets (for production, consider using services such as Azure Key Vault or similar secure stores).
- Secrets are stored in a local store on your development machine, typically in a JSON file, and not committed to source control.
- It integrates seamlessly with the configuration system in ASP.NET Core applications, enabling you to retrieve secrets directly from your configuration.
Note: Now, I will discuss using Secret Manager to store sensitive information in the development environment. The most important point you must remember is that the Secret Manager will only work in the Development Environment, not in Production or Staging Environments. For production, you can make use of Azure Key Vault, AWS Secrets Manager, or a similar storage mechanism.
How Do We Create Secret Manager in ASP.NET Core?
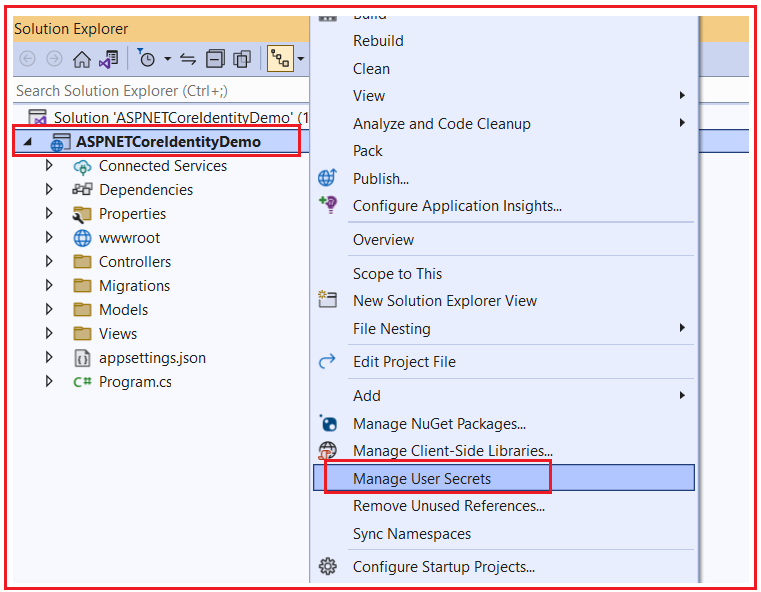
To add a Secret Manager file, right-click on the project name in Solution Explorer in Visual Studio and select Manage User Secrets from the context menu, as shown in the image below.

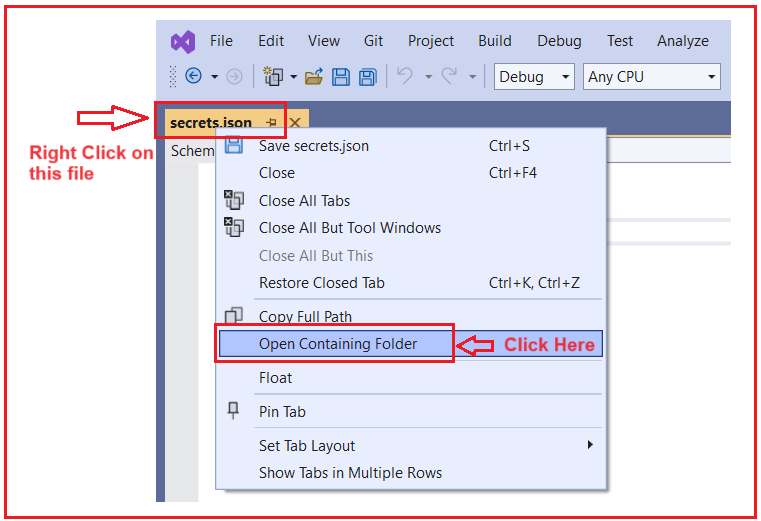
This will add secrets.json file as shown in the below image. The structure of this file is similar to the appSettings.json file. However, the important point to keep in mind is this file is not part of the project folder. It is located outside of the project folder. To find the secrets.json file location, right-click on the secrets.json file and select the Open Containing Folder option, as shown in the below image.

This will open the following:

The following is the complete path: C:\Users\Pranaya\AppData\Roaming\Microsoft\UserSecrets\f72c5352-702f-4e57-838a-6c850da74f72
So, we can say the path for the secrets.json file is as follows: C:\Users\{UserName}\AppData\Roaming\Microsoft\UserSecrets\{ID}
Here,
- {UserName} is the windows User Name that you use to log into the computer, in my case, it is Pranaya.
- {ID} is a GUID (Globally Unique Identifier), and in my case, it is f72c5352-702f-4e57-838a-6c850da74f72
On a single computer or on your machine, you may have multiple ASP.NET Core projects, and for each project, you can create a separate secrets.json file. This GUID links a given secrets.json file to a given ASP.NET Core project.
How does the ASP.NET Core Project link with this Secret File?
To establish the link between the ASP.NET Core Project and the secrets.json file, ASP.NET Core adds the following UserSecretsId node in the project file, i.e., .csproj file. To see this, right-click on your project and click on the Edit Project File option from the context menu. The value of UserSecretsId is nothing but the GUID value of the secrets.json file.

Using Secret Manager to Store Sensitive Data:
Let us see how we can use Secret Manager to store sensitive information about our application like database connection string, Facebook, Google, and Microsoft App ID and Secret. So, modify the secrets.json file as follows. Please replace the value of each key with its actual value.
{
  "ConnectionStrings:SQLServerIdentityConnection": "[Your Database Connection String]",

  "Facebook:AppId": "[Your Facebook Client ID]",
  "Facebook:AppSecret": "[Your Facebook Client Secret]",

  "Microsoft:AppId": "[Your Microsoft Client ID]",
  "Microsoft:AppSecret": "[Your Microsoft Client Secret]",

  "Google:AppId": "[Your Google Client ID]",
  "Google:AppSecret": "[Your Google Client Secret]"
}
Next, we need to see how to fetch the data from the secrets.json file. Using the same Configuration Manager, we can read the data from the secrets.json file.
Reading the External API ID and Secrets:
var GoogleClientId = builder.Configuration["Google:AppId"];
var GoogleClientSecret = builder.Configuration["Google:AppSecret"];

var MicrosoftClientId = builder.Configuration["Microsoft:AppId"];
var MicrosoftClientSecret = builder.Configuration["Microsoft:AppSecret"];

var FacebookClientId = builder.Configuration["Facebook:AppId"];
var FacebookClientSecret = builder.Configuration["Facebook:AppSecret"];

builder.Services.AddAuthentication()
.AddGoogle(options =>
{
    options.ClientId = GoogleClientId;
    options.ClientSecret = GoogleClientSecret;
})
.AddMicrosoftAccount(microsoftOptions =>
{
    microsoftOptions.ClientId = MicrosoftClientId;
    microsoftOptions.ClientSecret = MicrosoftClientSecret;
})
.AddFacebook(facebookOptions =>
{
    facebookOptions.ClientId = FacebookClientId;
    facebookOptions.ClientSecret = FacebookClientSecret;
});
Setting the Environment to Development:
Secret Manager isn’t for staging or production servers; it should only be used in the development environment. For production, always use either environment variables, Azure Key Vault, or 3rd party production secret management system. So, please set the environment to Development before running the application.
Once you set the Environment to Development, run the application, and it should work as expected. But if you set the environment to Staging or Production, it will not work, and in that case, if you want to store the same in the appSettings.json file, then you need to modify the appSettings.json file as follows:
{
  "ConnectionStrings": {
    "SQLServerIdentityConnection": "Server=LAPTOP-6P5NK25R\\SQLSERVER2022DEV;Database=IdentityCoreDB;Trusted_Connection=True;TrustServerCertificate=True;"
  },
  "Logging": {
    "LogLevel": {
      "Default": "Information",
      "Microsoft.AspNetCore": "Warning"
    }
  },
  "AllowedHosts": "*",
   "Facebook:AppId": "[Your Facebook Client ID]",
  "Facebook:AppSecret": "[Your Facebook Client Secret]",

  "Microsoft:AppId": "[Your Microsoft Client ID]",
  "Microsoft:AppSecret": "[Your Microsoft Client Secret]",

  "Google:AppId": "[Your Google Client ID]",
  "Google:AppSecret": "[Your Google Client Secret]"
}
Configuration File Reading Order in ASP.NET Core
In ASP.NET Core, the configuration system is very flexible, allowing you to read configuration settings from various sources like secrets.json file, appSettins.json file, environment variables, command-line arguments, etc. The order in which these configurations are read and applied is important, as later configurations will override earlier ones. The following is the typical order in which configurations are read in an ASP.NET Core application:
- appsettings.json: This is the standard configuration file in JSON format. It’s read first and provides a basic configuration structure.
- appsettings.{Environment}.json: Environment-specific settings are placed in these files. {Environment} is typically set to values like Development, Staging, or Production. This file is read after appsettings.json, and its settings will override those in appsettings.json for the corresponding environment.
- secrets.json: This is used in development mode (when the ASPNETCORE_ENVIRONMENT is set to Development). User secrets are stored outside of the project and are not checked into source control. The settings in this file override those in appsettings.json and appsettings.{Environment}.json.
- Environment Variables: Configuration settings in environment variables are read next. These are key-value pairs set in the environment of the system running the application. They can be used to override settings for all environments and are particularly useful for managing settings in production.
- Command-line Arguments: Lastly, configuration settings can be provided via command-line arguments when the application is started. These will override all the previous settings.
Note: It’s important to remember that the Secret Manager tool is intended for development purposes only. It’s not suitable for managing secrets in production environments. For production, you should consider more secure methods like environment variables, Azure Key Vault, or other secure storage mechanisms.
In the next article, I will discuss Configuring Email Services in ASP.NET Core Identity. In this article, I explain ASP.NET Core Secret Manager. I hope you enjoy this article, ASP.NET Core Secret Manager.
