Back to: AWS Tutorials For Beginners and Professionals
IAM MFA Hands-On in AWS:
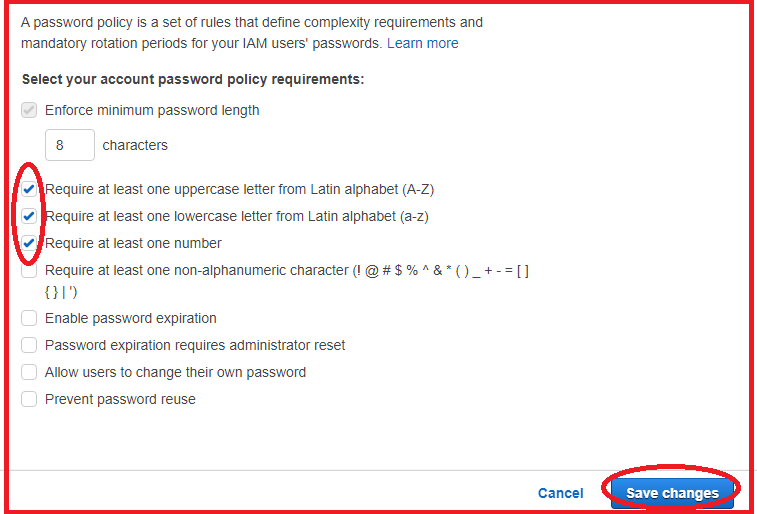
In this article, I will discuss IAM MFA Hands-On in AWS. Please read our previous article about IAM MFA in AWS. We are going to first set up a password policy for our account. So, in account settings, on the left-hand side, we click on change password policy, and here, we can enforce a password policy.

For example, regarding the password minimum length, we can require one uppercase letter, one lowercase letter, and one number. You can customize your password policy as you wish and then click on save changes. This password policy enhances the security of your accounts. The second thing we need to do is set up MFA for our root accounts. The root account is again very important to protect because it has full power over your accounts.
Note: I’m going to demonstrate this in front of you. You don’t have to, but if you do, your accounts will have higher security.


If you lose your MFA token, you will be locked out of your account. Again, you can just see what I’m doing and not follow the hands-on if you want. We can click on the account name on the right-hand side, top right, and click on my security credentials.

This takes us to this page where we can click on the multi-factor authentication, and we’re going to activate MFA to protect our accounts.

We have three options: virtual MFA, UTF security key, or other hardware MFA device. Because we want to use our phones, we’re going to use a virtual MFA device. Here, we have a list of compatible applications we can use to set up MFA.

You can have a look on this web page, but by scrolling down for the virtual MFA applications for Android and iPhone, we can use all of these in this list.

My personal favorite is using Authy. There’s Authy for Android and Authy for iPhone, and it is a free application that I really like.

I’m going to show the QR code. Next, I’m going to start Authy on my phone. Authy has started on my phone, and I will go add an account and scan a QR code. I will scan the QR code right here. It’s adding the accounts I will click on save and here I get a code. The first MFA code I have to enter in this box is like 644104, and then I have to wait an extra 15 seconds for the new code to appear. And my following code is 617613. So they’re linked.

I successfully assigned the MFA. We’ll be prompted to use an MFA next time we log in to our accounts.

I’m going to log out of my AWS accounts.

I’m going to sign in to the console again. I will use my root user and enter my email. Then, I will enter the MFA token I am getting from device 244572 and click on submit. I am connected to my management console using MFA. That’s it—MFA is set up for my root accounts.

Once you do so, please make sure not to lose your phone or your MFA device, as you will then be locked out of your account.
In the next article, I will discuss AWS Access Keys, CLI, and SDK. Here, in this article, I try to explain IAM MFA Hands-On in AWS, and I hope you enjoy this IAM MFA Hands-On in AWS article.
