Back to: ASP.NET Core Identity Tutorials
Integrating Facebook External Authentication in ASP.NET Core Identity
In this article, I will discuss Integrating Facebook External Authentication in the ASP.NET Core MVC Application using Identity. Please read our previous article discussing Google External Authentication in ASP.NET Core.
Integrating Facebook External Authentication in ASP.NET Core
Facebook External Login refers to a feature that allows users to sign in to other websites, mobile apps, and services using their Facebook account credentials. This feature is also known as “Facebook Login” or “Log in with Facebook”.
Integrating a Facebook Account for external authentication in an ASP.NET Core MVC application involves several steps. Now, we will set up the UI (i.e., the User Interface) and also configure it to redirect the request to the Facebook sign-in page when the user clicks the Sign-In with Facebook button.
Facebook External Authentication Login Flow:
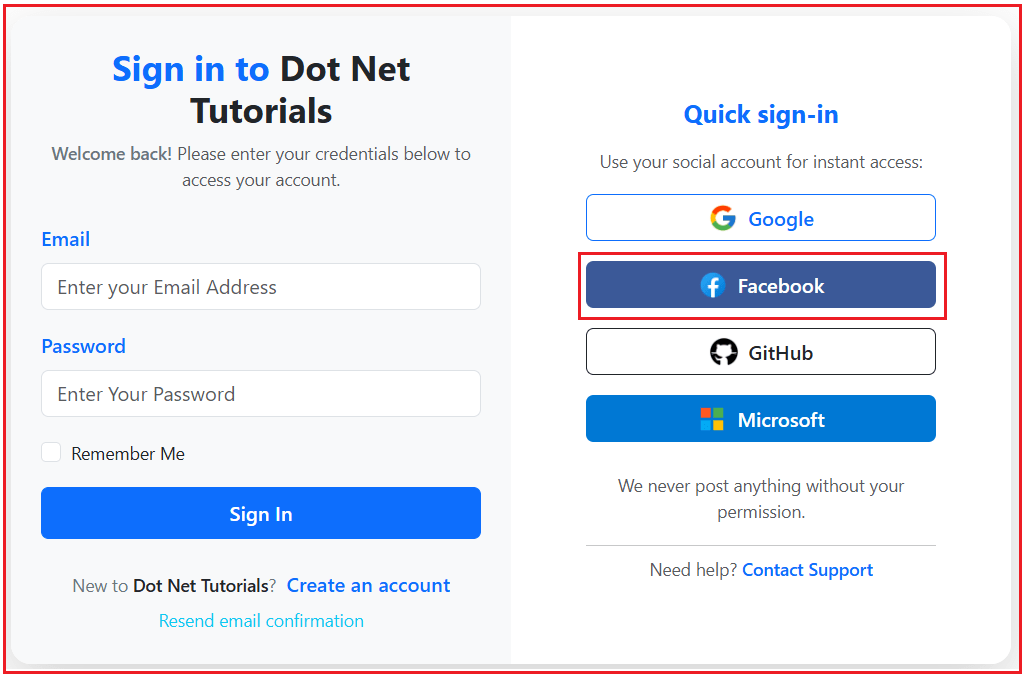
We want our login page to look like the following. Earlier, we integrated Google, and now we will integrate Facebook. So, the login page should have Google, Microsoft, and Facebook buttons as shown in the image below.

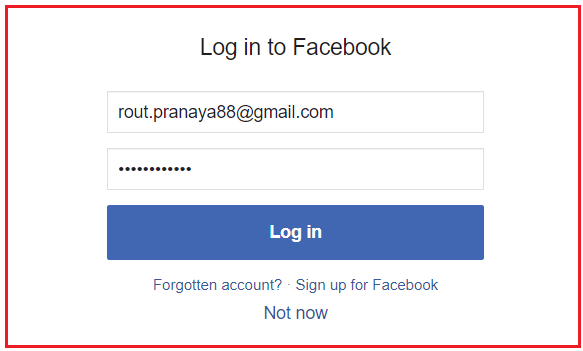
When the user clicks on the Facebook button, it will open the following page asking the user to log in using their Facebook credentials, as shown in the image below.

Once you enter the Facebook ID and Password, it will open the following page. Please click on the Continue button as shown in the image below.

Create a Facebook Developer Account:
First, you need to have a Facebook Developer account. You need to register as a developer to access Facebook’s developer tools. You can convert your existing Facebook account into a Developer Account by going to the Facebook Developers Website.
If you don’t already have one, you need to sign up for a Facebook Developer account. This is different from your regular Facebook account. Visit the URL: https://developers.facebook.com/. This will open the following page, where you can click on the login button as shown in the image below.

After clicking the Login button, the following page will open. Here, select the Login with Facebook option, as shown in the image below.

After clicking the Login with Facebook button, you will be directed to the login page. There, you will need to enter your Email Address or Phone Number and Password, then click the Login Button, as shown in the image below.

Once you enter your credentials and click Log in, if they are valid, your Facebook Developers account will be created.
Create a New App:
Once logged into the Facebook Developer account, you need to create a new app. This involves choosing a name for your app and specifying its purpose (e.g., gaming, business integration). To create a New App, click on the My Apps button as shown in the image below.

After clicking the My Apps button, the following page will open. From there, click the Create App button to create a new app, as shown in the image below.

Once you click on the Create App, it will open the screen below where you need to provide the name of the application (I am giving Dot Net Tutorials, you can give any name) and the App contact email, and click on the Next button as shown in the image below:

Add Use Cases:
Once you click on the Next button, it will open the Add Use Cases page below. Please select the “Other” Radio Button, as we will be manually configuring all settings. This option is also used for external authentication. Then, click the Next button, as shown in the image below.

Select App Type:
Once you click the Next button, the page below will open, allowing you to select an app type. From this page, please select the Consumer radio button (this is required for external login) and click on the Next button as shown in the image below.

Create the App:
Finally, review the details, update any required information, and then click the Create App button, as shown in the image below.

Add Products to your App
Once you click on the Create app button, it will open the following Add products page. From this page, please click on the Facebook Login Setup button as shown in the image below.

Select Platform as Web:
Once you click on the Facebook Login Setup button, it will open the following window asking you to select the platform where you want the Facebook Login Functionality. Please click on the Web option as shown in the image below.

Site URL:
Once you click on the Web, it will ask you to enter the base URL of your website. Since my application is running on the https://localhost:7080 URL, I enter this URL and click the Save button, as shown in the image below.

Note: From this screen, you can skip the remaining steps since we don’t need to use the JavaScript SDK.
Facebook Login/Settings:
Next, we need to do the OAuth settings. Please click on the Settings tab under the Facebook Login section, as shown in the image below.

OAuth Redirect URIs
Once you click on the Settings button, it will open the following page. Here, you need to provide the OAuth redirect URIs. These are the URLs to which Facebook will redirect users after they have authenticated. This is the URI at which your application is hosted. To this URI, append that path segment https://localhost:7080/signin-facebook. Once you provide the Valid OAuth Redirect URIs, click on the Save Changes button as shown in the image below.

Get App ID and App Secret:
Your application will be assigned an App ID and App Secret. These are essential credentials you will use in your app’s code to interact with Facebook APIs. To obtain the App ID and App Secret, click on the App Settings => Basic link located in the top-left corner, as shown in the image below.

This will open the following screen. Copy the App ID and App Secret, which we will use to integrate Facebook Authentication into our ASP.NET Core MVC Application.

Integrating Facebook External Authentication in ASP.NET Core
First, we need to install Microsoft.AspNetCore.Authentication.Facebook package, which is required for Facebook External authentication. So please install the package from NuGet by executing the following command in Package Manager Console.
- Install-Package Microsoft.AspNetCore.Authentication.Facebook
Update appsettings.json
We need to add Facebook credentials in the appsettings.json file. Please add the following to the appsettings.json file. Also, please use the actual values for [Your Facebook App ID] and [Your Facebook Client Secret].
"Authentication": {
    "Google": {
      "ClientId": "[Your Google Client ID]",
      "ClientSecret": "[Your Google Client Secret]"
    },
    "Facebook": {
      "ClientId": "[Your Facebook App ID]",
      "ClientSecret": "[Your Facebook Client Secret]"
    }
  }
Configure Authentication Services:
In the Program.cs file, configure the authentication services to include Facebook authentication. You need to use the App ID and Client Secret obtained from Facebook. We have already configured Google; let us add the Facebook OAuth authentication.
builder.Services.AddAuthentication()
    .AddGoogle(options =>
    {
        // Load credentials from appsettings.json
        options.ClientId = builder.Configuration["Authentication:Google:ClientId"]!;
        options.ClientSecret = builder.Configuration["Authentication:Google:ClientSecret"]!;
    })
    .AddFacebook(facebookOptions =>
    {
        facebookOptions.ClientId = builder.Configuration["Authentication:Facebook:ClientId"]!;
        facebookOptions.ClientSecret = builder.Configuration["Authentication:Facebook:ClientSecret"]!;
    });
What is the AddFacebook Method in ASP.NET Core?
The AddFacebook method in ASP.NET Core applications enables our ASP.NET Core application to authenticate users via their Facebook accounts. The method typically requires an App ID and App Secret, which we get from your Facebook app’s settings in the Facebook Developers portal.
Modify the Login View:
Please modify the Login.cshtml view as follows.
@model ASPNETCoreIdentityDemo.ViewModels.LoginViewModel

@{
    ViewData["Title"] = "Login";
    Layout = "~/Views/Shared/_Layout.cshtml";
}

<div class="container mt-3 mb-3">
    <div class="row shadow-lg rounded-4 bg-white overflow-hidden mx-auto" style="max-width: 800px;">
        <!-- Left: Login Section -->
        <div class="col-md-6 py-4 px-4 bg-light d-flex flex-column justify-content-center">
            <h3 class="mb-2 text-center fw-bold text-primary">Sign in to <span class="text-dark">Dot Net Tutorials</span></h3>
            <p class="text-center text-muted mb-4 small">
                <span class="fw-semibold text-secondary">Welcome back!</span>
                Please enter your credentials below to access your account.
            </p>

            <!-- Messages Section -->
            @if (ViewBag.Message != null)
            {
                <div class="alert alert-info alert-dismissible fade show mb-3 small text-center" role="alert">
                    @ViewBag.Message
                    <button type="button" class="btn-close" data-bs-dismiss="alert" aria-label="Close"></button>
                </div>
            }

            @if (!ViewData.ModelState.IsValid)
            {
                <div class="alert alert-danger alert-dismissible fade show small text-center" role="alert">
                    <strong>Please fix the errors below and try again:</strong>
                    <ul class="mb-0 mt-2">
                        @foreach (var error in ViewData.ModelState.Values.SelectMany(v => v.Errors))
                        {
                            <li>@error.ErrorMessage</li>
                        }
                    </ul>
                    <button type="button" class="btn-close" data-bs-dismiss="alert" aria-label="Close"></button>
                </div>
            }

            <form asp-action="Login" method="post" novalidate>
                <input type="hidden" name="ReturnUrl" value="@Model.ReturnURL" />

                <div class="mb-3">
                    <label asp-for="Email" class="form-label fw-semibold text-primary"></label>
                    <input asp-for="Email" class="form-control" placeholder="Enter your Email Address" autocomplete="username" />
                    <span asp-validation-for="Email" class="text-danger small"></span>
                </div>
                <div class="mb-3">
                    <label asp-for="Password" class="form-label fw-semibold text-primary"></label>
                    <input asp-for="Password" class="form-control" type="password" placeholder="Enter Your Password" autocomplete="current-password" />
                    <span asp-validation-for="Password" class="text-danger small"></span>
                </div>
                <div class="form-check mb-3">
                    <input asp-for="RememberMe" class="form-check-input" />
                    <label asp-for="RememberMe" class="form-check-label small"></label>
                </div>
                <button type="submit" class="btn btn-primary w-100 fw-semibold py-2 mb-2">Sign In</button>
                <p class="mt-3 text-center mb-1">
                    <span class="text-secondary small">New to <span class="fw-semibold text-dark">Dot Net Tutorials</span>?</span>
                    <a asp-action="Register" class="text-primary ms-1 text-decoration-none fw-semibold">Create an account</a>
                </p>
                <p class="text-center mb-0">
                    <a asp-action="ResendEmailConfirmation" class="text-info text-decoration-none small">Resend email confirmation</a>
                </p>
            </form>
        </div>

        <!-- Right: External Authentication -->
        <div class="col-md-6 py-4 px-4 d-flex flex-column justify-content-center align-items-center bg-white">
            <div class="w-100" style="max-width: 280px;">
                <h5 class="mb-3 fw-bold text-primary text-center">Quick sign-in</h5>
                <div class="mb-3 text-center text-muted small">Use your social account for instant access:</div>
                <div class="d-grid gap-3 mb-3">
                    <a asp-controller="Account" asp-action="ExternalLogin" asp-route-provider="Google"
                        class="btn btn-outline-primary d-flex align-items-center justify-content-center fw-semibold">
                        <img src="https://img.icons8.com/color/32/000000/google-logo.png" class="me-2" style="width:24px" alt="Google" />
                        Google
                    </a>
                    <a asp-controller="Account" asp-action="ExternalLogin" asp-route-provider="Facebook"
                       class="btn d-flex align-items-center justify-content-center fw-semibold" style="background-color: #3b5998; color: #fff;">
                        <img src="https://img.icons8.com/fluency/32/000000/facebook-new.png" class="me-2" style="width:24px" alt="Facebook" />
                        Facebook
                    </a>
                    <a href="#" class="btn btn-outline-dark d-flex align-items-center justify-content-center fw-semibold">
                        <img src="https://img.icons8.com/ios-filled/32/000000/github.png" class="me-2" style="width:24px" alt="GitHub" />
                        GitHub
                    </a>
                    <a href="#" class="btn d-flex align-items-center justify-content-center fw-semibold" style="background-color: #0078d4; color: #fff;">
                        <img src="https://img.icons8.com/color/32/000000/microsoft.png" class="me-2" style="width:24px" alt="Microsoft" />
                        Microsoft
                    </a>
                </div>
                <div class="text-center text-muted small mt-4 mb-2">
                    <span>We never post anything without your permission.</span>
                </div>
                <hr class="mb-2" />
                <div class="text-center text-muted small">
                    Need help? <a href="mailto:support@dotnettutorials.net" class="text-decoration-none fw-semibold">Contact Support</a>
                </div>
            </div>
        </div>
    </div>
</div>

@section Scripts {
    <partial name="_ValidationScriptsPartial" />
}
No changes required in action and service methods. Now, run the application and check the functionality, and it should work as expected.
In the next article, I will discuss Microsoft Authentication in ASP.NET Core Identity. In this article, I explain how to integrate Facebook Authentication in an ASP.NET Core MVC Application using Identity. I hope you enjoy this article, Integrating Facebook Authentication in ASP.NET Core Identity.

Want to see this in action?
Check out our step-by-step video tutorial on Facebook Authentication in ASP.NET Core Identity. It walks you through the complete setup, from creating a Facebook Developer account to integrating login functionality in your ASP.NET Core application.
👉Watch the full video here: https://youtu.be/tCp6XrWOg_g