Back to: ASP.NET Core Identity Tutorials
Custom Password Policy in ASP.NET Core Identity
In this article, I will discuss how to implement a Custom Password Policy in ASP.NET Core Identity with Examples. Please read our previous article discussing Register, Login, and Logout Functionalities in ASP.NET Core Identity.
Custom Password Policy in ASP.NET Core Identity
Implementing a strong password policy is one of the most effective ways to enhance the security of your web application. ASP.NET Core Identity provides a flexible system for enforcing password rules, helping to protect user accounts from unauthorized access and common attacks. By understanding and customizing these policies, you can ensure that your application meets both security standards and specific business requirements. Now, we will explore the default policy and demonstrate how to configure a custom password policy in ASP.NET Core Identity.
ASP.NET Core Identity Default Password Policy
ASP.NET Core Identity is a framework that manages authentication and authorization for web applications. One key part of security is the password policy, rules that define what a valid password looks like. These rules ensure that users create passwords that are not easily guessable or crackable, which helps protect the application from unauthorized access.
How does it work?
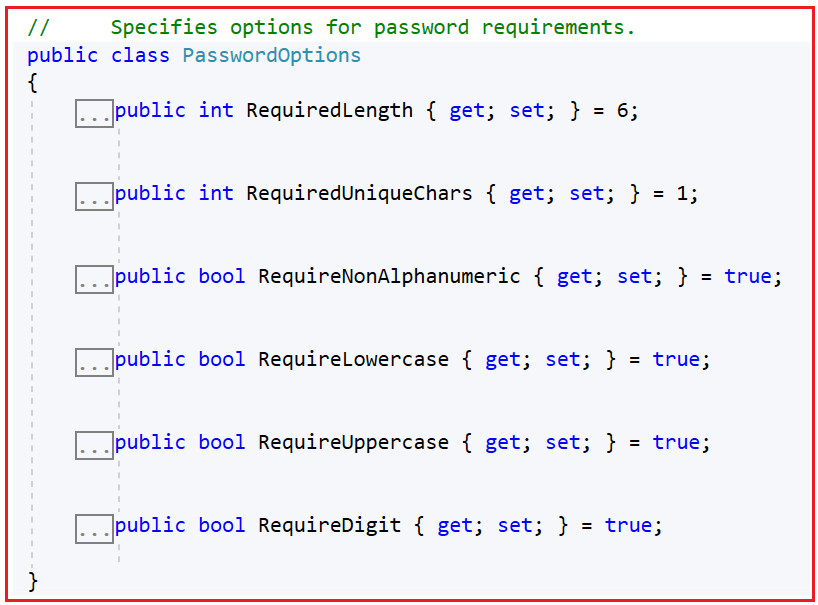
The default password policy in ASP.NET Core Identity is implemented using the PasswordOptions class. If you go to the definition of the PasswordOptions class, you will see the following:

The Default Password Rules:
This class has several properties that define the minimum requirements for passwords, which are:
- Required Length (6): The password must be at least 6 characters long. This prevents users from using short, simple passwords like “abc” or “123”.
- Require Digit (True): At least one number (0–9) must be in the password. This makes passwords harder to guess.
- Require Lowercase (True): The password must include at least one lowercase letter (a–z).
- Require Uppercase (True): The password must include at least one uppercase letter (A–Z).
- Require Non-Alphanumeric (True): The password must include at least one special character, such as!, @, or #. This adds complexity.
- Required Unique Chars (1): There must be at least one distinct (unique) character in the password. For example, “aaaaaa” would fail if set higher than 1.
Why such complexity?
These rules together make it harder for attackers to guess or brute-force passwords. Passwords that are too simple, like “123456” or “password123” or “111111”, are vulnerable because they can be found quickly by automated attacks. By requiring a mix of character types and length, the policy forces stronger passwords.
What is a Brute Force Attack?
A brute force attack is one of the simplest but still effective ways hackers try to gain unauthorized access. Imagine trying every possible combination of letters, numbers, and symbols until the correct password is found. Because computers can try thousands or millions of guesses per second, passwords that are too simple or short can be cracked relatively quickly.
The default password policy in ASP.NET Core Identity is designed to prevent easy success from brute force attacks by:
- Increasing the password length (longer passwords are exponentially harder to guess).
- Forcing the use of different types of characters (digits, uppercase, lowercase, symbols).
- Requiring unique characters so the password isn’t repetitive.
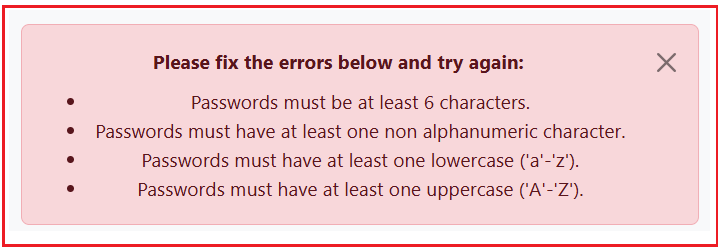
If you try to register with a password like “1234”, the system will reject it because it does not meet these complexity rules, and you will get error messages guiding you to create a stronger password.
Example with Weak Password:
To verify the default password policy, run the application and register a new user using the password 1234. You will then see the following error messages that show the default password policy.

Customizing the Password Policy in ASP.NET Core Identity
While the default policy is suitable for many applications, you might want stricter rules for your application. For example, you might want longer passwords or require more unique characters. Custom policies can help you:
- Enforce higher security standards.
- Meet regulatory compliance.
- Match specific business rules.
Example requirements in a Custom Password Policy:
- Password must be at least 8 characters long (instead of the default 6).
- Must include digits, uppercase and lowercase letters, and special characters.
- Must have at least 4 unique characters to avoid simple repetition.
How to Configure Custom Password Policy in ASP.NET Core Identity
As we have already seen, the PasswordOptions class contains properties for settings like required length, required unique characters, and requirements for non-alphanumeric, lowercase, uppercase, and numeric characters. To configure the Custom Password Policy in ASP.NET Core Identity, we need to modify the PasswordOptions settings in the Program.cs file where we set up Identity services. So, modify the Identity Settings as follows within the Program.cs class file:
// Register ASP.NET Core Identity Services using AddIdentity
builder.Services.AddIdentity<ApplicationUser, ApplicationRole>(
        options =>
        {
            // Password settings
            options.Password.RequireDigit = true;               // Must include digits
            options.Password.RequiredLength = 8;                // Minimum length 8
            options.Password.RequireNonAlphanumeric = true;     // Must include special characters
            options.Password.RequireUppercase = true;           // Must include uppercase letters
            options.Password.RequireLowercase = true;           // Must include lowercase letters
            options.Password.RequiredUniqueChars = 4;           // At least 4 unique characters
        })
        .AddEntityFrameworkStores<ApplicationDbContext>()
        .AddDefaultTokenProviders();
Here,
- AddIdentity adds the Identity system with our custom password options.
- Each option corresponds to one of the password policy rules explained earlier.
Testing the Custom Password Policy:
With the above changes in place, run the application and verify whether the custom password policy is working as expected. Try registering a user with a password like “1122”. This will fail because it does not meet the uniqueness or character variety requirements.

Now, use a valid password like “Abcd@#1234”. This password meets the requirements: it is longer than 8 characters, includes digits, uppercase/lowercase letters, and special characters, and has at least 4 unique characters, ensuring the user creation will succeed.
How ASP.NET Core Identity Stores Passwords
Even if the user’s password is strong, it must be stored securely. ASP.NET Core Identity does not store passwords as plain text. Instead, it uses a hashing algorithm (based on HMACSHA256) to convert the password into a hashed string. This hashing is one-way, meaning the original password cannot be derived from the hash.
When a user logs in, the system hashes the entered password and compares it to the stored hash. This protects your users even if your database is compromised, because the actual passwords are never saved directly.
When Should You Implement a Custom Password Policy?
Implementing a custom password policy in ASP.NET Core Identity enhances security, complies with regulatory standards, and adapts to specific business requirements. The following are some scenarios where we need to consider implementing a custom password policy:
- Enhanced Security Needs: If your application handles sensitive or confidential data (financial data, personal info, healthcare data), you need stronger passwords to reduce risks.
- Compliance Requirements: Many industries have security standards requiring specific password strengths (e.g., HIPAA for healthcare, PCI DSS for payments). Meeting these rules often requires custom policies.
- Business-Specific Rules: Your business might want to block common passwords, enforce password expiration, or impose additional constraints not covered by default policies.
Implementing your own password policy ensures your application stays secure and compliant with whatever requirements your users or regulators expect.
In the next article, I will discuss how to Redirect to ReturnUrl After Login in ASP.NET Core Identity. In this article, I explain how to implement a Custom Password Policy in ASP.NET Core Identity. I hope you enjoy this article, “How to Implement Custom Password Policy in ASP.NET Core Identity.”

Prefer watching instead of reading?
I’ve recorded a step-by-step video covering Custom Password Policy, Remote Validation, and safe Redirect to ReturnUrl in ASP.NET Core MVC—with live demo. Watch here: https://youtu.be/EmOoDqa5R7M
If it helps, please like the video and subscribe to Dot Net Tutorials for more ASP.NET Core content.