
Back to: Java Servlets Tutorials
Steps to Create a Servlet Application
In this article, I am going to discuss the Steps to Create a Servlet Application. Please read our previous article where we discussed Servlet Life Cycle in Java. At the end of this article, you will understand the following pointers.
- What are the different steps involved in Java Web Application?
- Step-1: Web Application Directory Structure
- Step2: Developing the web resources (and helper files if any)
- Step3: Developing the deployment descriptor (web.xml)
- Step4: Configuring the application files.
- What is the Purpose of <servlet> tag?
- What is the Purpose of <servlet-mapping> tag?
- How many names can a Servlet have in a Java Web Application?
- Understanding the URL Patterns
- Different Ways to Prepare Servlet in Java
What are the different steps involved in Java Web Application?
4 steps are involved.
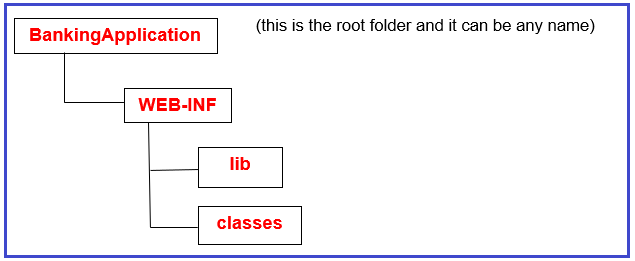
Step1: create a structured hierarchy of directories. For better understanding, please have a look at the below image.
Step2: Developing the web resources (and helper files if any)
Step3: Developing the deployment descriptor (web.xml)
Step4: Configuring the application files.
Placing the files into the appropriate folder of the application directory structure is nothing but configuring the application files.
- Copy web.xml into the WEB-INF folder.
- Copy java class files into the “classes” folder.
- Copy jar files into the lib folder.
- Html files into the root folder.
Step-1: Web Application Directory Structure
If we want to design any web application then we have to prepare the following directory structure at the server machine.

When we install the Tomcat server, automatically Tomcat 9.0 folder will be created. In Tomcat 9.0 folder, the main purpose of webapps folder is to accommodate all the web applications provided by the developer.
To represent our own web applications in the server we have to prepare a separate folder under webapps folder i.e. application folder or context rot. Inside the application folder,
- Themes: To store .css files (Cascade Style Sheet) to generate reports.
- Images: To store logos of the organizations, background sceneries, and so on in the form of jpg, jpeg, gif files.
- Literature: To store documentations in the form of doc, Docx, and so on.
- src(Source code): It can be used to store all the source files like Java files.
Along with all these folders, it is possible to provide some static resources directly like HTML files and dynamic resources like .jpg files.
WEB-INF folder will include:
- web.xml: This XML file can be used to store the metadata about the web application required by the container to perform a particular action.
- lib: It is able to manage jar files that are required by the server-side components.
- classes: It will include .class files of servlets, filters, listeners, and so on.
The above web application directory structure was divided into the subsequent
Private Area:
In the web application directory structure, the WEB-INF folder and its internal is treated as a private area. If we deploy any resource under the private area then the client is unable to access that resource by using its name directly.
Note: Generally, we’ll keep servlet .class files under the classes folder i.e. private area so that we are unable to access that servlet by using its name directly from the client. To access any servlet, we’ve to define an URL pattern in the web.xml file with respect to this servlet, with the defined URL pattern only the client is able to access the respective servlets.
Public Area:
The area which is outside of the WEB-INF folder and inside the appliance folder is treated as the public area. If we deploy any resource under the public area then the client is in a position to access that resource by using its name directly.
Note: In general, in web applications, we are able to keep HTML files under the application folder i.e. the public area in order that we are ready to access those resources by using its name directly from the client.
Step-2: Deployment Descriptor or web.xml file:
Deployment Descriptor is a web.xml file, it can be used to provide the metadata about the present web application required by the container in order to perform a particular server-side action. In the web application, the web.xml file includes the following configuration details with respect to. the web application.
- Welcome File Configuration
- Display Name Configuration
- Servlets Configuration
- Filters Configuration
- Listeners Configuration
- Context Parameters Configuration
- Session Time Out Configuration
- Load On Startup Configuration
- Initialization Parameters Configuration
- Session Time Out Configuration
- Load On Startup Configuration
- Error Page Configuration
- Tag Library Configuration
- Security Configuration
In general, in web applications, we will deploy the servlets .class files under the classes folder of the web application directory structure i.t. private area.
If we deploy any resource under the private area then the client is unable to access that resource through its name, the client is able to access that resource through alias name or locators. In the case of servlets, the client is able to access servlet classes through the locators called URL Patterns.
If we provide multiple numbers of servlets under the classes folder and we provide a particular request to a particular servlet available under the classes folder with an URL pattern then the container should require mapping details between URL patterns and servlets class name as metadata in order to identify with respect to the servlet.
In the above context, to provide the required metadata to the container we have to provide servlet configuration in the web.xml file. To provide servlet configuration in the web.xml file we have to use the following XML tags.
<web-app>
……………….
<servlet>
<servlet-name>logical_name</servlet-name>
<servlet-class>fully qualified name of servlet</servlet-class>
</servlet>
<servlet-mapping>
<servlet-name>logical_name</servlet-name>
<url-pattern>urlpattern_name</url-pattern>
</servlet-mapping>
…………………………
</web-app>
Note: In the above servlets configuration, <servlet-name> tag value under <servlet> tag and <servlet-mapping> tag must be same.
Example: Deployment Descriptor or web.xml file
If we want to access the below servlet then you have to provide the URL http://localhost:8080/servlet/welcome to the client browser.
<web-app>
 <servlet>
  <servlet-name>ServletInterface</servlet-name>
  <servlet-class>ServletInterface</servlet-class>
 </servlet>
 <servlet-mapping>
  <servlet-name>ServletInterface</servlet-name>
  <url-pattern>/welcome</url-pattern>
 </servlet-mapping>
</web-app>
What is the Purpose of <servlet> tag?
To register a servlet with the container. The servlet engine can’t execute a servlet if the servlet is not registered with it. In the above example, the servlet class is registered with the container with the registration name “ServletInterface” (any user-defined name).
What is the Purpose of <servlet-mapping> tag?
To give a public URL name to a servlet. The public URL name is any user-defined name but preceding with ‘/’. If the client request is coming with registration name OR servlet class name, the container doesn’t execute the servlet. A client can access the service of a servlet if and only if it uses the “public URL of the servlet” in its URL.
How many names can a Servlet have in a Java Web Application?
3 names
- Registration name
- Class name
- Public URL name
URL Patterns:
In the servlet configuration, there are three ways to define URL patterns:
- Exact Match Method
- Directory Match Method
- Extension Match Method
Exact Match Method
In the Exact Match Method, we have to define an URL pattern in the web.xml file, it must be prefixed with a forward-slash (“/”) and the pattern name may be anything.
Example: <url-pattern>/abc/xyz</url-pattern>
If we define any URL pattern with the exact match method then to access the respective resource, we have to provide an URL pattern at the client address bar along with the URL, it must be matched with the URL pattern which we defined in the web.xml file.
Directory Match Method
In Directory Match Method, we have to define an URL pattern in the web.xml file, it must be prefixed with forward-slash (“/”) and it must be terminated with “*”.
Example: <url-pattern>/abc/*</url-pattern>
If we define any URL pattern with this method then to access the respective resource from the client, we have to specify an URL pattern at the client address bar it should match its prefix value with the URL pattern defined in the web.xml file.
Extension Match Method
In Extension Match Method, we have to define an URL pattern in the web.xml file, it must be prefixed with “*” and it must be terminated with a particular extension.
Example: <url-pattern>*.do</url-pattern>
If we define an URL pattern with this method then to access the respective server-side resource from the client we have to specify an URL pattern at the client address bar, it may start with anything, but must be terminated with an extension that was specified in web.xml file.
In web applications, the web.xml file is mandatory or optional is completely depending on the server which we used. In Apache Tomcat Server, web.xml file is optional when we have not used servlets, filters, and so on. In Weblogic Server, web.xml file is mandatory irrespective of using servlets, filters, and so on.
Up to servlets 2.5 version [J2EE 5.0] it is mandatory to provide a web.xml file if we use servlets, listeners, filters, and so on in our application. But in the servlets 3.0 version, there is a replacement for the web.xml file i.e. annotations. Annotations will make the web.xml file is optional.
In web applications, it is not possible to change the name and location of the deployment descriptor because the container will search for a deployment descriptor with a web.xml name under the WEB-INF folder as per its predefined implementation.
Step-3: Prepare Web Resources (Servlet Development)
If we want to prepare custom exceptions, threads, and so on in Java applications then we have to use some predefined library provided by Java API. Similarly, if we want to prepare servlets in our web applications then we have to use some predefined library provided by Servlet API. To design servlets Servlet API has provided the following predefined library as part of javax.servlet package and javax.servlet.http package.

Never ever a user-defined servlet directly implements the Servlet interface. If implemented all the abstract methods of the servlet interfaces must be implemented even though not required.
GenericServlet implements two life cycle methods of Servlet interface i.e. init method and destroy method. The service method is not implemented therefore it has become the abstract class.
If user-defined servlet extends GenericServlet only service method is required to be implemented. Other methods if required only can be overridden.
Different Ways to Prepare Servlet in Java
Servlet is an object available at the server machine which must implement either directly or indirectly Servlet interface. As per the predefined library provided by Servlet API, there are 3 ways to prepare servlets.
1.Implementing Servlet Interface
If we want to design a servlet with this approach then we have to take a user-defined class it should be an implementation class to Servlet interface.
public interface Servlet
{
    public void init (ServletConfig config) throws ServletException;
    public void service (ServletRequest req, servletResponse res) throws ServletException;
    public ServletConfig getServletConfig ();
    public String getServletInfo ();
    public void destroy ();
}
public class MyServlet implements Servlet
{
   //... ... ....... ... ....
}
Where the purpose of the init(_) method is to provide servlets initialization.
2.Extending GenericServlet abstract class
If we want to design servlets by using this approach then we have to take a user-defined class which must be a subclass to GenericServlet abstract class.
public abstract class GenericServlet implements Servlet, ServletConfig, Serializable
{
    private transient ServletConfig congif;
    public void init (ServletConfig config) throws ServletException
    {
        this.config = config;
        init ();
    }
    pubic void init ()
    {
    }
    public abstract void service (ServletRequest req, ServletResponse res) throws ServetException, IOException;
    public ServletConfig getServletConfig ()
    {
        return config;
    }
    public String getServletInfo ()
    {
        return null;
    }
    public void destroy ()
    {
    }
}

public class MyServlet extends GenericServlet
{
    //... ... ....... ... .....
}
3.Extending HTTPServlet abstract class
If we want to prepare servlets by using HTTPServlet abstract class then we have to take a user-defined class which must be a subclass to HttpServlet abstract class.
public abstract class HttpServlet extends GenericServlet
{
    public void service (ServletRequest req, ServletResponse res) throws SE, IOException
    {
        HttpServletResponse hreq = (HttpServletResponse) req;
        HttpServletResponse hres = (HttpServletResponse) res;
        service (hreq, hres);
    }

    public void service (HttpServletRequest hreq, HttpServletResponse hres) throws ServletException, IOException
    {
        String method = hreq.getMethod ();
        if (method.equals ("GET"))
        {
         doGet (hreq, hres);
        }
        if (method.equals ("POST"))
        {
         doPost (hreq, hres);
        }
    }

    public void doGet (HttpServletRequest hreq, HttpServletResponse hres) throws ServletException, IOException
    {
    }

    public void doPost (HttpServletRequest hreq, HttpServletResponse hres) throws ServletException, IOException
    {
    }
    public class MyServlet extends HttpServlet
    {
        //... ........ ....
    }
}
Step-4: Start the server
There are three ways to start the server:
- Execute either startup.bat file or Tomcat9 Service Runner available under the bin folder of Tomcat Server. C:\Program Files\Apache Software Foundation\Tomcat 9.0\bin
- Use system program monitor Tomcat. Start-> All Programs -> Apache Tomcat 9.0 -> Monitor Tomcat
- Use Apache Tomcat System Service. Start-> Type service.MVC in search field -> Select Apache Tomcat 9.0 -> Select Start Service Icon
Step-5: Access the Web Application
There are two ways to access web applications.
Open the web browser and type the complete URL on the address bar. http://localhost:8080/app1/servlet
Open the web browser and type the URL up to http://localhost:8080
If we do the above automatically the Tomcat Home Page will be opened, where we have to select Manager Applications, provide the username and password in the Security window and click on the OK button. If we do the above automatically a list of applications will be opened, where we have to select the required application.
Servlet First Application
web.xml
<web-app>
<servlet>
<servlet-name>ms</servlet-name>
<servlet-class>MyServlet</servlet-class>
</servlet>
<servlet-mapping>
<servlet-name>ms</servlet-name>
<url-pattern>/ms</url-pattern>
</servlet-mapping>
</web-app>
MyServlet.java
import java.io.IOException;
import java.io.PrintWriter;
import javax.servlet.Servlet;
import javax.servlet.ServletConfig;
import javax.servlet.ServletException;
import javax.servlet.ServletRequest;
import javax.servlet.ServletResponse;
import javax.servlet.ServletRequest;
public class MyServlet implements Servlet
{
    public MyServlet ()
    {
    }
    public void init (ServletConfig congig) throws ServletException
    {
    }
    public void destroy ()
    {
    }
    public ServletConfig getServletConfig ()
    {
        return null;
    }
    public String getServletInfo ()
    {
        return null;
    }
    public void service (ServletRequest request, ServletResponse response) throws ServletException, IOException
    {
        response.setContentType ("text/html");
        PrintWriter out = response.getWriter ();
        out.println ("<h1><center>hello</center></h1>");
    }
}
To compile the above servlet, we have to set the classpath environment variable to servlet-api.jar provided by Tomcat server at C:\Program Files\Apache Software Foundation\Tomcat 9.0\lib\servlet-api.jar.
Example: set classpath=%classpath%;C:\Program Files\Apache Software Foundation\Tomcat 9.0\lib\sercvlet-api.jar;
To access the above application, we have to use the following URL on the client address bar.
http://localhost:8081/Servlet/ms
Output: hello
Configuration of Apache Tomcat Server in Eclipse IDE
To run Servlet in Eclipse, you need a Server. In this article, we will see how to download and configure the Apache tomcat server in Eclipse IDE.
Step1: Download
Go to this link: https://tomcat.apache.org/download-90.cgi. If you are on 64-bit windows then click on the 64-bit Windows zip.
In this article, I’m downloading Apache tomcat version 9.0
Step2: Extract the downloaded zip folder
Extract the zipped folder to any desired location.
Step3: Select the Server in Eclipse IDE
Open Eclipse IDE ❯ Click on the Servers tab located at the bottom ❯ right-click ❯ New ❯ click on Server
Select Apache and then select the appropriate version of tomcat server, for example, I’ve downloaded the tomcat version 8.0.44 so I’m selecting Tomcat v8.0 Server. After selecting, click next.
You will be presented with a window as shown in the image below. Click browse and select the folder that you have extracted from the zip file in Step 2.
That’s it you have successfully configured the tomcat server in Eclipse.
In the next article, I am going to discuss First Java Servlet Application. Here, in this article, I try to explain the Steps to Create Servlet Application. I hope you enjoy the Steps to Create Servlet Application article.
About the Author: Pranaya Rout
Pranaya Rout has published more than 3,000 articles in his 11-year career. Pranaya Rout has very good experience with Microsoft Technologies, Including C#, VB, ASP.NET MVC, ASP.NET Web API, EF, EF Core, ADO.NET, LINQ, SQL Server, MYSQL, Oracle, ASP.NET Core, Cloud Computing, Microservices, Design Patterns and still learning new technologies.