Back to: jQuery Tutorials
jQuery Optimized Image Gallery with Examples
In this article, I am going to discuss How to Optimized jQuery Image Gallery with Examples. Please read our previous article, where we discussed jQuery Image Gallery.
jQuery Optimized Image Gallery
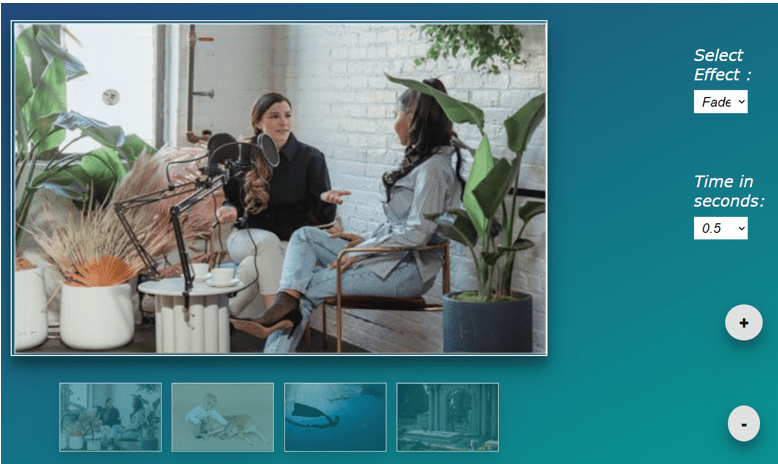
In this article, we will make the image gallery of the previous article optimized and we will add some extra features. The following things are to be done.
- Optimize the performance speed of the gallery
- Add the option for the user to select the animation effect and the animation duration
- Add the option for zoom in and zoom out the image
Following is the complete source code of the optimized image gallery using jQuery.
<!DOCTYPE html>
<html lang="en">
<head>
        <meta charset="utf-8">
        <meta name="viewport" content="initial-scale=1.0, maximum-scale=1.0, user-scalable=1">
        <title>Home</title>
        <style>
                * {
                        padding: 0;
                        margin: 0;
                        box-sizing: border-box;
                }

                body {
                        font-family: Verdana, Geneva, Tahoma, sans-serif;
                        font-style: italic;
                        background: #fff;
                        min-height: 100vh;
                        background: linear-gradient(to right bottom, #273c75, #079992);
                        background-repeat: no-repeat;
                }

                .container {
                        padding: 40px 0;
                }

                #mainImg {
                        margin: 0 auto 40px;
                        display: block;
                        height: 500px;
                        width: 800px;
                        border: 2px solid #fff;
                        box-shadow: 0 19px 38px rgba(0, 0, 0, 0.30), 0 15px 12px rgba(0, 0, 0, 0.22);
                }

                ul {
                        list-style: none;
                        margin: 0;
                        text-align: center;
                }

                ul li {
                        margin: 0 5px;
                        display: inline-block;
                        border: 1px solid #fff;
                        cursor: pointer;
                }

                ul li img {
                        display: block;
                        width: 150px;
                        height: 100px;
                        opacity: 0.4;
                        transition: 0.4s;
                        box-shadow: 0 12px 16px 0 rgba(0, 0, 0, 0.24), 0 17px 50px 0 rgba(0, 0, 0, 0.19)
                }

                ul li img:hover {
                        opacity: 1;
                }

                .toolbox {
                        position: fixed;
                        right: 0;
                        top: 0;
                        display: flex;
                        justify-content: space-evenly;
                        align-items: center;
                        flex-direction: column;
                        height: 100%;
                        width: 150px;
                }

                select {
                        padding: 5px 8px;
                        margin: 10px auto;
                        width: 130%;
                        border: none;
                        font-size: 20px;
                        width: 80px;
                        cursor: pointer;
                        font-style: italic;
                }

                select:focus {
                        outline: none;
                }

                label {
                        font-size: 24px;
                        color: #fff;
                }

                input[type="button"] {
                        background-color: #e0e0e0;
                        border: none;
                        color: black;
                        padding: 10px 20px;
                        margin: 10px;
                        text-align: center;
                        text-decoration: none;
                        display: block;
                        font-size: 24px;
                        font-weight: 800;
                        border-radius: 50%;
                        cursor: pointer;
                        box-shadow: 0 12px 16px 0 rgba(0, 0, 0, 0.24), 0 17px 50px 0 rgba(0, 0, 0, 0.19)
                }
        </style>
</head>

<body>
        <div class="toolbox">
                <label>Select Effect :
                        <select id="imgEffect">
                                <option value="Fade">Fade</option>
                                <option value="Slide">Slide</option>
                        </select></label>
                <label>Time in seconds:
                        <select id="imgDuration">
                                <option value="0.5">0.5</option>
                                <option value="1">1</option>
                                <option value="1.5">1.5</option>
                                <option value="2">2</option>
                                <option value="2.5">2.5</option>
                                <option value="3">3</option>
                        </select></label>
                <input id="btnEnlarge" type="button" value="+" />
                <input id="btnShrink" type="button" value="-" />
        </div>
        <div class="container">
                <img id="mainImg" src="D:\Images\PIC1.jpg">
                <ul>
                        <li><img src="D:\Images\PIC1.jpg"></li>
                        <li><img src="D:\Images\PIC2.jpg"></li>
                        <li><img src="D:\Images\PIC3.jpg"></li>
                        <li><img src="D:\Images\PIC4.jpg"></li>
                </ul>
        </div>

        <script src="https://ajax.googleapis.com/ajax/libs/jquery/3.6.0/jquery.min.js"></script>
        <script>
                $(document).ready(function () {
                        $('ul').on("click", "img", function () {
                                var imageURL = $(this).attr('src');
                                var effect = $('#imgEffect').val();
                                var duration = $('#imgDuration').val() * 1000;
                                if (effect == "Fade") {
                                        $('#mainImg').fadeOut(duration, function () {
                                                $(this).attr('src', imageURL);
                                        }).fadeIn(duration);
                                }
                                else {
                                        $('#mainImg').slideUp(duration, function () {
                                                $(this).attr('src', imageURL);
                                        }).slideDown(duration);
                                }

                        }

                        );
                        var mainImg = $("#mainImg");
                        $("#btnEnlarge").click(function () {
                                mainImg.animate({ width: "+=100px", height: "+=100px" }, 500);

                        });
                        $("#btnShrink").click(function () {
                                mainImg.animate({ width: "-=100px", height: "-=100px" }, 500);

                        });

                });
        </script>
</body>
</html>
Steps:
- Let’s first optimize the performance. Here you can notice that we are attaching the event on the parent <ul> and inside the on() method we are using “IMG” as a Child Selector parameter. Thus, fewer event handlers will be stored in memory.
- We are retrieving the value of two select boxes what the user has selected and storing those in variables “effect” & “duration”
- Then we are using the condition that if the effect is “Fade” then the fade out-in code will be executed otherwise the slide up-down
- And in the duration parameter, instead of using any value manually, we are using the parameter “duration” in which the user-selected duration is present
- Finally, On the two buttons, we are attaching two click event handlers by which the width and height property of the main image will be increased and decreased respectively.
Output:
Now run the above code, and you will get the following output.

Now click on the plus (+) button to zoom in and the minus (-) button to zoom out the image as shown in the below image.

Now select the effect whether you want to slide or fade in and fade out as well as we also provide the Time seconds to do the same as shown in the below image.

In the next article, I am going to discuss jQuery Image Slideshow with Thumbnails with Examples. Here, in this article, I try to explain how to Optimize jQuery Image Gallery with Examples and I hope you enjoy this Optimize jQuery Image Gallery article.
Registration Open – Microservices with ASP.NET Core Web API
Session Time: 6:30 AM – 8:00 AM IST
Advance your career with our expert-led, hands-on live training program. Get complete course details, the syllabus, registration, and Zoom credentials for demo sessions via the links below.
