Back to: Microservices using ASP.NET Core Web API Tutorials
ASP.NET Core Web API Fundamentals
In this post, we will understand the foundational concepts of ASP.NET Core Web API using Entity Framework Core (EF Core) and SQL Server, which is used for building modern web services and microservices. Please read our previous article discussing the basic concept of Microservices Architecture. In this article, we will understand the key components such as Controllers, Models, DTOs, and DbContext. Using the Entity Framework Core Code First approach, we will also create an ASP.NET Core Web API project from scratch and implement CRUD operations on a Student entity, including seeding test data. By the end of this post, you will be able to:
- Understand the difference between .NET Core and .NET Framework.
- Understand what ASP.NET Core Web API is.
- Learn about Controllers, Models, DTOs, and DbContext.
- Set up a complete ASP.NET Core Web API project with Entity Framework Core (Code First approach).
- Perform CRUD operations on a Student Entity.
Difference Between .NET Core and .NET Framework
Before developing an application using ASP.NET Core Web API, it’s essential to understand the key differences between .NET Core and .NET Framework:
.NET Core:
- Cross-Platform: It can run on Windows, Linux, and macOS.
- Open Source: Fully open-source and maintained by Microsoft and the community.
- Lightweight and Modular: A smaller runtime footprint that can be tailored to the needs of your application.
- Modern: Regular updates with new features, improved performance, and support for microservices and containerization (Docker, Kubernetes).
- Supports Web API: Designed to support building REST APIs and microservices.
.NET Framework:
- Windows-Only: Can only run on Windows.
- Closed-Source: Mostly proprietary, with fewer contributions from the community.
- Monolithic: It has a larger framework, requiring the installation of the entire system even if only a small subset is needed.
- Legacy: While still maintained, .NET Framework is considered legacy for newer web development projects.
Note: .NET Core is the preferred choice for building modern, scalable, cross-platform applications, including Web APIs.
What is ASP.NET Core Web API?
ASP.NET Core Web API is a framework for building HTTP-based APIs for web and mobile applications. It’s a lightweight, high-performance framework that allows developers to expose functionality through HTTP methods (GET, POST, PUT, DELETE). It’s an essential tool for building backend services for various client applications, such as:
- Web Applications
- Mobile Applications
- Microservices
Some key features of ASP.NET Core Web API:
- Cross-platform: Run on Windows, macOS, or Linux.
- Lightweight: With minimal overhead and high performance.
- Open Source: Fully open-source and actively developed by Microsoft.
- Integrated with Dependency Injection: Built-in dependency injection for better maintainability and testability.
- Swagger Support: Automatic API documentation generation.
Setting Up the Development Environment
You will need the right tools and environment to get started with ASP.NET Core Web API development.
- IDE: For development, you can use Visual Studio 2022 or Visual Studio Code. Visual Studio provides a rich, integrated development environment with features like debugging, testing, and deployment tools.
- SDK: Ensure the .NET 8 SDK is installed to compile and run your application. This is essential to work with .NET Core applications.
Creating a New ASP.NET Core Web API Project
Open Visual Studio and create a New ASP.NET Core Web API Project named StudentAPI.
Install Entity Framework Core
We need to install the necessary packages to use Entity Framework Core with SQL Server. So, please execute the following commands in Visual Studio Command Prompt.
- Install-Package Microsoft.EntityFrameworkCore.SqlServer
- Install-Package Microsoft.EntityFrameworkCore.Tools
Creating Models
Models are classes that define the data structure used in your application. They represent the entity that will be mapped to your database. In our example, we will define a Student model. So, first, create a folder named Models in the Project root directory. Then, create a class file named Student.cs within the Models folder and copy and paste the following code:
namespace StudentAPI.Models
{
    public class Student
    {
        public int Id { get; set; }
        public string Name { get; set; }
        public string Email { get; set; }
    }
}
Creating DTOs (Data Transfer Objects)
DTOs are objects used to transfer data between the server and client. Unlike models, DTOs are often simplified versions of models meant to expose only the required properties to the client. So, first, create a folder named DTOs in the project root directory. Inside the DTOs folder, create a class file named StudentDTO.cs and copy and paste the following code.
namespace StudentAPI.DTOs
{
    public class StudentDTO
    {
        public string Name { get; set; }
        public string Email { get; set; }
    }
}
Creating DbContext
DbContext is the primary class in Entity Framework Core that allows interaction with the database. It represents a session with the database and is used for querying and saving data. First, create a folder named Data in the project root directory. Then, inside the Data folder, create a class file named ApplicationDbContext.cs and copy and paste the following code.
using Microsoft.EntityFrameworkCore;
using StudentAPI.Models;

namespace StudentAPI.Data
{
    public class ApplicationDbContext : DbContext
    {
        public DbSet<Student> Students { get; set; }

        public ApplicationDbContext(DbContextOptions<ApplicationDbContext> options) : base(options) { }

        protected override void OnModelCreating(ModelBuilder modelBuilder)
        {
            base.OnModelCreating(modelBuilder);

            // Seed data
            modelBuilder.Entity<Student>().HasData(
                new Student { Id = 1, Name = "John Doe", Email = "john.doe@example.com" },
                new Student { Id = 2, Name = "Jane Smith", Email = "jane.smith@example.com" }
            );
        }
    }
}
Configure the DbContext in the Program.cs file
Please modify the Program.cs class file as follows to register our ApplicationDbContext and other services:
using Microsoft.EntityFrameworkCore;
using StudentAPI.Data;

namespace StudentAPI
{
    public class Program
    {
        public static void Main(string[] args)
        {
            var builder = WebApplication.CreateBuilder(args);

            // Add services to the container.

            builder.Services.AddControllers()
            // Optionally, configure JSON options or other formatter settings
            .AddJsonOptions(options =>
            {
                // Configure JSON serializer settings to keep the Original names in serialization and deserialization
                options.JsonSerializerOptions.PropertyNamingPolicy = null;
            });

            // Learn more about configuring Swagger/OpenAPI at https://aka.ms/aspnetcore/swashbuckle
            builder.Services.AddEndpointsApiExplorer();
            builder.Services.AddSwaggerGen();

            // Add DbContext with SQL Server
            builder.Services.AddDbContext<ApplicationDbContext>(options =>
                options.UseSqlServer(builder.Configuration.GetConnectionString("DefaultConnection")));

            var app = builder.Build();

            // Configure the HTTP request pipeline.
            if (app.Environment.IsDevelopment())
            {
                app.UseSwagger();
                app.UseSwaggerUI();
            }

            app.UseHttpsRedirection();

            app.UseAuthorization();

            app.MapControllers();

            app.Run();
        }
    }
}
Configure the Connection String
In the appsettings.json file, add the connection string:
{
  "Logging": {
    "LogLevel": {
      "Default": "Information",
      "Microsoft.AspNetCore": "Warning"
    }
  },
  "AllowedHosts": "*",
  "ConnectionStrings": {
    "DefaultConnection": "Server=LAPTOP-6P5NK25R\\SQLSERVER2022DEV;Database=StudentsDB;Trusted_Connection=True;TrustServerCertificate=True;"
  }
}
Creating and Applying Database Migration:
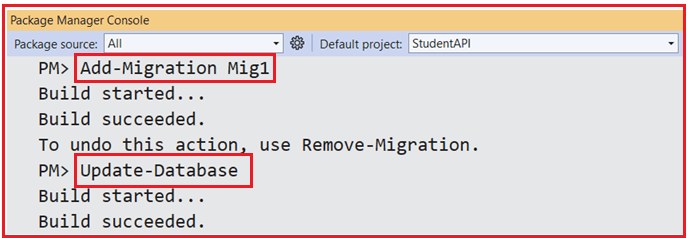
In Visual Studio, open the Package Manager Console and execute the Add-Migration and Update-Database commands as follows to generate the Migration file and then apply the Migration file to create the StudentsDB database and the required Students table:

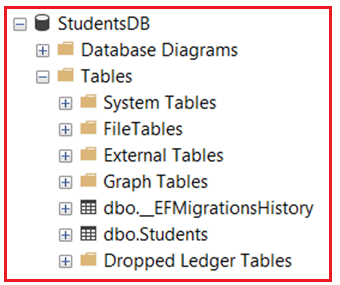
Once you execute the above commands and verify the database, you should see the StudentsDB database with the required Students table, as shown in the image below.

Creating Student API Controller
Controllers are responsible for handling incoming HTTP requests and returning HTTP responses. They contain action methods corresponding to HTTP methods such as GET, POST, PUT, and DELETE. So, create an API Empty Controller named StudentsController within the Controllers folder and then copy and paste the following code:
using Microsoft.AspNetCore.Mvc;
using Microsoft.EntityFrameworkCore;
using StudentAPI.Data;
using StudentAPI.DTOs;
using StudentAPI.Models;

namespace StudentAPI.Controllers
{
    [ApiController]
    [Route("api/[controller]")]
    public class StudentsController : ControllerBase
    {
        private readonly ApplicationDbContext _context;

        public StudentsController(ApplicationDbContext context)
        {
            _context = context;
        }

        // This method returns a list of students.
        // GET: api/students
        [HttpGet]
        public async Task<ActionResult<IEnumerable<StudentDTO>>> GetStudents()
        {
            var students = await _context.Students.ToListAsync();
            return Ok(students.Select(s => new StudentDTO { Name = s.Name, Email = s.Email }));
        }

        // This method returns a single student by Id.
        // GET: api/students/5
        [HttpGet("{id}")]
        public async Task<ActionResult<StudentDTO>> GetStudent(int id)
        {
            var student = await _context.Students.FindAsync(id);

            if (student == null)
            {
                return NotFound();
            }

            return Ok(new StudentDTO { Name = student.Name, Email = student.Email });
        }

        // This method handles creating a new Student in the database.
        // The request body should contain the student's Name and Email.
        // POST: api/students
        [HttpPost]
        public async Task<ActionResult<StudentDTO>> CreateStudent(StudentDTO studentDTO)
        {
            var student = new Student
            {
                Name = studentDTO.Name,
                Email = studentDTO.Email
            };

            _context.Students.Add(student);
            await _context.SaveChangesAsync();

            // The CreatedAtAction method returns a status code of 201 and
            // the URL of the newly created resource.
            return CreatedAtAction(nameof(GetStudent), new { id = student.Id }, studentDTO);
        }

        // This method is used to update an existing Student.
        // You must pass the student's ID and new data in the request body.
        // PUT: api/students/5
        [HttpPut("{id}")]
        public async Task<IActionResult> UpdateStudent(int id, StudentDTO studentDTO)
        {
            var student = await _context.Students.FindAsync(id);

            if (student == null)
            {
                return NotFound();
            }

            student.Name = studentDTO.Name;
            student.Email = studentDTO.Email;

            _context.Entry(student).State = EntityState.Modified;
            await _context.SaveChangesAsync();

            // NoContent() returns a 204 status code, indicating that the update was successful,
            // but there is no content to return.
            return NoContent();
        }

        // This method deletes a student from the database based on ID.
        // DELETE: api/students/5
        [HttpDelete("{id}")]
        public async Task<IActionResult> DeleteStudent(int id)
        {
            var student = await _context.Students.FindAsync(id);

            if (student == null)
            {
                return NotFound();
            }

            _context.Students.Remove(student);
            await _context.SaveChangesAsync();

            // NoContent() is returned after the student is deleted, indicating success.
            return NoContent();
        }
    }
}
API Testing and Documentation (Swagger)
Testing your Web API is crucial for ensuring your endpoints are functional and return the expected results. Tools like Postman and Swagger are popular for testing and documenting APIs.
- Postman: Allows you to send requests to your API and inspect responses. This tool is excellent for manual testing.
- Swagger: Automatically generates API documentation for your Web API, making it easier for developers to interact with and understand the available endpoints.
Testing CRUD Operations
Once the API is set up, you can test the CRUD operations using Postman or Swagger (which is automatically set up in ASP.NET Core for API documentation).
- POST a new student.
- GET all students or get a student by ID.
- PUT to update student data.
- DELETE to remove a student.
With this setup, you have a fully functional ASP.NET Core Web API project using Entity Framework Core with SQL Server. Through the API, you can perform basic CRUD Operations (Create, Read, Update, Delete) on the Student entity.
In the next article, I will discuss Core Microservices Design Principles with Examples. In this article, I explain ASP.NET Core Web API Fundamentals. I hope you enjoy this article, ASP.NET Core Web API Fundamentals.
