Back to: Microservices using ASP.NET Core Web API Tutorials
Download, Install, and Configure RabbitMQ Locally on a Windows OS
RabbitMQ is a powerful open-source message broker that enables reliable communication between different parts of a distributed application. It acts as a middleman to handle messages between producers (senders) and consumers (receivers), ensuring that no message is lost even if one side is temporarily unavailable.
To set up RabbitMQ locally on a Windows operating system, two essential components are required:
- Erlang OTP, which is the runtime on which RabbitMQ depends.
- RabbitMQ Server, which is the broker application itself.
Now, we will walk through the step-by-step process of downloading, installing, and configuring RabbitMQ on Windows for development purposes, including enabling the management dashboard for browser-based access.
What Do We Need to Install for RabbitMQ and Why?
RabbitMQ is written in Erlang, so you must first install Erlang. Then you install RabbitMQ, which uses Erlang to run and process your messages. Both are essential. Wrong Erlang version = RabbitMQ won’t start. To run RabbitMQ locally on Windows, you must install two components:
Erlang OTP (64-bit)
Why do we need Erlang?
- RabbitMQ is built using the Erlang programming language.
- It depends on the Erlang runtime environment to function, just like a .NET app requires the .NET runtime, or a Java app needs the Java Runtime Environment (JRE).
Important Notes:
- You must install Erlang before RabbitMQ.
- You also need to install a version that’s compatible with your RabbitMQ version.
For RabbitMQ 4.1.x:
- Use Erlang OTP 26.x or Erlang OTP 27.x
- Do NOT install Erlang 28 (it’s not supported as of now)
Reference: You can check RabbitMQ’s official compatibility chart here: https://www.rabbitmq.com/which-erlang.html
RabbitMQ Server
What is this?
- This is the actual RabbitMQ message broker.
- It handles messaging, queues, exchanges, routing, and other related tasks.
- It runs in the background as a Windows service.
Installation Methods (Choose one):
- Official .exe installer (Recommended for beginners)
- choco install rabbitmq (for advanced users using Chocolatey)
- Portable .zip (manual use, not recommended for beginners)
Download Erlang OTP
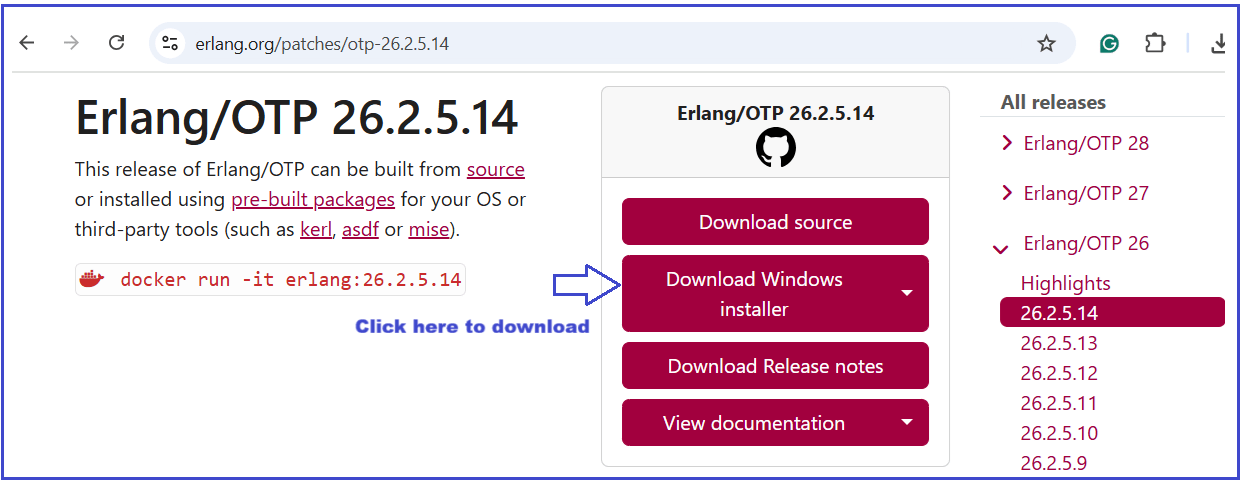
Download the Windows 64-bit installer (.exe). Please visit the Erlang/OTP official downloads page: https://www.erlang.org/downloads
Please click on the Download Windows Installer button as shown in the image below. I have selected Erlang/OTP 26.2.5.14. RabbitMQ does not currently support Erlang 28.

Install Erlang
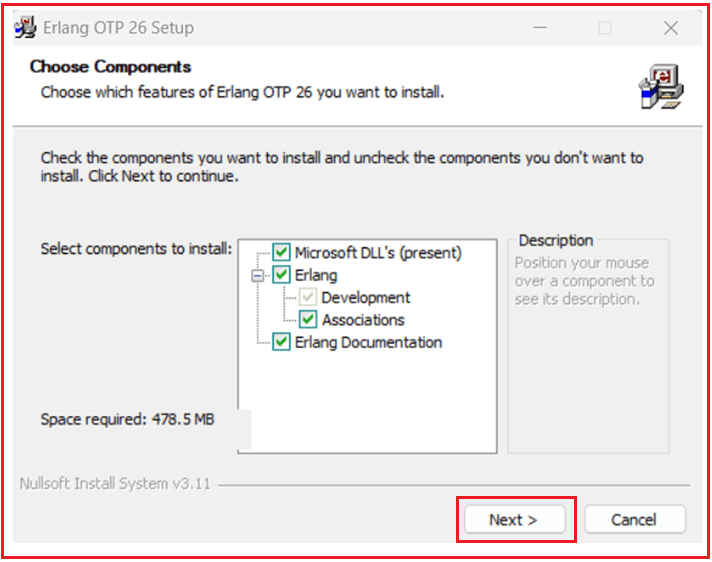
Now, double-click the .exe file to begin the installation. It will open the below Choose Component window. Please select all the components and click on the Next button as shown in the image below.

Choose Install Location:
From the Choose Install Location window, select the default installation path (e.g., C:\Program Files\Erlang OTP) and click Next, as shown in the image below.

Choose Start Menu Folder:
Next, go with the default Start Menu folder and then click on the Install button as shown in the image below.

Accept License:
Then, accept the License Terms and Conditions and click on the Install button as shown in the image below:

Installation Complete:
You will get the following message once the installation is completed. Simply, click on the Close button.

Adding Erlang’s bin Folder to the System PATH
PATH is an environment variable that specifies the location where Windows looks for executables. If Erlang’s bin folder isn’t in PATH, you can’t just type erl from any terminal; you’d have to cd into its folder every time. RabbitMQ itself requires Erlang’s executables to be discoverable. If not in PATH, the RabbitMQ service may fail to start. So, it is mandatory for proper RabbitMQ functioning.
How to add Erlang to PATH (Windows 10/11)
Open Environment Variables:
- Press Win + R, type sysdm.cpl, press Enter
- Go to the Advanced tab
- Click Environment Variables

Edit the Path Variable:
Under System Variables, find Path → Click Edit as shown in the image below.

Then, click New, paste the Erlang bin path: C:\Program Files\Erlang OTP\bin, and click the OK button to save the changes as shown in the image below:

Then, click the OK button in the corresponding window. Close and reopen any Command Prompt/PowerShell windows.
Verify Erlang
After installation, verify that Erlang Is Installed. To verify, open the Command Prompt (cmd). Run the erl command. If installed correctly, you’ll see an Erlang shell starting with Eshell V…. as shown in the image below,

Then, type q(). and press Enter to quit.

Download RabbitMQ for Windows
Go to the official RabbitMQ download page: https://www.rabbitmq.com/download.html
Scroll to the Windows Installer section.
- You’ll see something like:
- rabbitmq-server-4xx.x.exe (Latest version)
- Download the .exe installer (easiest way for Windows).
Please check the image below:

Install RabbitMQ
Run rabbitmq-server-4.1.4.exe. Follow the installer prompts:
Choose Components:
It will open the following Choose Components. Please select all components and click on the Next button as shown in the image below:

Choose Install Location:
From the Choose Install Location window, choose the default installation path (e.g., C:\Program Files\RabbitMQ Server) and click on the Next button, as shown in the image below.

Then, it will install, and you will get the following Installation Complete window, and from here, click on the Next button.

Finish installation.

Add RabbitMQ’s sbin folder to the System PATH
Locate RabbitMQ Installation Path
Typically, RabbitMQ is installed at: C:\Program Files\RabbitMQ Server\rabbitmq_server-4.1.4\sbin
(Adjust the version if you installed a different one.)
Open Environment Variables:
- Press Win + R, type sysdm.cpl, press Enter
- Go to the Advanced tab
- Click Environment Variables

Edit the Path Variable:
Under System Variables, find Path → Click Edit as shown in the image below.

Then, click New, paste the Erlang bin path: C:\Program Files\RabbitMQ Server\rabbitmq_server-4.1.4\sbin, and click the OK button to save the changes as shown in the image below:

Then, click the OK button in the corresponding window. Close and reopen any Command Prompt/PowerShell windows.
Start the RabbitMQ Service
Option A: Using Windows Services
- Press Win + R, type: services.msc
- Find RabbitMQ in the list
- Right-click → Start
Option B: Using Command Prompt
Open Command Prompt as Administrator, then run: net start RabbitMQ

To stop the RabbitMQ service, use the command: net stop RabbitMQ
How to view RabbitMQ in a Browser?
You can view RabbitMQ in your browser through its Management UI, but this feature only works if you enable the Management Plugin.
Enable RabbitMQ Management Plugin
Open Command Prompt (cmd) as Administrator. Run this command: rabbitmq-plugins enable rabbitmq_management

Restart RabbitMQ service so the plugin loads:
- net stop RabbitMQ
- net start RabbitMQ

Open RabbitMQ Dashboard
- Open your browser.
- Go to: http://localhost:15672
This is the default management UI address.
Login
Default credentials:
- Username: guest
- Password: guest
These only work from localhost (not remotely).

What You Can See in the UI
Once logged in, you’ll see:
- Overview Tab → broker status, message rates.
- Connections → clients connected.
- Channels → open communication channels.
- Exchanges → routes for messages.
- Queues → list of queues with pending/ready/unacknowledged messages.
- Admin → manage users, permissions, and virtual hosts.

By installing Erlang/OTP and RabbitMQ Server, adding them to the system PATH, and enabling the management plugin, we now have a fully functional RabbitMQ broker running locally on your Windows OS.
We can access the Management Dashboard at http://localhost:15672, create exchanges, queues, and bindings, and start experimenting with producers and consumers. We will discuss these things in our next session.
With this setup complete, we are ready to integrate RabbitMQ into our projects, such as our ECommerce microservices system, and take advantage of asynchronous, reliable messaging in a hands-on way.

If you’ve been wanting to learn how RabbitMQ enables asynchronous messaging in Microservices, this video is for you.
In this step-by-step tutorial, I cover:
✅ What RabbitMQ is and why it’s needed
✅ Producers, Consumers, Queues, and Exchanges explained with real-world examples
✅ Installation and configuration of RabbitMQ on Windows
✅ How RabbitMQ improves scalability, reliability, and decoupling in microservices
👉 Watch the full tutorial here: https://www.youtube.com/watch?v=ZsUz8M5wvZs