
A working application can be difficult to explain in one screenshot. The image shows the interface, but it cannot direct the viewer’s eye, reveal a feature in sequence, or create the pace expected in a launch post. A recorded walkthrough solves part of the problem, although it also requires a stable build, clean test data, careful cursor movement, and editing.
There is a useful middle option for short promotional assets. Developers and product teams can animate an approved app screenshot, landing-page mockup, or dashboard image into a brief product clip. The result is best treated as a visual introduction rather than proof of how the software behaves. With the insMind AI video generator, the source image, motion instruction, generation settings, preview, and download controls sit in one browser-based workflow.
This guide explains how to prepare the screenshot, write a restrained motion prompt, generate the clip, and review it without implying functionality that the application does not have.
Why App Screenshots Benefit from Controlled Motion
A product demo video does not need to cover every menu and workflow. For a five-second launch clip, a single job is enough: introduce the interface and focus attention on the feature named in the surrounding copy. A slow push toward an analytics panel can support a release announcement. A shallow camera move across a mobile mockup can introduce a redesigned screen. A subtle lighting change can give a static hero image more presence on social media.
Motion becomes a problem when it changes the evidence. If a generated clip invents buttons, rewrites labels, or suggests an interaction that the product cannot perform, viewers may leave with the wrong understanding. The source screenshot and prompt therefore need a clear division of responsibility. The screenshot controls the interface. The prompt should control only camera movement, depth, emphasis, and atmosphere.
Choose a Screenshot the Model Can Preserve
Start with a screenshot or mockup that has one clear visual priority. Crop away browser tabs, personal notifications, debug panels, API keys, customer data, and any element that should not appear in public material. Use a high-resolution export so labels and icons are easier to inspect after generation.
A suitable source image usually has these characteristics:
- The main screen or feature occupies most of the frame.
- Text is large enough to remain readable at the intended video size.
- The interface uses approved branding and realistic sample data.
- There is some empty space around the focal area for camera movement.
- No tooltip, modal, or menu is cut off at the edge unless that crop is intentional.
When the exact interface must remain recognizable, an image-to-video workflow is the appropriate starting point because the uploaded screenshot acts as the visual reference. If the project begins with an idea instead of an existing design, the text-to-video tool can create a concept scene, but it should not be expected to reproduce a real user interface accurately from a written description alone.
How It Works in insMind
Step 1 Switch to Image to Video and Upload the Screenshot
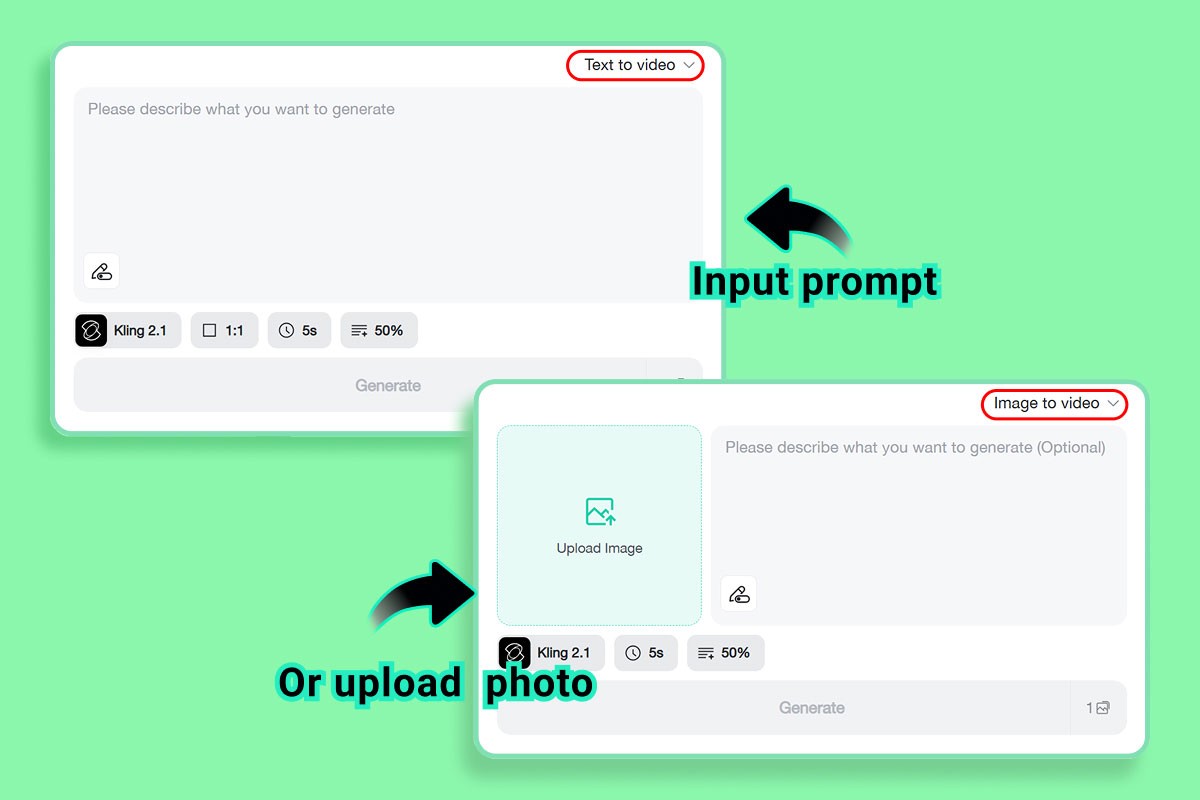
Open the video generator and use the selector at the top right of the input area to choose Image to video. Select Upload Image, then add the prepared app screenshot or product mockup. Confirm that the uploaded image is the approved public version before continuing.
Use one screenshot for the first generation. Combining several screens in a single composite gives the model more interface elements to interpret and makes it harder to control where the camera should focus.
Step 2 Describe the Motion and Set the Output
Write a prompt that describes the camera movement first, the focal area second, and the elements that must remain unchanged last. Avoid asking the model to simulate clicks, open menus, or change charts unless the source material contains the required states. Those actions are better shown with a genuine screen recording.
Animate this app screenshot as a clean software launch clip. Use a slow, shallow camera push toward the analytics panel with slight depth between the interface and background. Keep all text, icons, colors, chart values, layout, and screen proportions unchanged. No cursor, new controls, rewritten labels, flicker, or interface distortion.
Then choose an available model, aspect ratio, duration, and prompt strength. Match the aspect ratio to the destination: 16:9 for a website or presentation, 9:16 for Shorts and Reels, or 1:1 for a square feed. Start with a short duration and moderate motion. Available models and settings can change as the service is updated. Select Generate once the screenshot, prompt, and output settings agree.

Step 3 Generate the Video
Review the uploaded screenshot, prompt, model, aspect ratio, duration, and prompt strength one more time. When those inputs match the planned placement, select Generate. Keep the browser tab open while insMind processes the request.
Generation creates a new video from the screenshot and prompt; it does not change the original source file. Processing time and credit use can vary with the selected model and account.
Step 4 Preview, Revise, and Download the Approved Version
Play the generated video from beginning to end. Pause on the first frame, the moment of greatest movement, and the final frame. Compare each point with the original screenshot. Check navigation labels, numbers, charts, logos, icon shapes, corner radii, and spacing. Small distortions can be easy to miss at normal playback speed.
If the interface changes, revise one instruction before selecting Regenerate. Reduce the camera movement, remove an unnecessary effect, or strengthen the instruction to preserve text and layout. Changing one variable at a time makes the next result easier to evaluate. If repeated generations cannot keep a critical label intact, crop closer to a less text-heavy area or use a conventional motion-graphics editor for that shot.
When the interface remains accurate throughout the clip, select Download. Give the file a useful name that includes the feature, aspect ratio, and version, such as analytics-overview-vertical-v2.mp4. Store it with the source screenshot and final prompt so another team member can reproduce or revise the asset later.
Add the explanatory layer in the publishing channel. A short caption, release-note headline, or voice-over should tell viewers what the feature actually does. The generated movement attracts attention; the accompanying product copy provides the factual explanation.
Practical Uses for Software Teams
Release Notes and Changelog Posts
Use a short clip at the top of a release announcement to identify the changed screen. Keep the written changelog as the source of truth for behavior, availability, and limitations. The video can establish context before the reader moves to the detailed explanation.
Product Hunt and Social Launches
A vertical or square variation can introduce a product without asking viewers to watch a long walkthrough. Focus each clip on one screen and one message. Several concise assets are easier to reuse across a launch sequence than one video that tries to explain the whole application.
Sales Decks and Internal Reviews
Subtle screenshot motion can help a presentation move from a problem statement to a product view. It can also help a team review how a planned interface will be introduced before the release candidate is ready. Label mockups clearly when the displayed feature has not shipped.
Landing Page Feature Sections
A restrained loop can support a feature headline when page performance and accessibility requirements allow video. Provide a static fallback image, avoid autoplay audio, and keep controls available when the clip contains information that is not repeated in text.
Protect Interface Accuracy and User Trust
AI-generated product footage needs the same review discipline as screenshots, documentation, and release copy. A visually convincing result can still be wrong. Ask someone familiar with the feature to compare the clip with the current build before publication.
- Remove private information and credentials before upload.
- Confirm that all visible data can be used in public marketing.
- Reject frames that alter labels, values, controls, or brand marks.
- Do not present generated cursor movement as a tested workflow.
- Identify conceptual UI when the screen is a mockup rather than a released feature.
These checks matter most for technical audiences. Developers notice inconsistent controls and impossible states quickly. A modest camera move that preserves the screen will usually communicate more credibility than a dramatic effect that damages the interface.
Build a Repeatable Asset Workflow
Keep a small record for each approved video: source image, prompt, selected model, aspect ratio, duration, generation date, reviewer, and intended channel. Model availability and output behavior can change, so the record should describe the result rather than promise that an identical generation will always be available.
Create a separate export for each destination instead of relying on automatic cropping. A wide dashboard centered in a 16:9 frame may lose its navigation and labels when cropped to 9:16. For a vertical version, begin with a new crop that isolates the important panel, then generate motion from that source.
When to Use a Screen Recording Instead
Image-to-video is suited to an introduction, visual teaser, or atmosphere shot. Use a real screen recording when the viewer must learn a sequence of clicks, confirm exact timing, inspect form validation, compare application states, or verify that a feature works. Recorded interaction is also the better choice for support documentation and accessibility instructions.
The two formats can work together. An AI-generated screenshot clip can open the video, while a captured walkthrough supplies the evidence. This keeps the opening concise without weakening the technical explanation.
Frequently Asked Questions
Can insMind animate a dashboard screenshot
Yes. Upload the dashboard as an image and request a restrained camera move or depth effect. Review every label, metric, and chart before publishing because generated motion may alter fine interface details.
What motion works best for an app screenshot
Start with a slow push, shallow pan, or gentle depth effect focused on one interface area. Complex movement creates more opportunities for text and controls to change.
Should the prompt describe the product feature
Describe the visible focal area and desired motion, but do not rely on the prompt to demonstrate software behavior. Explain the feature in the caption, release notes, narration, or accompanying page copy.
Can the same generated clip be used in every channel
It is safer to create separate versions for widescreen, vertical, and square placements. Each format needs a source crop that keeps the important interface area readable.
A Focused Way to Introduce a Software Product
An app screenshot can become a useful product video when the motion has a narrow purpose. Prepare a public-safe image, tell the model exactly what may move, inspect the generated interface frame by frame, and add factual product context after download.
For developers and small software teams, this approach can fill the gap between a static launch image and a complete walkthrough. It creates a short visual entry point while leaving detailed product behavior to the documentation, live application, and recorded demo.